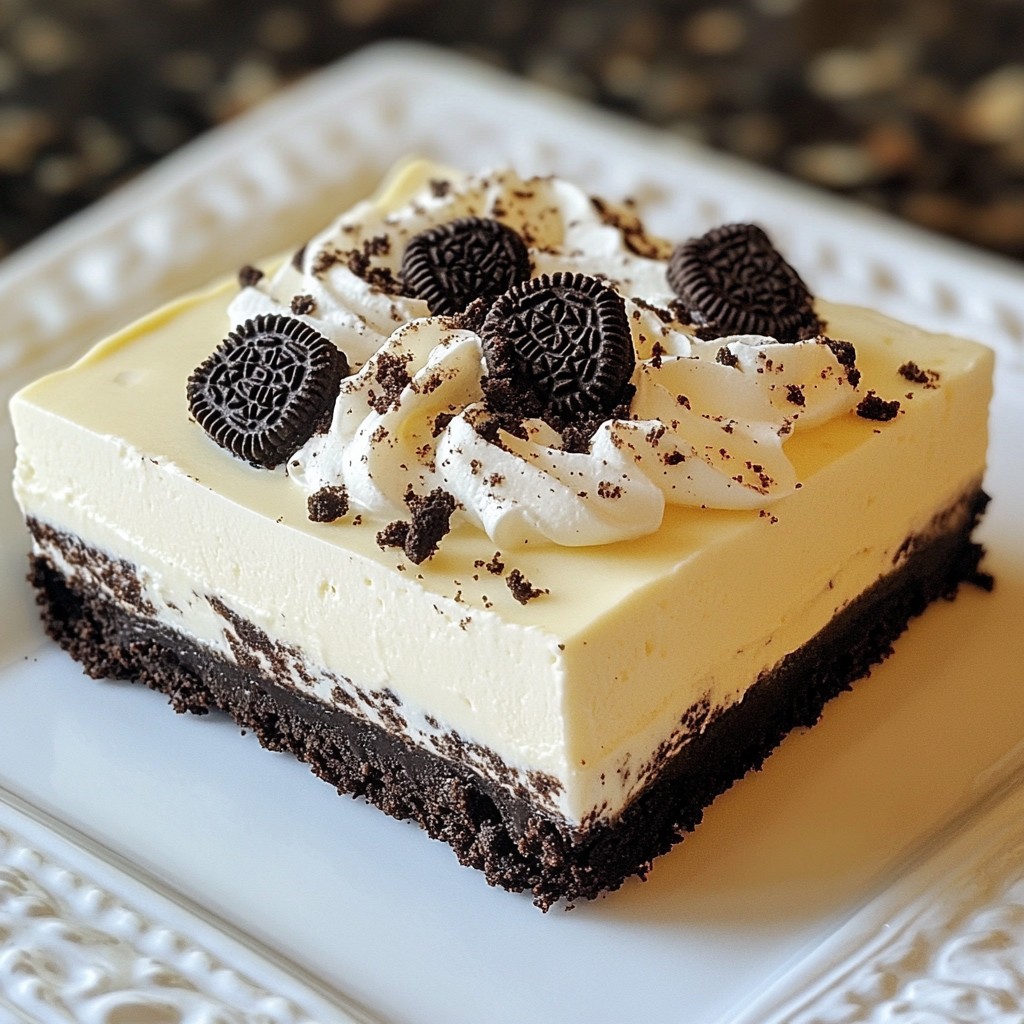
If you're craving a sweet treat that’s simple and satisfying, you’re in the right place! I’m excited to share my easy and delicious no-bake Oreo cheesecake recipe. With just a few key ingredients and simple steps, you can impress your friends and family in no time. Get ready to whip up a dessert that looks fancy but takes minimal effort. Let’s dive into the details and make your new favorite cheesecake!
Error: Connection error.
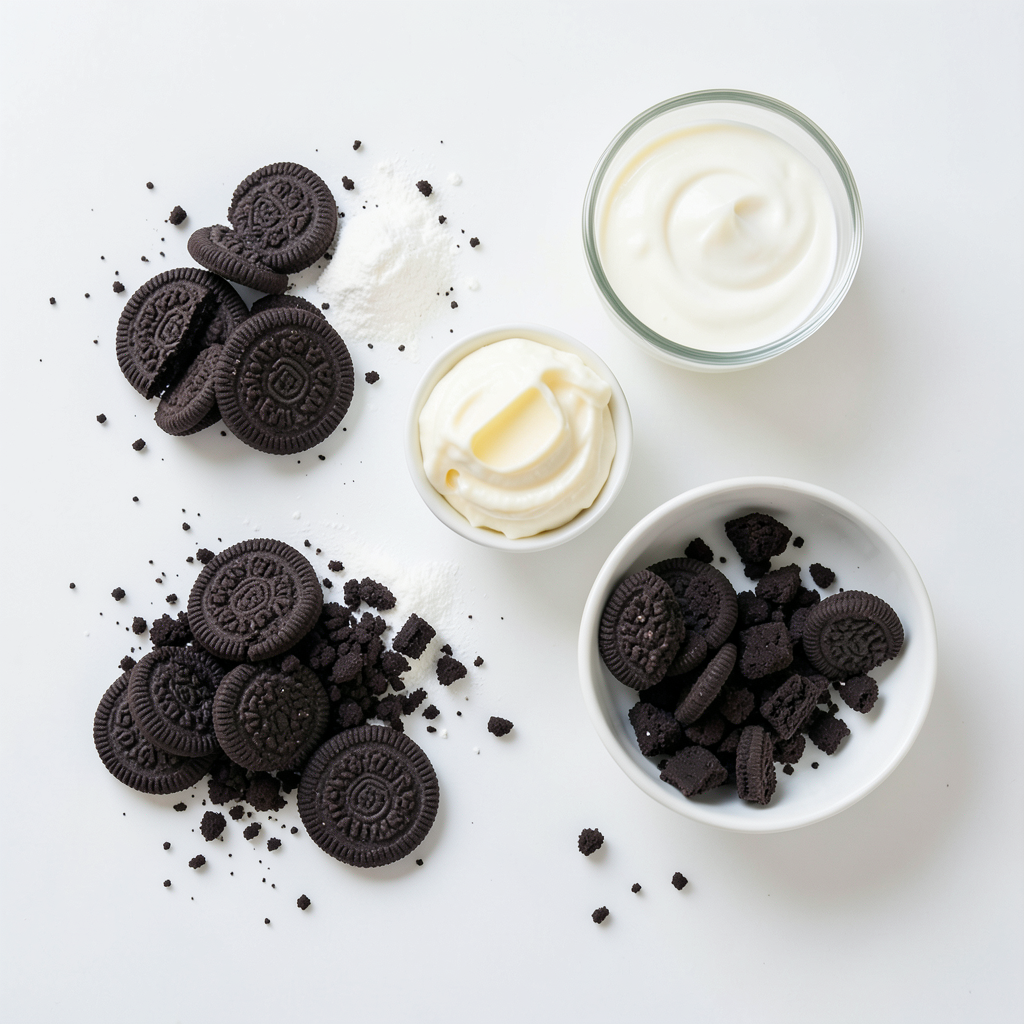
Ingredients
Main Ingredients for No-Bake Oreo Cheesecake
To make a delicious No-Bake Oreo Cheesecake, you need some key ingredients:
- 24 Oreo cookies, finely crushed
- 4 tablespoons unsalted butter, melted
- 16 oz cream cheese, softened to room temperature
- 1 cup powdered sugar
- 1 teaspoon pure vanilla extract
- 1 cup heavy whipping cream
- 12 Oreo cookies, roughly chopped (for the filling)
- Extra crushed Oreos for garnish
Each ingredient plays a vital role. The crushed Oreos form a tasty base, while the cream cheese adds that creamy texture. The whipped cream lightens the filling, making it airy and delightful.
Measurements and Substitutions
When making this cheesecake, accuracy is key. You want the right balance. If you don't have unsalted butter, you can use salted butter. Just cut back on added salt in the recipe. For cream cheese, low-fat can work, but it may not be as rich. If you can’t find powdered sugar, you can blend granulated sugar to make your own.
Optional Garnishes and Toppings
To make your cheesecake even more special, consider adding some toppings. Here are a few ideas:
- Whole Oreo cookies
- Whipped cream dollops
- Chocolate sauce drizzle
- Fresh mint leaves
These garnishes not only enhance the look but also add extra flavor and texture to your dessert.
Step-by-Step Instructions
Preparing the Oreo Crust
First, gather your ingredients for the crust. You will need 24 Oreo cookies and 4 tablespoons of unsalted butter. Start by crushing the Oreos into fine crumbs. Place them in a medium bowl. Pour the melted butter over the crumbs. Mix well until the crumbs look wet and clumpy. This mixture will form a sturdy base for your cheesecake.
Next, grab a 9-inch springform pan. Transfer the Oreo mixture into the pan. Use the back of a measuring cup or your fingers to press it down firmly. Make sure to spread it evenly across the bottom. This will help it hold its shape. Once pressed, place the pan in the fridge. Let it chill for about 15 minutes. This step helps the crust firm up nicely.
Making the Cream Cheese Filling
Now, let’s work on the filling. Begin with 16 ounces of softened cream cheese. Place it in a large mixing bowl. Use an electric mixer on medium speed to beat the cream cheese. Mix until it is smooth and creamy. There should be no lumps in the mixture.
Next, add in 1 cup of powdered sugar and 1 teaspoon of pure vanilla extract. Keep mixing until everything blends well and becomes fluffy. In a separate bowl, pour 1 cup of heavy whipping cream. Use the electric mixer again. Whip the cream until stiff peaks form. Be careful not to overwhip it. You want it light and airy for the cheesecake.
Combining and Filling the Cheesecake
Now, it’s time to combine the two mixtures. Gently fold the whipped cream into the cream cheese mixture using a spatula. Be sure to mix just until no streaks remain. This helps keep the filling light.
Next, take 12 roughly chopped Oreo cookies and fold them into the cheesecake filling. This adds great texture and extra flavor. Now, pour this filling over the chilled Oreo crust. Use the spatula to spread it evenly across the top.
Cover the cheesecake with plastic wrap or a lid. Place it back in the fridge. Chill it for at least 4 to 6 hours. For the best results, chill it overnight. When it is fully set, carefully remove the sides of the springform pan. Top with extra crushed Oreos before slicing. Enjoy this delicious dessert!
Tips & Tricks
Essential Tips for Perfect Texture
To get a perfect texture in your No-Bake Oreo Cheesecake, start with room-temperature cream cheese. This helps it mix smoothly. When you whip the cream, stop when stiff peaks form. If you whip too long, it can become buttery. Make sure to fold the whipped cream gently into the cream cheese. This keeps your cheesecake light and airy.
Common Mistakes to Avoid
One mistake is not chilling the crust long enough. It needs to firm up in the fridge for at least 15 minutes. Another error is overmixing the filling. You want to mix until smooth but not too much. Lastly, don’t skip the chilling step after filling the crust. Refrigerate for at least 4-6 hours. This helps the cheesecake set well.
Serving Suggestions and Pairings
Serve the cheesecake cold for the best taste. Top each slice with whipped cream and crushed Oreos. You can also add fresh berries for a fruity touch. If you like chocolate, drizzle some chocolate sauce over the top. Each bite will be a treat!
Error: Connection error.
Variations
Different Cookie Options for the Crust
You can change the crust to fit your taste. Try different cookies. Some good options include:
- Chocolate sandwich cookies
- Graham crackers
- Digestive biscuits
Each cookie gives a unique flavor and texture. Just crush them finely and mix with melted butter. Press it down like you would with Oreos.
Flavor Variations (Mint, Chocolate, etc.)
You don't have to stick to plain Oreo flavor. Add fun twists! For a mint version, use mint Oreos. You can also mix in chocolate syrup for a richer taste. Here are some other ideas:
- Peanut butter Oreos for a nutty kick
- Coffee-flavored Oreos for a bold taste
- White chocolate chunks for sweetness
Experiment with flavors to find your favorite!
Vegan or Dairy-Free Alternatives
You can make this cheesecake vegan or dairy-free. Use these swaps:
- Replace cream cheese with vegan cream cheese
- Use coconut cream instead of heavy cream
- Choose dairy-free butter for the crust
These changes still give you a yummy cheesecake. It allows everyone to enjoy this dessert!
Storage Info
Best Ways to Store No-Bake Cheesecake
To keep your No-Bake Oreo Cheesecake fresh, store it in the fridge. Use an airtight container or cover it tightly with plastic wrap. This keeps the cheesecake moist and prevents odors from other foods.
How Long Does It Last?
When stored properly, this cheesecake lasts about 5 days in the fridge. I recommend checking it for any changes in texture or smell before serving. If you’re unsure, it’s best to play it safe and toss it out.
Freezing and Thawing Instructions
You can freeze the No-Bake Oreo Cheesecake for up to 2 months. Cut it into slices first, then wrap each slice in plastic wrap. Place them in a freezer-safe bag to protect them from freezer burn. To thaw, move the cheesecake to the fridge overnight. Enjoy each slice chilled for the best taste!
FAQs
Can I make No-Bake Oreo Cheesecake ahead of time?
Yes! You can make No-Bake Oreo Cheesecake a day or two in advance. This makes it a great option for parties. Just cover it tightly with plastic wrap and store it in the fridge. The flavors will blend well, and it will taste even better after chilling overnight.
What can I use instead of cream cheese?
If you want a different option, use mascarpone cheese. It has a similar texture and taste. You can also try Greek yogurt for a lighter version. Just remember, this may change the flavor slightly.
How do I know when the cheesecake is set?
The cheesecake is set when it feels firm to the touch. After chilling, gently press the center. If it holds its shape, it’s ready. A good rule of thumb is to chill it for at least 4-6 hours. For best results, leave it overnight.
This blog post shared how to make a No-Bake Oreo Cheesecake. We covered the main ingredients, measurements, and optional toppings. I gave you step-by-step instructions and helpful tips for a great texture. You now know variations to try and how to store your cheesecake properly.
In summary, this treat is easy and fun to make. You can personalize it with different flavors or cookies. Enjoy making your perfect cheesecake.