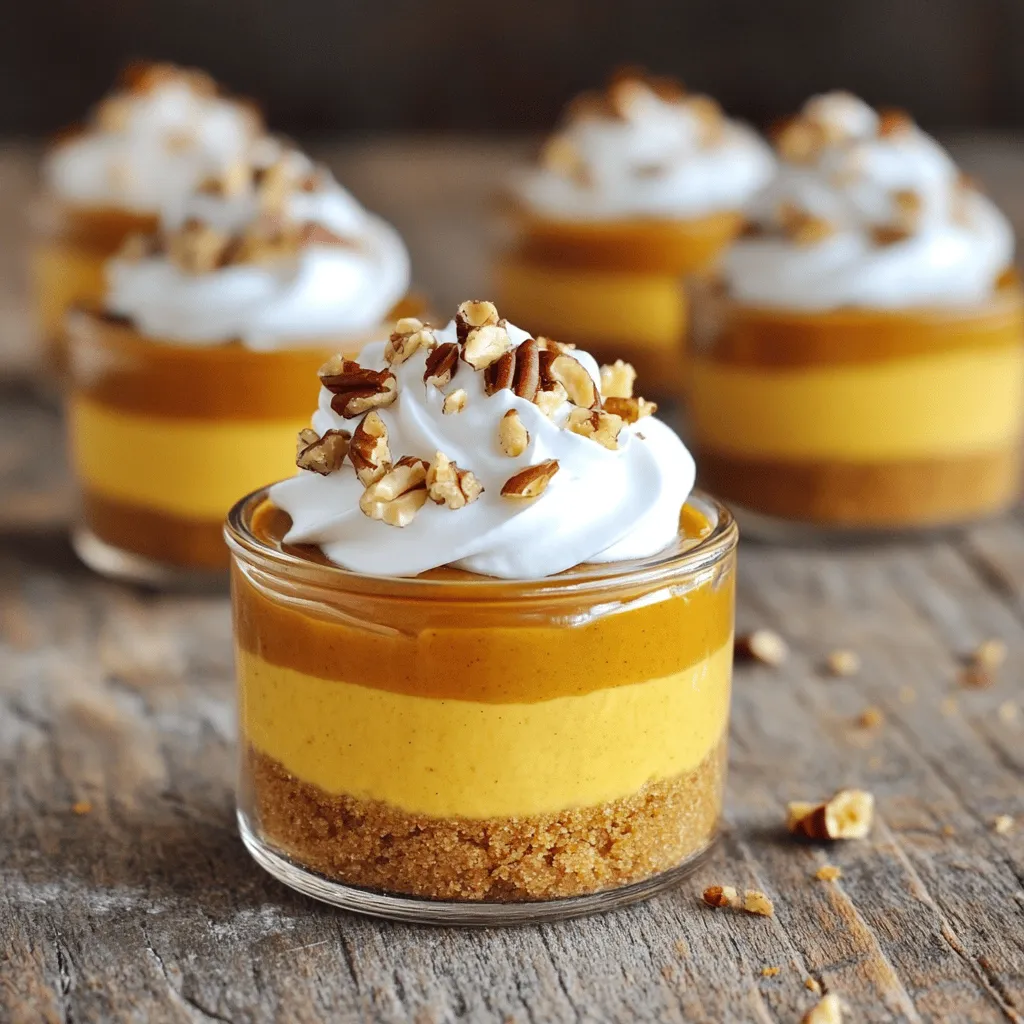
Craving a sweet, fall treat without the fuss? No Bake Pumpkin Cheesecake Cups are the perfect solution! These delightful, creamy cups combine rich pumpkin flavor and a delicious crust, all without turning on your oven. I’ll guide you through simple steps to make this easy dessert, plus share tips on ingredients, variations, and storing leftovers. Ready to impress your friends and family? Let’s dive in!
Ingredients
Complete Ingredient List
To make No Bake Pumpkin Cheesecake Cups, you need to gather these items:
– 1 cup graham cracker crumbs
– 1/4 cup unsalted butter, melted
– 2 (8 oz) packages cream cheese, softened to room temperature
– 1 cup pumpkin puree (not pumpkin pie filling)
– 1 cup powdered sugar
– 1 teaspoon vanilla extract
– 1 teaspoon ground cinnamon
– 1/2 teaspoon ground nutmeg
– 1/2 cup heavy whipping cream
– Whipped cream, for topping
– Crushed pecans or walnuts, for garnish
Ingredient Substitutions
You can make this recipe your own with easy swaps. If you want a gluten-free crust, use gluten-free graham crackers. For a lighter option, try Greek yogurt instead of cream cheese. If you are out of pumpkin puree, mashed sweet potato works well.
Tips for Fresh Ingredients
Always use fresh cream cheese for the best taste. Check your pumpkin puree for freshness, too. Look for cans that are not dented and are within the expiration date. Heavy cream should be cold when whipping for the best volume.
Step-by-Step Instructions
Preparation Overview
First, gather your ingredients. You will need graham cracker crumbs, butter, cream cheese, pumpkin puree, and more. Make sure your cream cheese is soft. This will help it mix smoothly.
Detailed Mixing Process
In a medium bowl, mix the graham cracker crumbs and melted butter. Stir until all the crumbs are coated. This will be your crust. Next, in a large bowl, beat the cream cheese with an electric mixer. Mix until it’s smooth and creamy. Add the pumpkin puree, powdered sugar, vanilla, cinnamon, and nutmeg. Mix again until smooth.
In another bowl, pour the heavy cream. Whip it until stiff peaks form. This step is key for a light filling. Gently fold the whipped cream into the pumpkin mixture. Use a spatula and be careful not to deflate it.
Assembling the Cheesecake Cups
Now it’s time to layer. Spoon the crumb mixture into six cups. Press it down firmly. This makes a solid base. Next, add the creamy pumpkin filling over the crusts. Fill each cup nearly to the top. Chill them in the fridge for at least four hours. This helps the mixture set. When ready, add a dollop of whipped cream on top. Sprinkle with crushed nuts for extra flavor. Enjoy your delicious no bake pumpkin cheesecake cups!
Tips & Tricks
Secrets to a Light and Fluffy Filling
To make a light and fluffy filling, use cold heavy whipping cream. Whip it until you see stiff peaks. This step is key. Gently fold it into the pumpkin mix. Do not stir too hard. You want to keep the air in the whipped cream. This air makes the cheesecake light.
Best Practices for Chilling
Chilling is vital for the best texture. After you assemble the cups, place them in the fridge. Let them chill for at least four hours. This time helps the filling set well. If possible, overnight chilling is even better. It allows all the flavors to meld together.
Serving Suggestions
When ready to serve, add a dollop of whipped cream. This adds a lovely touch. You can also sprinkle crushed pecans or walnuts on top. This adds crunch and flavor. For a fun twist, use a piping bag to decorate the whipped cream. A sprinkle of cinnamon also looks nice. If you want a dessert to impress, these tips will help.

Variations
Alternative Flavors (e.g., Chocolate, Maple)
You can switch things up with flavors. Try chocolate for a rich twist. Use cocoa powder in place of pumpkin puree. Mix it in well with cream cheese and sugar. Maple can also be a great option. Just replace pumpkin with maple syrup. This gives a sweet, fall vibe that everyone loves.
Gluten-Free or Dairy-Free Options
For a gluten-free version, use gluten-free graham crackers. They make a great base just like regular ones. If you need a dairy-free option, swap cream cheese for a vegan cream cheese. You can also use coconut cream instead of heavy cream. It will still taste rich and creamy without dairy.
Serving Sizes and Presentation Ideas
These cups are perfect for a party. You can serve them in small glasses or mason jars. If you want smaller bites, use mini cups. For a beautiful look, layer the filling and crust. Top with whipped cream and nuts for crunch. You can also add a cinnamon stick for a festive touch.
Storage Info
Refrigeration Tips
After making your no bake pumpkin cheesecake cups, place them in the fridge. Cover each cup with plastic wrap or a lid. This helps keep them fresh and safe from odors. They taste best when chilled for at least four hours, but you can store them for up to three days. The longer they sit, the more the flavors blend.
Freezing Instructions
If you want to save some for later, freezing works great. First, let the cheesecake cups chill in the fridge for at least four hours. Then, wrap each cup in plastic wrap and foil. This keeps them safe from freezer burn. They can stay in the freezer for up to two months. When you’re ready to eat, thaw them in the fridge overnight.
Shelf Life of Cheesecake Cups
These delightful cheesecake cups can last in the fridge for about three days. After that, they may lose their creamy texture and flavor. If you freeze them, they can last up to two months. But, for the best taste, enjoy them within a month.
FAQs
Can I make No Bake Pumpkin Cheesecake Cups ahead of time?
Yes, you can make these cups ahead of time. I often prepare them a day in advance. This allows the flavors to meld and the filling to set perfectly. Just cover them with plastic wrap and store them in the fridge. They will taste fresh and delicious when you serve them.
What can I substitute for cream cheese?
If you need a cream cheese substitute, try using Greek yogurt. It gives a nice texture and tang. You can also use mascarpone cheese for a richer taste. Just keep in mind that the flavor may change slightly. For a dairy-free option, try cashew cream or coconut cream mixed with a bit of lemon juice.
How do I know when the filling is set?
Check the filling after chilling for at least four hours. It should feel firm to the touch, not jiggly. If you press lightly, it should hold its shape. The filling will become creamier and smoother as it sets. If you’re unsure, let it chill longer for the best results.
You learned about making no-bake cheesecake cups. We covered ingredients, steps, and tips to ensure success. Remember to use fresh ingredients for the best taste. I also shared different flavor ideas and storage tips. These insights can help you create a delightful dessert. Enjoy crafting your cheesecake cups, and don’t forget to experiment with flavors and presentations. With practice, you’ll impress everyone with your tasty treats. Happy baking!