Are you ready to indulge in a treat that’s easy to make and delicious? These Peanut Butter Chocolate Banana Bars combine ripe bananas, creamy peanut butter, and rich chocolate for a snack you’ll love. Perfect for kids and adults alike, these bars are packed with flavor and nutrition. Let’s dive into the simple ingredients and easy steps that will have you baking in no time!
Why I Love This Recipe
- Healthy Indulgence: These bars offer a delightful combination of flavors while being packed with nutritious ingredients, making them a guilt-free treat.
- Quick and Easy: With a prep time of just 10 minutes, these bars are a simple solution for satisfying your sweet tooth without a lot of fuss.
- Versatile Sweetener: Whether you choose honey or maple syrup, you can customize the sweetness level to your liking, catering to different dietary preferences.
- Perfect for Meal Prep: These bars can be made ahead of time, making them an ideal snack for busy days or a healthy dessert option.
Ingredients
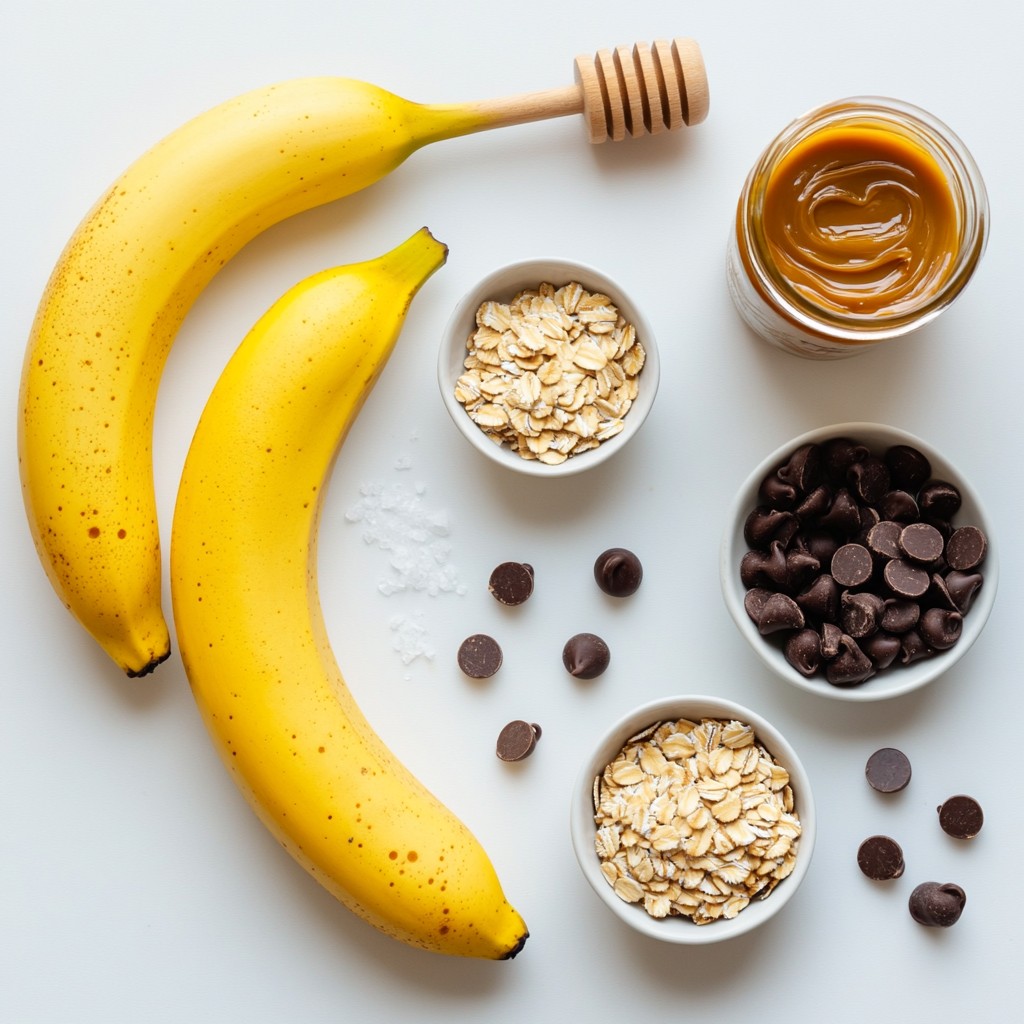
To make Peanut Butter Chocolate Banana Bars, you need simple and tasty ingredients. Here’s what you’ll need:
- 2 ripe bananas, thoroughly mashed
- 1 cup creamy peanut butter
- 1/2 cup honey or maple syrup
- 1/2 cup rolled oats
- 1/2 cup dark chocolate chips
- 1/2 teaspoon vanilla extract
- 1/2 teaspoon baking powder
- A pinch of salt
Each ingredient plays a key role in the bars' flavor and texture. Ripe bananas add natural sweetness and moisture. Creamy peanut butter gives the bars a rich, nutty taste. Honey or maple syrup acts as a sweetener and binds the mixture together. Rolled oats provide a chewy texture. Dark chocolate chips add a delightful burst of chocolate in every bite. Vanilla extract enhances the overall flavor, while baking powder helps the bars rise slightly. The pinch of salt balances the sweetness, making each bite even better.
Feel free to mix things up! You can swap honey for maple syrup, depending on your taste. Each ingredient works together to create a delicious treat. Enjoy these bars as a snack or dessert!
Step-by-Step Instructions
Preparation
1. Preheat your oven to 350°F (175°C). This step is key for even baking.
2. Prepare your 8x8 inch baking dish. Line it with parchment paper, letting some hang over the edges. This makes it easy to lift out the bars after baking.
3. In a large mixing bowl, mash the ripe bananas. You want them very smooth.
4. Add the creamy peanut butter and honey or maple syrup to the bowl. Mix these wet ingredients until they blend well together.
5. Incorporate the vanilla extract into the mixture. Stir until combined.
6. Next, add the rolled oats, baking powder, and a pinch of salt. Gently mix until just combined. Be careful not to overmix, as this can change the texture.
Baking Process
1. Fold in the dark chocolate chips. This adds a sweet touch to your bars. Save a few for later decoration.
2. Pour the batter into your prepared baking dish. Use a spatula to spread it evenly.
3. Sprinkle the reserved chocolate chips on top. This gives a nice look and extra chocolate flavor.
4. Bake in your preheated oven for 20-25 minutes. You’ll know they’re done when the edges are golden brown. A toothpick should come out clean when inserted in the center.
5. Once done, let the bars cool in the pan for about 10 minutes.
6. Carefully lift them out by the edges of the parchment paper. Transfer to a wire rack to cool completely.
Final Steps
1. Once cool, slice the bars into squares or rectangles. Enjoy these tasty treats!
2. For added flair, drizzle melted dark chocolate over the bars before serving. You can also dust them lightly with powdered sugar for an elegant touch.
Tips & Tricks
Perfecting Texture
To get the best texture, use ripe bananas. They should be very soft and sweet. The more ripe they are, the creamier your bars will be. Place bananas in a bowl and mash them well. This helps mix them easily with peanut butter.
Do not overmix your batter. Stir until ingredients just come together. Overmixing can make the bars tough. You want them soft and chewy.
Enhancing Flavor
You can swap out peanut butter. Try almond or cashew butter for a different taste. Each nut brings its own unique flavor. You can also add spices like cinnamon or nutmeg for warmth. A touch of sea salt can enhance the sweet flavors too.
Serving Suggestions
These bars pair well with milk or almond milk. They also taste great with fresh fruit like strawberries or blueberries. For a fun twist, serve them with a scoop of vanilla ice cream. Enjoy them as a snack or a tasty breakfast treat!
Pro Tips
- Ripe Bananas: Make sure your bananas are very ripe for the best flavor and sweetness. The more brown spots, the better!
- Peanut Butter Choice: Use a high-quality creamy peanut butter for a smoother texture and richer taste in your bars.
- Oat Variations: For added texture, consider using quick oats or even a mix of oats and nut flour.
- Storage Tips: Store the bars in an airtight container at room temperature for up to a week, or refrigerate for longer freshness.
Variations
Dietary Substitutions
You can make these bars fit your diet. For a vegan version, swap honey for maple syrup. This keeps the bars sweet and plant-based. If you need gluten-free bars, use certified gluten-free oats. They work just as well and maintain flavor.
For sweeteners, feel free to use agave syrup or coconut sugar. Each option gives a unique taste. Choose what you like best!
Flavor Additions
Want to amp up the flavor? You can add nuts or seeds to the mix. Walnuts or pecans add a nice crunch. Chia seeds or flaxseeds give extra nutrients. Just fold them into the batter before baking.
You can also explore different types of chocolate. Use milk chocolate chips for a sweeter treat. Or try white chocolate for a creamy twist. Each choice brings a new taste to your bars.
Storage Info
Proper Storage Techniques
To keep your Peanut Butter Chocolate Banana Bars fresh, store them in an airtight container. This helps prevent them from drying out. Place a layer of parchment paper between the bars to avoid sticking. You can store them at room temperature for up to three days. If you want them to last longer, consider refrigerating them. This way, they can stay fresh for about a week.
For best results, use a glass or plastic container with a tight lid. Avoid metal containers, as they can affect the taste.
Freezing Instructions
If you want to freeze your bars, first, let them cool completely. After cooling, slice the bars into squares or rectangles. Wrap each piece in plastic wrap. Then, place the wrapped bars in a freezer-safe bag or container. Label the bag with the date for easy reference.
To thaw, simply remove a bar from the freezer. Unwrap it and leave it on the counter for about 30 minutes. You can also warm it in the microwave for a few seconds. Enjoy your tasty treat anytime!
FAQs
Common Questions About Peanut Butter Chocolate Banana Bars
- Can I use natural peanut butter?
Yes, you can use natural peanut butter. It adds a great flavor, but it may change the texture slightly. Natural peanut butter can be runnier, so your bars might be softer.
- How do I know when the bars are done baking?
The bars are done when the edges turn golden brown. You can also insert a toothpick in the center. If it comes out clean, the bars are ready.
- Can I substitute the honey with a sugar alternative?
Yes, you can replace honey with a sugar alternative like agave syrup or a stevia blend. Just keep in mind that it might affect the flavor and texture.
- How long do these bars last?
These bars last about five days at room temperature. Store them in an airtight container to keep them fresh. You can also refrigerate them for longer shelf life.
- Can I make these bars ahead of time?
Yes, you can make these bars ahead of time. They are perfect for meal prep. Just store them in an airtight container until you are ready to enjoy them.
You now have a tasty recipe for Peanut Butter Chocolate Banana Bars. We covered key ingredients, step-by-step instructions, and tips for perfect texture and flavor. Remember, you can make these bars vegan or gluten-free with simple swaps. Store them well for lasting freshness, and don’t hesitate to try different flavors. These bars are easy to make and fun to share. Enjoy baking and savoring these delicious treats!