Skip to content
DisclaimerTerms Of UseGDPR PolicyCookie Policy

spoonfulsavory

  • Home
  • Drinks
  • Appetizers
  • Dinner
  • Dessert
  • About
  • Contact
  • Privacy Policy
DisclaimerTerms Of UseGDPR PolicyCookie Policy

NO-ING-IMG

- 2 cups rolled oats - 2 cups almond milk (or any milk of your choice) - 2 large apples, peeled, cored, and diced - 1/3 cup pure maple syrup (or honey for sweetness) - 1/4 cup packed brown sugar - 1 teaspoon ground cinnamon - 1/2 teaspoon ground nutmeg - 1/4 teaspoon salt - 1 teaspoon pure vanilla extract I love using rolled oats for this bake. They give great texture and flavor. Almond milk keeps it creamy, but you can use any milk you like. Fresh apples add sweetness and a nice crunch. - 1/2 cup walnuts or pecans, finely chopped - 1/4 cup raisins or dried cranberries Adding nuts gives a lovely crunch. Walnuts or pecans are my favorites. Dried fruit can boost sweetness too. Raisins or cranberries work well. You can mix and match based on what you have. - Fresh apple slices - Additional cinnamon Garnishing with fresh apple slices makes it pretty. A sprinkle of extra cinnamon adds a nice touch. You can also drizzle a bit of maple syrup on top for more flavor. {{ingredient_image_2}} 1. Preheat your oven to 350°F (175°C). This helps the oatmeal bake cook evenly. 2. Prepare your baking dish. Take a 9x9-inch baking dish and grease it lightly with cooking spray or butter. This prevents the oatmeal from sticking. 1. Combine oats and almond milk. In a big mixing bowl, add 2 cups of rolled oats and 2 cups of almond milk. Stir well. 2. Fold in additional ingredients. Add 2 diced apples, 1/3 cup of maple syrup, and 1/4 cup of brown sugar. Sprinkle in 1 teaspoon of cinnamon, 1/2 teaspoon of nutmeg, and 1/4 teaspoon of salt. Lastly, add 1 teaspoon of vanilla extract. Mix everything until blended. 1. Pour the mixture into the greased baking dish. Spread it evenly to bake well. 2. Bake for 30-35 minutes. Look for a golden top and a firm center. This means it’s done. 3. Cool and serve. Once out of the oven, let it cool for 5-10 minutes. This makes cutting easier. Slice it into squares or rectangles as you like. Enjoy warm with apple slices and a sprinkle of cinnamon on top. To get the right texture in your Apple Cinnamon Oatmeal Bake, follow these tips: - Use rolled oats: They give a nice chew and hold their shape well during baking. - Don’t skip the nuts: Walnuts or pecans add crunch and flavor. - Check the doneness: Look for a golden top and a firm center. Cooling is key! Let the bake sit for 5-10 minutes after it comes out of the oven. This helps it set and makes slicing easier. If you slice it too soon, it may fall apart. Fresh ingredients make a big difference. Use crisp, sweet apples for the best taste. For a twist on the classic, try these cinnamon alternatives: - Nutmeg: Adds warmth and depth. - Cardamom: Gives a floral note that brightens flavors. Don't be afraid to experiment with spices. A little change can create a new favorite. There are so many fun ways to serve your oatmeal bake! Here are some ideas: - Individual bowls: Serve warm portions topped with yogurt or a scoop of ice cream. This adds a nice creaminess. - Garnish: Use fresh apple slices and an extra sprinkle of cinnamon on top. You can also drizzle a bit of maple syrup for added sweetness. Enjoy your cozy treat! Pro Tips Choose Your Apples Wisely: Opt for a mix of sweet and tart apples, like Honeycrisp and Granny Smith, to add depth of flavor to your oatmeal bake. Customize Your Sweetness: Adjust the amount of maple syrup or brown sugar based on your preference for sweetness; taste the mixture before baking. Make It Ahead: Prepare the mixture the night before and refrigerate it. Just bake it in the morning for a quick and delicious breakfast. Textural Variations: For added crunch, top with extra nuts or seeds before baking, or serve with a dollop of yogurt or ice cream for a delightful contrast. {{image_4}} You can easily tweak this recipe for different diets. For a vegan option, use almond milk and skip the honey. Instead, stick with pure maple syrup. If you want gluten-free, just make sure your oats are certified gluten-free. You can also change up the sugars. Instead of brown sugar, try coconut sugar or a sugar substitute like stevia. These keep the sweetness without the extra calories. Get creative with fruit! Instead of apples, try ripe bananas, juicy pears, or sweet peaches. Each fruit brings its own flavor and texture. You can also mix up the spices. Ginger adds a warm kick, while cardamom gives a unique taste. Experiment with these spices to find your favorite blend. Seasonal fruits are a fun way to change this dish. In fall, add pumpkin puree. In summer, mix in berries or stone fruits. For extra protein, you can add chia seeds or protein powder. Both options boost nutrition without changing the taste much. This makes the meal more filling and satisfying. After you enjoy your apple cinnamon oatmeal bake, let it cool. For the best taste, store leftovers in an airtight container. Place it in the fridge. This keeps it fresh for about 4 to 5 days. If you want to keep it longer, freezing is a great option. To warm up your oatmeal bake, you can use the oven or microwave. If using the oven, preheat it to 350°F (175°C). Place a piece of the bake in a baking dish, cover it with foil, and warm it for about 10-15 minutes. For the microwave, heat a slice for 30-45 seconds on medium power. This method helps keep it moist and soft. If you want to freeze the oatmeal bake, cut it into squares first. Wrap each piece well in plastic wrap or foil, then place them in a freezer bag. This helps avoid freezer burn. To thaw, move a piece to the fridge for a few hours or overnight. Reheat it using the methods above for the best results. Yes, you can make this oatmeal bake ahead. Here’s how to store it. After baking, let it cool completely. Cut it into squares. Place them in airtight containers. Store in the fridge for up to five days. You can also freeze it. Wrap each square in plastic wrap. Then put the wrapped squares in a freezer bag. They will last for about three months. To eat, just reheat in the microwave or oven. If you don’t have almond milk, don’t worry! You can use other milk types. Regular cow's milk works great. Soy milk is another good option. Oat milk or coconut milk are also tasty. Just choose the milk you enjoy the most. Each will bring its own flavor to the dish. To make this recipe healthier, try these tips. Reduce the brown sugar to 2 tablespoons instead of 1/4 cup. You can also use less maple syrup. Add more apples for natural sweetness. Use whole rolled oats for added fiber. If you want, add chia seeds for extra nutrition. These changes help keep the taste but make it better for you. Yes, this recipe is great for kids! It’s packed with healthy oats and fruit. The apples give it natural sweetness. You can adjust the sugar for even less sweetness. The texture is soft and easy to chew. Plus, it’s a fun way for kids to enjoy breakfast or a snack. Just be mindful of any nut allergies if you add nuts. This blog post covered the ingredients, steps, and tips for making a delicious Apple Cinnamon Oatmeal Bake. You learned about key ingredients like oats and apples, along with optional add-ins to enhance flavor. I shared storage tips and variations for dietary needs, too. As you create your oatmeal bake, remember that the best results come from using fresh ingredients and paying attention to texture. Enjoy experimenting with flavors and serving ideas to make this dish your own!

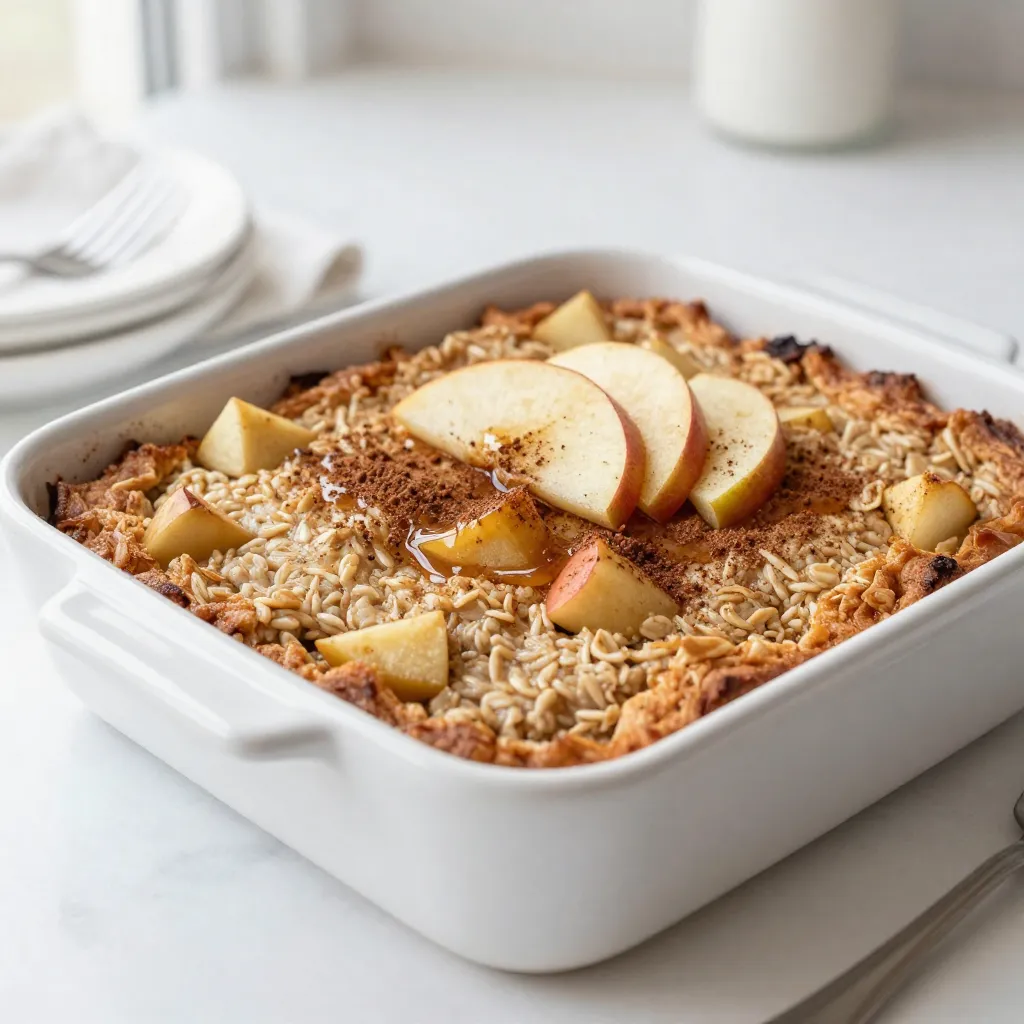
Apple Cinnamon Oatmeal Bake Simple and Tasty Recipe

Looking for a warm, easy breakfast that your whole family will love? This Apple Cinnamon Oatmeal Bake is the perfect

- 4 large carrots, peeled and coarsely grated - 1/2 cup raisins or currants - 1/4 cup sliced almonds or walnuts - 1/4 cup fresh cilantro, finely chopped - 1 tablespoon ground cumin - 1 teaspoon ground cinnamon - 1 teaspoon ground coriander - 1/2 teaspoon cayenne pepper - 3 tablespoons extra virgin olive oil - 2 tablespoons freshly squeezed lemon juice - Salt and freshly ground black pepper to taste You can switch out the carrots for parsnips if you want a unique twist. Instead of raisins, try dried cranberries for a tart flavor. If you prefer different nuts, sunflower seeds or pumpkin seeds work well too. You can skip the cilantro and try parsley for a milder taste. If you want more heat, add more cayenne pepper. For a sweeter touch, drizzle in a bit of honey or maple syrup. Carrots are high in beta-carotene, which helps your eyes and skin. They also provide fiber, aiding digestion. Raisins or currants add natural sweetness and iron, which is good for blood health. Nuts like almonds or walnuts give healthy fats, supporting heart health. Olive oil is rich in antioxidants and can lower bad cholesterol. Lemon juice boosts vitamin C, enhancing your immune system. Spices like cumin and coriander can improve digestion and add anti-inflammatory benefits. {{ingredient_image_2}} Start by peeling and grating the carrots. You want them coarsely grated for the best texture. Next, measure out your raisins or currants. Both add a nice sweetness. If you prefer nuts, slice your almonds or walnuts. These will give your salad a good crunch. Finally, chop your fresh cilantro to add a burst of flavor. In a large mixing bowl, combine the grated carrots and your choice of raisins or currants. Mix them well to ensure they are evenly distributed. This step is key for the sweetness to shine through. Once mixed, set the bowl aside as you prepare the dressing. Grab a smaller bowl and whisk together the spices. Add the ground cumin, cinnamon, coriander, and cayenne pepper. Next, pour in the olive oil and lemon juice. Add a pinch of salt and pepper to enhance the flavors. Whisk until everything blends nicely. This dressing is the heart of your salad. After mixing the dressing, drizzle it over the carrot mixture. Use two forks or your hands to toss everything gently. Make sure each carrot strand gets coated in that delicious dressing. Finally, fold in the chopped cilantro and nuts. This adds layers of flavor and texture. Let the salad rest for about 10-15 minutes. This helps the flavors come together. Before serving, taste the salad and adjust the seasoning if needed. Enjoy your fresh and vibrant Moroccan spiced carrot salad! To make the best Moroccan spiced carrot salad, use fresh carrots. Grate them just before mixing. This keeps them crunchy and sweet. Balance the flavors well. Add enough lemon juice for zing and adjust the cayenne for heat. If you want a sweeter salad, add more raisins or currants. Toss gently but thoroughly. This helps coat every carrot piece in dressing. Presentation matters! Serve the salad in a rustic wooden bowl to keep it warm. Top it with extra chopped cilantro and whole nuts. This adds color and texture. If you have space, sprinkle some edible flowers on top. They add a nice touch and make the dish pop. Remember, we eat with our eyes first! One mistake is not letting the salad rest. Allowing it to sit helps flavors blend. Avoid overdoing the spices. Start with less; you can always add more. Also, don’t skip the salt. It enhances all the flavors. Lastly, remember to taste before serving. Adjust seasoning as needed. This can make a big difference! Pro Tips Use Fresh Ingredients: Always opt for the freshest carrots and herbs to enhance the flavor and nutritional value of your salad. Adjust the Spices: Feel free to tweak the spices according to your taste. If you prefer a milder flavor, reduce the cayenne pepper. Let it Rest: Allowing the salad to rest for a short while before serving helps the flavors meld together beautifully. Experiment with Nuts: Try different types of nuts or seeds like pistachios or sunflower seeds for a unique twist on texture and flavor. {{image_4}} You can switch up your Moroccan spiced carrot salad with different nuts and dried fruits. Instead of almonds, try walnuts for a richer taste. Pecans add a unique flavor too. For dried fruits, apricots or dates can add a sweet touch. If you want a crunchier salad, add sunflower seeds or pumpkin seeds. These small changes keep the salad fresh and exciting. You can adjust the spice levels to match your taste. If you love heat, add more cayenne pepper. For a milder flavor, reduce the cayenne or leave it out. You can also add a pinch of smoked paprika for a smoky twist. If you prefer a sweeter salad, add more raisins or honey. Each tweak gives you a new flavor experience. For serving, I recommend a rustic wooden bowl to show off the vibrant colors. You can top the salad with extra chopped cilantro and nuts. This adds a nice touch and makes it more inviting. Serve it as a side dish with grilled meats or as a light lunch on its own. Pair it with flatbreads or pita for a complete meal. Enjoy your delightful Moroccan spiced carrot salad! To keep your Moroccan spiced carrot salad fresh, place it in an airtight container. Make sure to seal the container well to prevent air from getting in. You can also cover the bowl tightly with plastic wrap. This helps maintain the salad's flavor and crunch. This salad is best enjoyed cold, so reheating is not needed. If you prefer it warm, you can lightly sauté it on low heat for a few minutes. However, this may soften the carrots and change the texture. Keep in mind that the flavors may alter slightly if heated. When stored properly, this salad lasts up to three days in the fridge. After that, the carrots may lose their crispness and freshness. Always check for any off smells or changes in color before eating leftovers. If you notice any, it’s best to discard the salad for safety. Moroccan Spiced Carrot Salad is a bright and tasty dish. It features grated carrots mixed with raisins or currants. The blend of spices, like cumin and cinnamon, gives it a warm flavor. You also add nuts for crunch and fresh herbs for brightness. This salad is colorful and full of textures, making it a feast for your eyes and taste buds. Yes, you can make this salad ahead of time. Prepare it and let it sit for 10-15 minutes. This resting time allows the flavors to blend well. You can also store it in the fridge for up to three days. Just be sure to give it a good stir before serving. This salad pairs well with many dishes. You can serve it with grilled chicken or fish for protein. It also complements couscous or quinoa nicely. For a vegetarian meal, try it with falafel or roasted vegetables. These combinations create a tasty and balanced meal. Yes, this salad is vegan-friendly. It does not contain any animal products. The ingredients are all plant-based and healthy. Enjoy this salad as part of a vegan meal plan or as a side dish at any gathering. This blog post covers how to make a great Moroccan spiced carrot salad. You learned about key ingredients, easy step-by-step instructions, and helpful tips. We explored variations and how to store it properly. In closing, this salad is not only tasty but also healthy and easy to make. Enjoy experimenting with flavors and sharing it with friends and family. Your fresh take on this dish can make any meal shine.

Moroccan Spiced Carrot Salad Flavorful and Fresh Dish

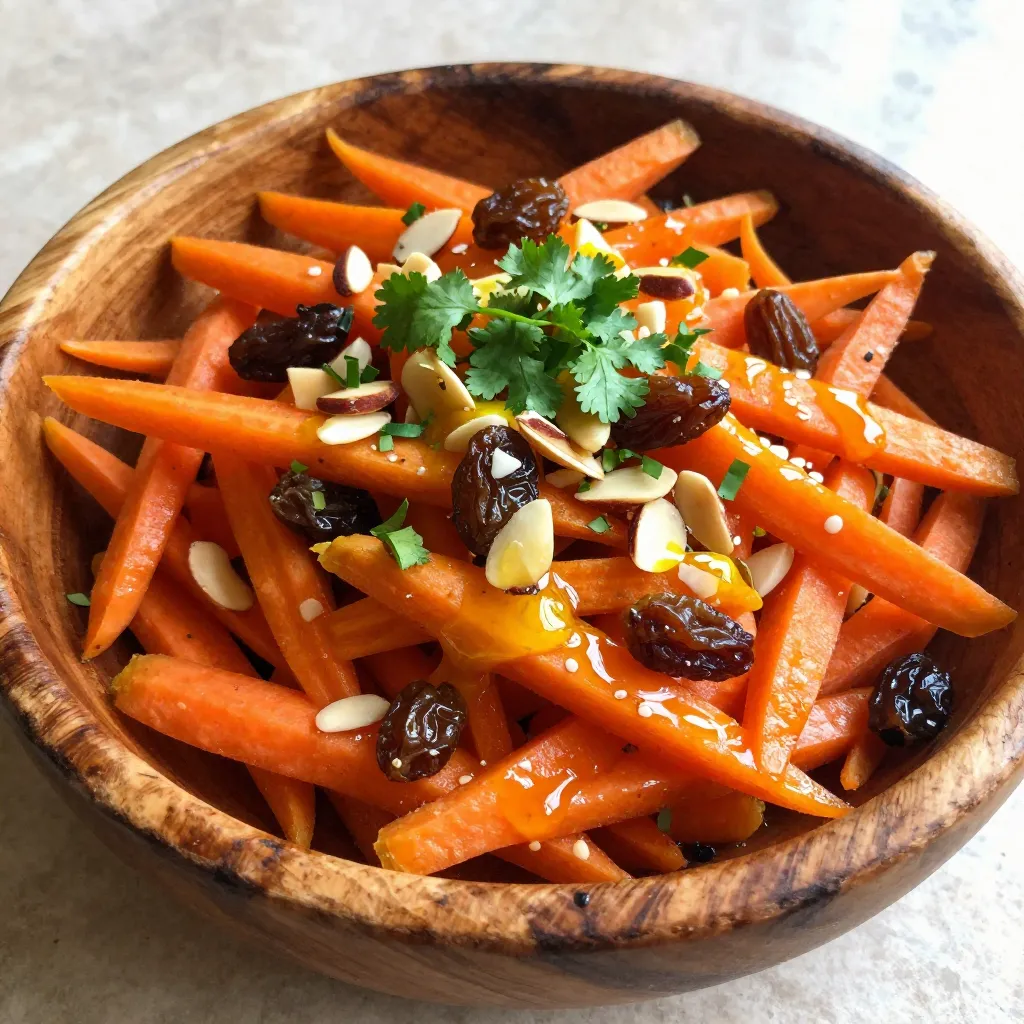
Discover the vibrant flavors of Moroccan Spiced Carrot Salad! This dish is not just a feast for your taste buds;

Here are the ingredients you need for Lemon Blueberry Cheesecake Dip: - 8 oz cream cheese, softened - 1/2 cup powdered sugar - 1 cup Greek yogurt - 1 tablespoon lemon zest - 2 tablespoons lemon juice - 1 cup fresh blueberries - 1 teaspoon vanilla extract - Assorted dippers This dip is simple to make. Each ingredient adds a unique flavor. The cream cheese makes it creamy while the Greek yogurt gives it a nice tang. The lemon zest and juice add bright, fresh notes. Fresh blueberries bring sweetness and color. For dippers, you can use graham crackers, animal crackers, or fresh fruit slices. These options make it fun and tasty. You can mix and match to find your favorite combo! {{ingredient_image_2}} - Mix cream cheese and powdered sugar: Start with 8 oz of soft cream cheese. Add 1/2 cup of powdered sugar to a large bowl. Use an electric mixer to blend. Mix until smooth and creamy. This step is key for a nice texture. - Add yogurt and lemon ingredients: Next, add 1 cup of Greek yogurt. You can use plain or vanilla yogurt. Then add 1 tablespoon of lemon zest and 2 tablespoons of lemon juice. Also, add 1 teaspoon of vanilla extract. Mix until everything is light and fluffy. - Fold in blueberries: Gently fold in 1 cup of fresh blueberries. Use a spatula or wooden spoon for this. Do this carefully to keep the blueberries whole. Reserve some blueberries for garnish later. - Spoon into serving bowl and refrigerate: Now, use a spatula to spoon the dip into a nice serving bowl. Smooth the top to make it look good. Cover the bowl with plastic wrap. Place it in the fridge for at least 30 minutes. This helps the flavors blend and cools the dip. - Garnish before serving: Before you serve, take the dip out of the fridge. Add the reserved blueberries on top for a pretty finish. You can also sprinkle some lemon zest for extra flavor. Arrange your dippers around the dip. Use graham crackers, animal crackers, or fresh fruit slices. Enjoy your tasty treat! To make this dip creamy, always use room temperature cream cheese. Cold cream cheese will not mix well. It leads to lumps that are hard to get rid of. I find it best to take the cream cheese out of the fridge at least an hour before you start. When mixing, use an electric mixer at medium speed. This helps blend the ingredients evenly. Mix until the dip is smooth and fluffy. If you see lumps, keep mixing until they are gone. Choosing the right yogurt is key. I recommend plain or vanilla Greek yogurt. Both add a nice texture and taste. The yogurt gives the dip a lightness that pairs well with the cream cheese. Using fresh lemon zest makes a big difference. It adds a bright, fresh flavor. Bottled lemon juice can be convenient, but it lacks the same punch. Always zest your lemon right before use for the best taste. Pro Tips Use Room Temperature Ingredients: Allow your cream cheese and Greek yogurt to come to room temperature for a smoother, creamier dip that blends easily without lumps. Fresh vs. Frozen Blueberries: While fresh blueberries provide the best texture and flavor, if using frozen, make sure to thaw and drain them well to avoid excess moisture in your dip. Experiment with Flavors: Feel free to add other flavorings such as almond extract or a hint of cinnamon for a unique twist on this classic dip. Chill for Best Flavor: Don’t skip the chilling step! Allowing the dip to chill not only enhances the flavors but also gives it a firmer consistency for easier dipping. {{image_4}} You can change the flavor of this dip easily. Adding other fruits makes it fun. Try strawberries or raspberries. These fruits give a sweet and tart twist. You can also use flavored yogurt. Vanilla or lemon yogurt adds extra taste. This simple change can brighten the dip. If you need gluten-free dippers, choose fresh fruit slices. Apples or pears work well. You can also use gluten-free crackers. Many brands offer great options today. If you want a vegan version, use vegan cream cheese. It tastes just as good. This switch keeps the dip creamy and delicious. To keep the Lemon Blueberry Cheesecake Dip fresh, store leftovers in an airtight container. This helps prevent the dip from absorbing other smells in the fridge. You can also cover the bowl tightly with plastic wrap. The dip stays good for up to 3 days in the refrigerator. Always check for freshness before serving. After storage, the dip may thicken a bit. To refresh it, stir in a splash of milk or yogurt. This keeps it creamy and easy to scoop. It’s best to keep dippers separate from the dip. This way, they stay crisp and tasty. Serve the dippers on a platter, and let your guests enjoy dipping at their own pace. Can I make this dip ahead of time? Yes, you can make this dip ahead of time. I suggest making it a day before. Just cover it and chill it in the fridge. This helps the flavors mix well and taste great. What can I use as dippers besides crackers? There are many fun dippers you can try! Fresh fruit slices work well. Think apples, strawberries, or bananas. You can also use pretzels for a salty twist. Animal crackers are a fun choice too. Is there a way to make this dip lower in sugar? Yes, you can lower the sugar. Try using less powdered sugar. You can also use a sugar substitute like stevia. Just make sure to adjust the amount to taste. This blog post shared a tasty creamy dip recipe featuring cream cheese, Greek yogurt, and fresh blueberries. I explained how to prepare it step by step. You learned tips for a creamy texture and how to make flavor swaps. We also covered storage best practices and answered common questions. Overall, this dip is easy to make and fun to enjoy. With fresh ingredients, it’s sure to be a hit at your next gathering. Dive in and savor every bite!

Lemon Blueberry Cheesecake Dip Simple and Tasty Treat

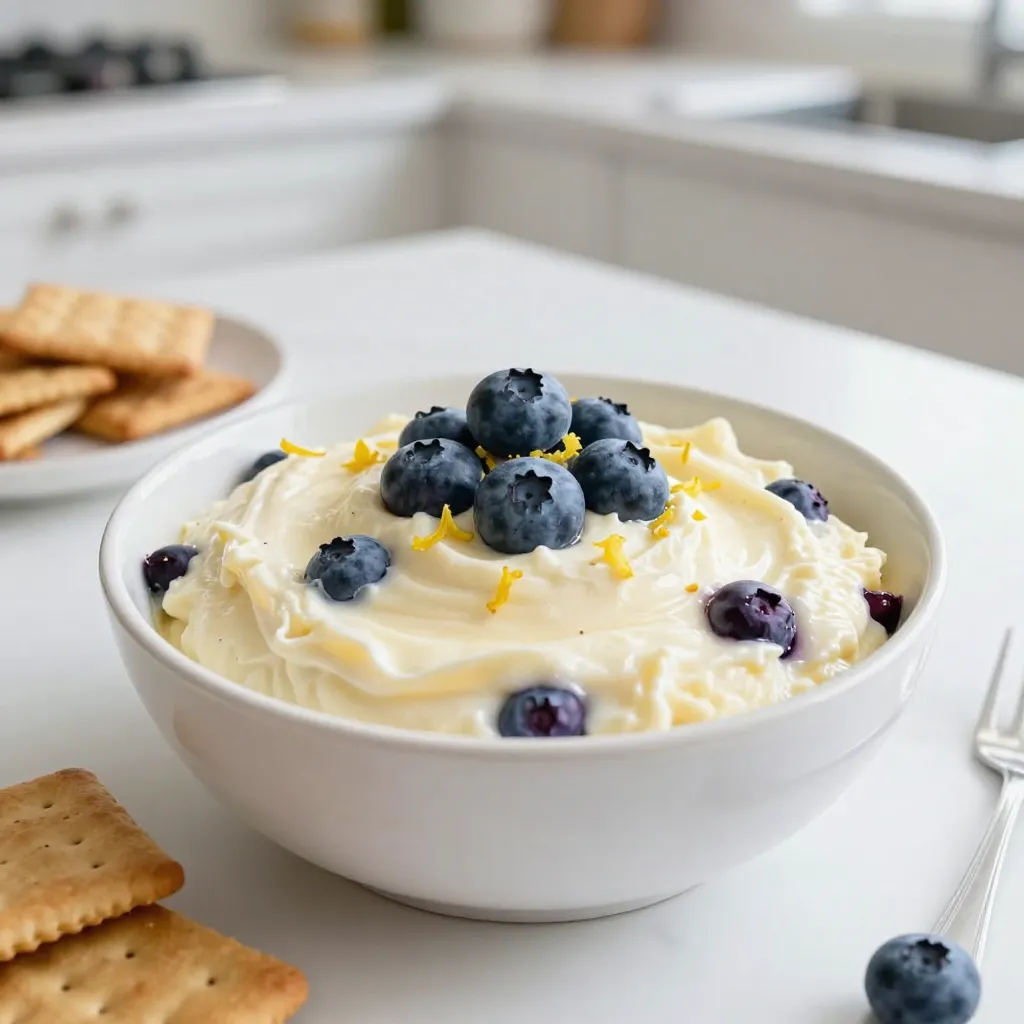
Are you craving a sweet and refreshing treat that’s easy to make? Look no further! This Lemon Blueberry Cheesecake Dip

The key to a great Chocolate Fudge Mug Cake lies in its simple ingredients. Gather these items to get started: - 4 tablespoons all-purpose flour - 4 tablespoons granulated sugar - 2 tablespoons unsweetened cocoa powder - 1/8 teaspoon baking powder - A pinch of salt - 3 tablespoons milk (use non-dairy milk for a vegan option) - 2 tablespoons vegetable oil (or substitute with melted butter for added richness) - 1/4 teaspoon vanilla extract - 2 tablespoons chocolate chips (optional, for an extra fudgy texture) These ingredients work together to create a rich and moist cake. All-purpose flour gives the structure, while granulated sugar adds sweetness. Cocoa powder gives that deep chocolate flavor. Baking powder makes the cake rise, and a pinch of salt balances the sweetness. Milk and oil keep the cake moist and tender. Vanilla extract adds a warm note, while chocolate chips make it extra special. You can skip the chips, but they add a gooey texture that many love. Using these simple ingredients, you can whip up a delicious mug cake in just a few minutes. Enjoy the ease of making a chocolaty treat anytime you crave something sweet! {{ingredient_image_2}} 1. Combine dry ingredients in a mug: Start with a large microwave-safe mug. Add 4 tablespoons of all-purpose flour, 4 tablespoons of granulated sugar, 2 tablespoons of unsweetened cocoa powder, 1/8 teaspoon of baking powder, and a pinch of salt. Use a fork to mix these dry ingredients well. Make sure there are no lumps. 2. Mix in wet ingredients until smooth: Pour in 3 tablespoons of milk, 2 tablespoons of vegetable oil, and 1/4 teaspoon of vanilla extract. Use the fork again to mix until the batter is smooth. Check for any dry pockets at the bottom. 3. Fold in chocolate chips (if using): If you want extra fudginess, add 2 tablespoons of chocolate chips to the batter. Gently fold them in to spread the chocolate evenly. 1. Microwave cooking time and tips: Place the mug in the microwave. Cook on high for about 1 minute and 30 seconds. Keep an eye on it as cooking times vary with microwaves. 2. Signs that the cake is done cooking: The cake is ready when it has risen and is set in the center. It should be moist but not wet. Be careful not to overcook it, as that can make the cake dry. - Use the right size of mug: Choose a large mug. A 12-ounce mug works well. It gives the cake room to rise without spilling over. - Avoid overmixing the batter: Mix until just combined. Overmixing can make the cake tough. A few lumps are okay. - Keep an eye on cooking time: Microwaves vary in power. Start with 1 minute and 30 seconds. If it needs more time, add 10 seconds. Check often to avoid overcooking. - Topping ideas: Top your mug cake with whipped cream for lightness. Ice cream adds creaminess. A drizzle of chocolate sauce makes it extra rich. - Presentation tips for serving: Serve in the mug for a cozy feel. For a fancier look, transfer to a plate. Sprinkle cocoa powder or chocolate shavings on top. This adds a nice touch. Pro Tips Use the Right Mug: Make sure to choose a large microwave-safe mug to prevent overflowing as the cake rises during cooking. Mix Thoroughly: Ensure you mix the batter well to avoid any dry pockets of flour or cocoa, which can lead to an uneven texture. Watch Cooking Time: Microwaves vary in power; start with 1 minute and 30 seconds, but check frequently to avoid overcooking. Add Toppings: Enhance your mug cake with a scoop of whipped cream, ice cream, or a drizzle of chocolate sauce for extra indulgence! {{image_4}} You can easily change the flavor of your chocolate fudge mug cake. Here are some fun ideas: - Add nuts or fruit: Chopped nuts like walnuts or pecans can add a nice crunch. Fresh fruit, such as raspberries or bananas, can bring a burst of flavor. - Experiment with different extracts: Instead of vanilla, try almond or mint extract. A few drops can change the whole taste. If you follow special diets, you can still enjoy this mug cake. - Vegan alternative options: Use non-dairy milk instead of regular milk. You can also swap vegetable oil for melted coconut oil for a vegan treat. - Gluten-free ingredient substitutions: Substitute all-purpose flour with almond flour or a gluten-free blend. This makes the cake safe for those with gluten allergies. Feel free to mix and match these ideas to create your perfect mug cake! Can you store a mug cake? Yes, you can store a mug cake. After it cools, place it in an airtight container. This helps keep it fresh. Mug cakes taste best when eaten right away. But if you have leftovers, storing them is fine. Best practices for refrigeration To store your mug cake, wrap it tightly in plastic wrap. You can also use a small container with a lid. Then, put it in the fridge. It will stay fresh for up to two days. Keep in mind that the texture may change. Refrigeration can make it a bit denser. How to warm up the mug cake for optimal texture To reheat your mug cake, use the microwave. Place it back in the microwave for about 10 to 15 seconds. Check if it's warm enough. If not, heat it for a few more seconds. Avoid overheating it. This can dry out the cake. Enjoy your warm, fudgy treat! Yes, you can bake this cake in an oven. Preheat your oven to 350°F (175°C). Pour the batter into a small oven-safe dish. Bake for about 15 minutes, or until it is set in the middle. Check with a toothpick; it should come out clean. This method gives a different texture, but it’s delicious too! This mug cake is best enjoyed right after you cook it. If you have leftovers, cover it well and keep it in the fridge. It stays fresh for about one day. The texture may change after a day, becoming a bit dry. Reheat it in the microwave for a few seconds before eating. Yes, you can double the recipe! Use a larger mug or bowl to hold the extra batter. If you double the ingredients, adjust the cooking time. Start with two minutes in the microwave. Check for doneness as you cook. Enjoy your bigger portion! In this post, I covered how to make a simple mug cake. We went through the key ingredients and step-by-step instructions. I shared tips for baking, serving, and even variations to suit your taste. Remember to use the right-sized mug and avoid overmixing. This treats simple and fun and can fit your diet needs. Enjoy your mug cake creation and share it with friends for a sweet treat! Happy baking!

Chocolate Fudge Mug Cake Quick and Easy Recipe

Craving something sweet but short on time? You’ve come to the right place! This quick and easy Chocolate Fudge Mug

- 1 cup orzo pasta - 3 cups vegetable broth - 2 tablespoons extra virgin olive oil - 4 cloves garlic, finely minced - 1 small onion, finely diced - 1 cup heavy cream - 1 cup freshly grated Parmesan cheese - 1 teaspoon Italian seasoning blend - Salt and freshly ground black pepper, to taste - Fresh parsley, finely chopped, for garnish Here are some easy conversions: - 1 cup orzo = 200 grams - 3 cups vegetable broth = 720 milliliters - 2 tablespoons olive oil = 30 milliliters - 1 cup heavy cream = 240 milliliters - 1 cup Parmesan cheese = 100 grams You can add some fun twists to this dish: - Spinach for a fresh green touch - Cooked chicken for extra protein - Sun-dried tomatoes for a tangy flavor - A pinch of red pepper flakes for a kick - Fresh herbs like basil or thyme for added aroma These options let you make this dish your own. Enjoy crafting your creamy garlic Parmesan orzo! {{ingredient_image_2}} Start by heating 3 cups of vegetable broth in a medium saucepan. Bring it to a gentle simmer over medium heat. Once it's simmering, add 1 cup of orzo pasta. Cook the orzo according to the package instructions, which usually takes about 8-10 minutes. You want it to be al dente. When the orzo is ready, drain it and set it aside. In a large skillet, pour in 2 tablespoons of extra virgin olive oil. Heat it over medium heat. Once hot, add 1 small diced onion. Sauté the onion for about 2-3 minutes until it looks soft and translucent. Next, add 4 cloves of finely minced garlic to the skillet. Cook for another 1-2 minutes, stirring often. This prevents the garlic from burning and helps release its rich aroma. Now it’s time to make the creamy sauce. Carefully pour in 1 cup of heavy cream while stirring to blend it with the onion and garlic. Bring this mixture to a gentle simmer. Let it cook for around 5 minutes until the sauce thickens slightly. Gradually add in 1 cup of freshly grated Parmesan cheese and 1 teaspoon of Italian seasoning. Mix well until the cheese melts smoothly into the sauce. Finally, stir in the drained orzo, ensuring each piece is coated in the creamy sauce. Season this dish with salt and freshly ground black pepper to taste. Let it sit for a couple of minutes off the heat to allow the flavors to meld nicely. For a touch of color, sprinkle finely chopped fresh parsley on top before serving. To get that dreamy creamy texture, focus on the heavy cream. Use fresh heavy cream, as it blends better. When you add it to the skillet, let it simmer slowly. This helps it thicken nicely. Stir constantly to prevent it from sticking to the pan. The Parmesan cheese also plays a big role. Make sure to use freshly grated cheese for the best melt. It gives you a rich, smooth sauce that coats the orzo perfectly. If you want a dairy-free option, swap heavy cream with coconut milk or a nut milk. Use a dairy-free cheese to keep the flavor rich yet light. You can also use vegetable broth that is low-sodium to cut back on salt. For a lighter dish, consider using half-and-half instead of heavy cream. These swaps keep the dish creamy while catering to different diets. This creamy garlic parmesan orzo shines on its own. Serve it in shallow bowls, showing off that lovely sauce. You can add a sprinkle of extra Parmesan on top for flair. Fresh parsley adds a nice touch too. For a complete meal, pair it with a simple green salad. The crunch of the salad balances the creaminess. For extra protein, grilled chicken or shrimp complements the dish well. Pro Tips Use Fresh Garlic: Freshly minced garlic provides a stronger and more vibrant flavor compared to pre-minced alternatives. Always opt for fresh for the best taste! Stir Constantly: When adding the heavy cream, stir continuously to prevent it from curdling and to ensure a smooth, creamy sauce. Adjust Consistency: If the sauce becomes too thick, feel free to add a splash of vegetable broth or water to reach your desired consistency. Garnish Generously: A generous sprinkle of fresh parsley not only adds color but also enhances the overall flavor profile of this dish. {{image_4}} You can make creamy garlic Parmesan orzo even better by adding veggies. Spinach is a great choice. It wilts down nicely and adds color. Just toss it in during the last few minutes of cooking. Mushrooms also work well. Sauté them with the onion for extra flavor. You can try zucchini or peas, too. They add sweetness and crunch. Feel free to experiment with your favorite veggies! Adding protein turns this dish into a full meal. Grilled chicken is a popular choice. Cut it into bite-sized pieces and mix it in. Shrimp is another delicious option. Cook it separately and add it right before serving. For a vegetarian option, consider white beans or chickpeas. They pack in protein and keep it hearty. These additions make each bite satisfying and tasty! You can spice things up with flavor enhancements. If you like heat, add red pepper flakes while cooking the garlic. This gives it a nice kick! Fresh herbs like basil or thyme can elevate the dish, too. Stir in chopped herbs at the end for brightness. You can also switch the Italian seasoning for a Cajun blend for a fun twist. Each variation adds a new layer of taste to your creamy orzo! Store your creamy garlic Parmesan orzo in an airtight container. Let the dish cool to room temperature before sealing it. It’s best to use glass or plastic containers with tight-fitting lids. This way, the orzo stays fresh and delicious. Leftovers will keep well in the fridge for up to three days. To reheat, place the orzo in a skillet over medium heat. Add a splash of vegetable broth or cream to keep it creamy. Stir often to heat evenly. You can also microwave it in short bursts. Use a microwave-safe dish and cover it to avoid drying out. Heat until warm, stirring occasionally. You can freeze creamy garlic Parmesan orzo, but it may change the texture slightly. First, cool the orzo and portion it into freezer bags or containers. Be sure to remove excess air to prevent freezer burn. Label and date your containers. It’s best to use frozen orzo within three months. To reheat, thaw in the fridge overnight and then follow the reheating instructions. Orzo is a type of pasta that looks like rice. It is made from wheat and is often used in soups, salads, or as a side dish. You can cook orzo like regular pasta. It absorbs flavors well, making it great for creamy dishes like this one. Yes, you can make creamy garlic Parmesan orzo ahead of time. Cook the orzo and sauce, then store them separately. When you are ready to eat, just mix them together and heat. This helps keep the orzo firm and prevents it from becoming mushy. If your sauce is too runny, you can thicken it easily. One way is to add more cheese. Gradually stir in extra Parmesan until it thickens. Another method is to simmer the sauce longer. This reduces excess liquid and makes it creamy. Always stir while cooking to avoid burning. This blog post covered orzo, from ingredients to storage tips. We explored measurements, optional ingredients, and step-by-step cooking methods. You learned tips for a creamy texture and variations like adding veggies or protein. Storing leftovers and reheating made easy was also discussed. Remember, making orzo can be fun and adaptable. You can always tweak the recipe to fit your taste. Enjoy cooking and experimenting with new flavors!

Creamy Garlic Parmesan Orzo Flavorful and Simple Dish

Welcome to the delicious world of Creamy Garlic Parmesan Orzo! This flavorful and simple dish is perfect for busy weeknights

- 14 oz firm tofu, pressed and cubed - 1 bell pepper (red or yellow), sliced into thin strips - 1 cup broccoli florets, cut into bite-sized pieces - 1/4 cup low-sodium soy sauce - 2 tablespoons pure maple syrup - 1 tablespoon rice vinegar - 1 tablespoon sesame seeds - 3 green onions, sliced diagonally This Teriyaki Tofu Stir Fry is a blend of textures and tastes. Firm tofu gives you protein and a great base. I love using fresh bell peppers for their sweet crunch. Broccoli adds a nice green color and healthy nutrients. The sauce combines low-sodium soy sauce, maple syrup, and rice vinegar. This mix balances salty, sweet, and tangy flavors. Each ingredient brings its own flair to the dish. Don’t forget the garnishes! Sesame seeds and sliced green onions add a pop of flavor and brightness. They make your dish look beautiful and taste even better. When you gather these ingredients, you set the stage for a quick and tasty meal. Each part plays an important role in this lovely stir fry. Enjoy picking out your ingredients! {{ingredient_image_2}} How do I press tofu? To press tofu, wrap it in a clean kitchen towel. Place a heavy object on it. Let it sit for 15 to 20 minutes. This helps to remove extra moisture. What’s next after pressing? After pressing, cut the tofu into bite-sized cubes. Place the cubes in a bowl. Sprinkle 2 tablespoons of cornstarch over them. Toss gently to coat each cube evenly. This coating helps the tofu crisp up nicely. How do I cook the tofu? Heat 2 tablespoons of vegetable oil in a skillet over medium-high heat. Once hot, add the cornstarch-coated tofu cubes. Cook for about 5 to 7 minutes. Flip the cubes occasionally until they get crispy and golden on all sides. Once cooked, transfer the tofu to a plate. What vegetables do I add? In the same skillet, add sliced bell pepper, broccoli florets, snap peas, and sliced green onions. Don’t forget to add minced garlic and grated ginger. Stir-fry these for 3 to 4 minutes. They should be bright and tender but still crisp. How do I make the sauce? In a small bowl, whisk together 1/4 cup of low-sodium soy sauce, 2 tablespoons of pure maple syrup, 1 tablespoon of rice vinegar, and 1 teaspoon of sesame oil. This mix brings all the flavors together. When do I add the sauce? Pour the sauce over the sautéed vegetables in the skillet. Stir well to coat everything evenly. What do I do with the tofu? Return the crispy tofu to the skillet. Gently toss everything together. Heat for another 2 to 3 minutes. This allows the tofu and vegetables to soak in the sauce. How do I finish the dish? Remove the skillet from heat and sprinkle sesame seeds on top for garnish. Your Teriyaki Tofu Stir Fry is now ready to serve! Pressing tofu is key for great texture. When you press tofu, you remove extra water. This helps it absorb flavors better. Wrap your tofu in a clean towel. Place something heavy on top. A cast iron pan works well. Let it sit for 15-20 minutes. This step is worth the wait. To achieve crispy tofu, coat it with cornstarch. After pressing, cut your tofu into cubes. Then, toss the cubes in a bowl with cornstarch. Make sure every piece is evenly coated. This will give a nice crunch when you fry it. For the best vegetable texture, cut them evenly. This helps them cook at the same rate. Use a hot skillet to maintain crispness. Add your veggies in stages. Start with the ones that take longer to cook, like broccoli. Then, add quicker-cooking ones, like snap peas. To keep colors bright, avoid overcooking. Stir-fry for just a few minutes. This helps maintain vibrant greens and other colors. Lastly, add garlic and ginger later in the cooking process. This way, you keep their flavors fresh and strong. Pair your stir-fry with rice or noodles. Both options soak up the teriyaki sauce well. A warm bowl of fluffy rice is comforting. Noodles add a nice chew. Choose what you love! For extra garnishes, sprinkle sesame seeds on top. They add crunch and look pretty. Consider adding sliced green onions for a fresh touch. A squeeze of lime can also brighten the dish. Don’t be afraid to get creative with your toppings! Pro Tips Press Tofu Thoroughly: Make sure to press the tofu long enough to remove excess moisture, as this will help it achieve a crispy texture when cooked. Use High Heat: When sautéing the tofu, ensure your skillet is hot enough to sear the tofu quickly, creating a crispy exterior while keeping the inside tender. Customize Your Veggies: Feel free to swap in your favorite vegetables or whatever is in season to add variety and freshness to the dish. Adjust the Sauce: Taste the sauce before adding it to the stir-fry; you can easily adjust the sweetness or saltiness by adding more maple syrup or soy sauce to suit your preference. {{image_4}} If you want a twist, try using tempeh instead of tofu. Tempeh has a firmer texture and a nutty flavor. It packs more protein, making it great for a filling meal. To prepare, cut the tempeh into cubes just like the tofu. You can follow the same steps to coat and cook it. The tempeh will soak up the teriyaki sauce nicely, giving you a tasty dish. While bell peppers are great, you can switch them out for other veggies. Carrots, zucchini, or even mushrooms work well. Each adds its own unique flavor. You can also pick seasonal vegetables. In spring, try asparagus or snap peas. In fall, use squash or Brussels sprouts. These changes keep your stir fry fresh and exciting. For a healthier option, look for low-sodium soy sauce. It cuts down on salt but keeps the flavor strong. You can also add a kick to your sauce. Try adding red pepper flakes or sriracha for heat. If you love sweet, mix in a splash of pineapple juice. This adds a fruity twist that pairs well with the teriyaki flavor. To keep your Teriyaki Tofu Stir Fry fresh, store it in an airtight container. This helps maintain flavor and texture. Place the container in the fridge. The dish lasts about 3 to 5 days when stored properly. Make sure it cools before sealing to avoid excess moisture. To reheat, use the microwave or a skillet. For the microwave, heat in 30-second bursts, stirring in between. This helps heat evenly. If you're using a skillet, add a splash of water to prevent drying. Heat over medium-low until warm, stirring often. Always cover it to lock in moisture and flavor. You can freeze the stir fry, but tofu has a different texture when thawed. Freeze in a container or zip-top bag. It lasts about 2 to 3 months. To thaw, place it in the fridge overnight. For reheating, use a skillet over medium heat. Add a bit of water to keep it moist and delicious. To press tofu, start with firm tofu. Wrap the tofu block in a clean kitchen towel. Place a heavy object on top, like a skillet or cans. Let it sit for 15-20 minutes. This removes extra moisture and helps the tofu absorb flavors. The result is tofu that gets crispy and tasty when cooked. Yes, you can! If you want to skip soy sauce, try tamari or coconut aminos. Both options give a similar taste. You can also mix miso paste with water for a different flavor. Each choice adds a unique twist to your dish while keeping it savory and delicious. Your Teriyaki Tofu Stir Fry will last about 3-4 days in the fridge. Store it in an airtight container to keep it fresh. Before eating, reheat it in a pan or microwave until warm. This keeps the flavors alive and makes it just as tasty as when you first cooked it. In this blog post, we explored making Teriyaki Tofu Stir Fry. We covered key ingredients like firm tofu, broccoli, and bell pepper. I shared how to prepare and cook everything, plus helpful tips for great results. We also discussed tasty variations and storage info. Now, grab your ingredients and try this dish! You’ll enjoy a delicious, healthy meal. Cooking can be fun, and with these simple steps, you’ll impress everyone at your table.

Teriyaki Tofu Stir Fry Flavorful and Easy Meal Option

Are you ready to whip up a healthy, tasty dish? Teriyaki Tofu Stir Fry is simple and bursting with flavor!

- 4 large ripe tomatoes - 1 cup fresh mozzarella balls or diced mozzarella cheese - 1/2 cup fresh basil pesto - 1/4 cup grated Parmesan cheese - 1/4 teaspoon salt - 1/4 teaspoon black pepper - 1 tablespoon balsamic glaze (optional) - Fresh basil leaves for garnish For Pesto Mozzarella Stuffed Tomatoes, you need fresh, quality ingredients. Start with ripe tomatoes. They should feel firm but slightly soft. This means they are juicy and ready. Next, choose creamy mozzarella. I like the small balls, but diced cheese works too. Fresh basil pesto is key. It adds rich flavor and a nice green color. The Parmesan cheese gives a salty kick. Salt and black pepper bring out all the tastes. You can drizzle balsamic glaze on top for sweetness. Lastly, fresh basil leaves add a pop of color and taste. Gather all these ingredients before you start. Having everything ready makes cooking easier and more fun! {{ingredient_image_2}} Set your oven to 375°F (190°C). This step is key. A hot oven helps to cook the tomatoes evenly. Slice off the tops of the tomatoes. Use a spoon to scoop out the insides. Be careful not to break the walls. You want your tomatoes to hold their shape. Save the scooped-out flesh for sauces or soups later. In a bowl, combine the fresh mozzarella, basil pesto, grated Parmesan, salt, and black pepper. Mix well until all the ingredients blend nicely. This filling will bring great flavor to your dish. Take the filling and spoon it into each hollowed tomato. Push it down gently to pack it in. Make sure to fill them generously for maximum taste and excitement in every bite. Place the stuffed tomatoes upright in a baking dish. If they wobble, trim their bottoms carefully. Then, bake them for 20 to 25 minutes. The cheese should melt and the tomatoes will soften just a bit. Enjoy the delicious aromas that fill your kitchen! To help your tomatoes stand tall, trim the bottoms. Use a sharp knife to slice off a small piece of the base. This keeps them steady during baking. Make sure to cut just enough, so they still hold their shape. A flat base helps them not tip over. You can make these tomatoes even tastier! Try adding a pinch of garlic powder or red pepper flakes to the filling. Fresh herbs like thyme or oregano work great too. For a touch of sweetness, sprinkle some sugar into the mix. You can also top them with breadcrumbs for a crunchy finish. Serve your stuffed tomatoes on a colorful platter. Drizzle balsamic glaze around the plate for a gorgeous look. Place fresh basil leaves around the tomatoes for a pop of green. This not only makes your dish pretty but also adds extra flavor. Enjoy the beauty as much as the taste! Pro Tips Tomato Selection: Choose large, ripe tomatoes for the best flavor and texture. Look for tomatoes that are firm but slightly soft to the touch, indicating ripeness. Customizable Filling: Feel free to add other ingredients to the filling, such as chopped sun-dried tomatoes, olives, or even cooked sausage for extra flavor and protein. Cheese Variations: Experiment with different types of cheese, like goat cheese or feta, for a unique taste profile. Mix and match to find your favorite combination! Serving Suggestions: Pair these stuffed tomatoes with a light salad or crusty bread to create a complete meal. They also make a great appetizer for gatherings! {{image_4}} You can make this dish even more fun by using other veggies. Try using zucchini or bell peppers instead of tomatoes. They both have thick walls, so they hold the filling well. Slice the zucchini in half lengthwise. For bell peppers, cut off the tops and scoop out the seeds. This way, you can enjoy a fresh taste while keeping the filling intact. If you want to change the flavor, explore other cheese options. Feta or goat cheese adds a nice twist. Feta gives a salty punch, while goat cheese offers a creamier texture. You can mix these cheeses with the mozzarella for a unique taste. Just remember to keep the ratios balanced to maintain a good melt. Want to spice things up? Just add red pepper flakes to the filling. A quarter teaspoon can add a nice heat without overpowering the dish. If you love spice, feel free to add more. This small change can turn a mild dish into something exciting. You can also serve it with a side of hot sauce for those who crave extra heat. To store leftovers in the fridge, let the stuffed tomatoes cool. Place them in an airtight container. You can keep them for up to three days. Make sure to separate layers with parchment paper to prevent sticking. Can you freeze stuffed tomatoes? Yes, you can! However, I recommend freezing them before baking. Wrap each tomato tightly in plastic wrap. Then, place them in a freezer-safe bag. They can last up to three months in the freezer. To reheat without losing flavor, preheat your oven to 350°F (175°C). Place the tomatoes in a baking dish. Cover them with foil to keep moisture in. Bake for about 15-20 minutes or until heated through. This keeps the cheese melty and the tomatoes juicy. You can use canned tomatoes, but fresh is best. Canned tomatoes may have more liquid. This can make the filling too watery. If you choose canned, drain them well. You can also use them for sauces later. Leftovers last about three days in the fridge. Store them in an airtight container. Make sure they are cool before sealing. Always check for any signs of spoilage before eating. Yes, you can prepare stuffed tomatoes in advance. Stuff them a day ahead and cover them. Store in the fridge until you are ready to bake. This helps the flavors meld together. Just add a few extra minutes to the bake time. Stuffed tomatoes are simple and fun to make. We covered the ingredients, step-by-step instructions, and tips to enhance your dish. You can try different veggies or cheeses for variety. Don’t forget to store leftovers properly so they stay fresh. Enjoy creating your own stuffed tomatoes that not only taste great but also look beautiful. Happy cooking, and let your creativity shine in the kitchen!

Pesto Mozzarella Stuffed Tomatoes Fresh and Tasty Dish

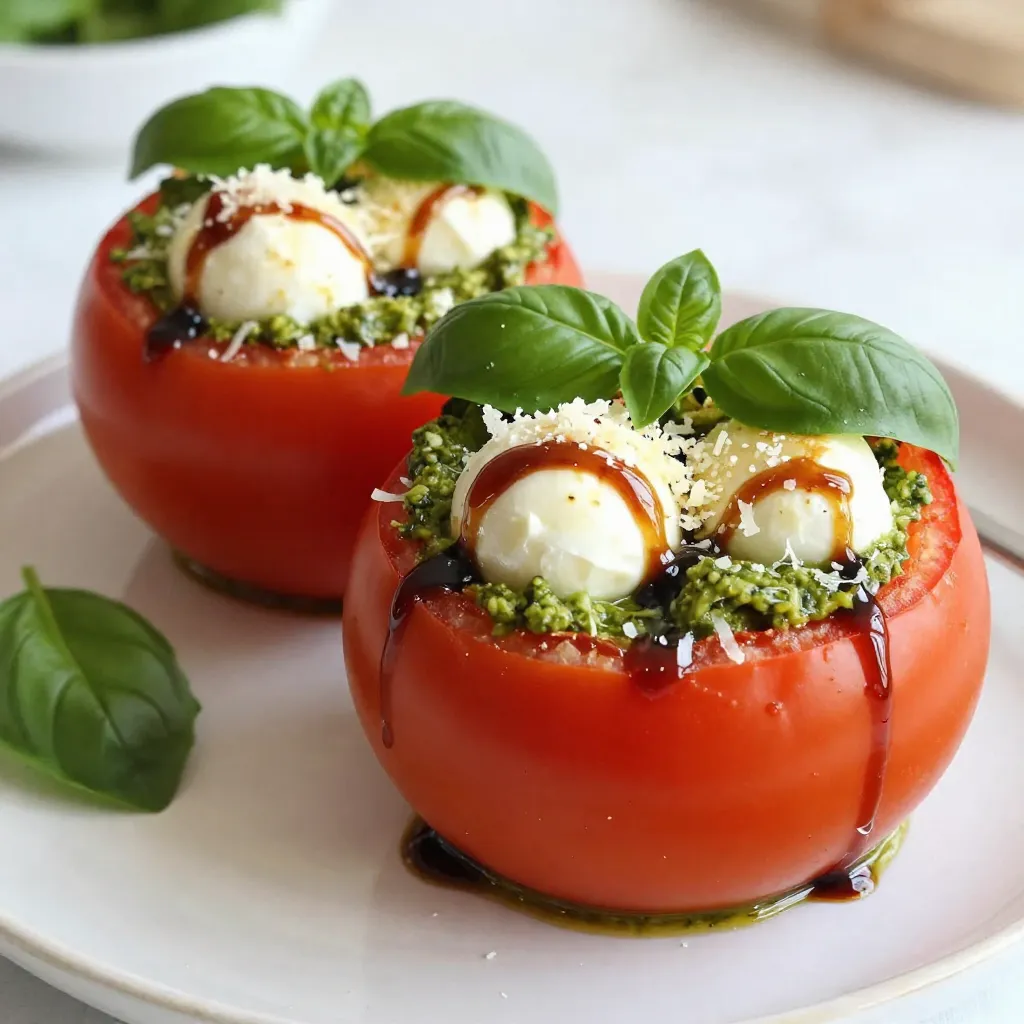
Imagine biting into a juicy tomato filled with creamy mozzarella and fresh pesto. That’s exactly what you’ll get with my

- 1 lb baby carrots, peeled - 3 tablespoons honey - 2 tablespoons unsalted butter - 3 cloves garlic, finely minced - 1 tablespoon fresh thyme leaves (or 1 teaspoon dried thyme) - Salt and freshly ground black pepper to taste - 1 tablespoon freshly squeezed lemon juice These ingredients come together to create a tasty dish that shines on your table. The baby carrots bring a sweet crunch, while honey adds a rich flavor. Butter helps to make the sauce smooth and creamy. Garlic gives the dish a wonderful aroma, and thyme adds a hint of earthiness. A touch of lemon juice brightens everything up. Using fresh ingredients makes a big difference. Fresh thyme has a unique taste that dried thyme cannot match. You can use either, but fresh is best. Always taste your dish as you cook. Adjust the salt and pepper to suit your taste. This way, you can make the dish just right for you and your family. {{ingredient_image_2}} - Bring water to a boil. - Cook carrots for 5-7 minutes. Start by filling a large pot with water. Bring it to a rolling boil. Carefully add the peeled baby carrots. You want them tender but not mushy. After 5-7 minutes, check the texture with a fork. Drain the carrots and set them aside to cool a bit. - Melt butter and sauté garlic. - Combine garlic with honey and thyme. Now, heat a large skillet over medium heat. Add unsalted butter. Let it melt completely. Once melted, add the finely minced garlic. Sauté for 1-2 minutes. Stir often to prevent burning. When the garlic turns golden and fragrant, pour in the honey. Add thyme next, stirring until bubbly and well mixed. - Toss cooked carrots in the honey-garlic mixture. - Season with salt and pepper and caramelize. Once your garlic mixture is ready, add the cooked carrots. Toss them gently to coat each carrot in the honey-garlic glaze. Season with salt and freshly ground black pepper to taste. Keep cooking for another 5-7 minutes. Stir occasionally until the carrots are shiny and caramelized. Finally, drizzle lemon juice over the carrots. This adds a bright touch to the dish. Give them a gentle toss to mix. Enjoy your sweet and savory honey garlic glazed carrots! To get the perfect glaze, cook your baby carrots for about 5-7 minutes. They should be tender but not mushy. The ideal skillet temperature is medium heat. This will help the butter melt and the garlic sauté without burning. You can adjust the sweetness by adding more or less honey. If you want a stronger flavor, add more garlic or thyme. For a different twist, try maple syrup instead of honey. You can also use dried thyme if fresh thyme is not available. For serving, place the warm glazed carrots on a nice platter or in a rustic bowl. To make it look pretty, garnish with fresh thyme sprigs. This adds color and enhances the dish's aroma, making it even more inviting. Pro Tips Tip Title: Choose Fresh Carrots: Opt for vibrant, firm baby carrots for the best flavor and texture. Fresh carrots will enhance the overall sweetness and crunch of the dish. Tip Title: Control the Heat: When sautéing the garlic, keep a close eye on the heat. If it gets too hot, the garlic can burn quickly, leading to a bitter taste in your glaze. Tip Title: Experiment with Herbs: While thyme is a classic choice, feel free to experiment with other fresh herbs like rosemary or parsley for a different flavor profile. Tip Title: Perfectly Glazed Carrots: For a thicker glaze, let the honey and butter mixture simmer a bit longer before adding the carrots. This will create a more intense flavor. {{image_4}} You can use regular carrots if you can't find baby ones. Just peel and cut them into sticks. They will still taste great with the honey glaze. Another idea is to roast the carrots instead of boiling them. Roasting gives a nice caramelized flavor. Just toss them in oil, salt, and pepper, then roast at 400°F for 20-25 minutes. Spice things up by adding cayenne or paprika to the honey mixture. This adds a nice kick without overpowering the dish. If you want some crunch, add nuts like chopped almonds or walnuts. They add extra texture and flavor. For a vegan version, swap the butter with coconut oil or vegan butter. This keeps the dish plant-based and just as tasty. If you need a gluten-free option, this recipe is already gluten-free! Just double-check that your honey is pure and free of any additives. To keep your honey garlic glazed carrots fresh, store them in the fridge. Place the carrots in an airtight container. This helps keep their flavor and texture intact. They can last up to four days in the fridge. If you plan to eat them later, this method works well. You can reheat glazed carrots in a few ways. The best method is using a skillet. Just add a little water and heat on low. Stir gently until warmed through. This keeps them moist and tasty. You can also use the microwave. Heat them in a bowl for about one to two minutes. Make sure to cover the bowl. The best temperature to aim for is hot but not boiling. Enjoy your carrots again, just like fresh! Yes, you can prepare honey garlic glazed carrots ahead of time. Cook the carrots and glaze them. Let them cool, then store in the fridge. When ready to serve, reheat them in a skillet over low heat. This method keeps them tasty and fresh. You will know the carrots are done when they are tender but still firm. A fork should easily pierce them, but they should not be mushy. Aim for a bright orange color, which shows they are cooked well without losing nutrients. These carrots pair well with many dishes. Serve them alongside roasted chicken or grilled fish. They also go great with rice or quinoa. For a vegetarian option, try them with a hearty grain salad. Their sweet and savory flavor complements many meals. You can use frozen carrots, but the texture will change. Frozen carrots often become softer when cooked. If you use them, reduce the boiling time. Sauté them longer in the glaze to ensure they absorb flavor. The dish will still taste good, but fresh carrots are best. This blog post explored a delicious recipe for honey garlic glazed carrots. We covered the ingredients, step-by-step instructions, and tips for perfect results. You learned about variations to suit your taste and dietary needs, as well as storage and reheating advice. Remember, experimenting with flavors and techniques can lead to new favorite dishes. Enjoy making this simple yet tasty recipe! Your meals can shine with just a few key ingredients. Try it out and see how easy it is to impress everyone at the table.

Honey Garlic Glazed Carrots Simple and Tasty Recipe

Looking for a simple and tasty side dish? Honey garlic glazed carrots are your answer! In just a few steps,

- 1 pound large shrimp, peeled and deveined - 3 cloves garlic, minced - 1/4 cup fresh lemon juice (about 2 lemons) - Zest of 1 lemon - 1/4 cup extra-virgin olive oil - 1 teaspoon smoked paprika - 1/2 teaspoon red pepper flakes - Sea salt and freshly cracked black pepper to taste - Fresh parsley and lemon wedges for garnish When making Lemon Garlic Grilled Shrimp, each ingredient plays a key role. The large shrimp provide a firm texture, while the garlic gives a strong, savory kick. Fresh lemon juice brings bright acidity, enhancing the shrimp's natural flavors. The lemon zest adds a fragrant layer that lifts the dish. Extra-virgin olive oil keeps the shrimp moist and adds richness. Smoked paprika adds a subtle smokiness, perfect for grilling. The red pepper flakes give a hint of heat, which you can adjust based on your taste. Finally, sea salt and black pepper enhance all these flavors. Fresh parsley not only adds color but also freshness. Lemon wedges are perfect for squeezing just before eating, giving an extra zesty punch. Gather these ingredients, and you are ready to create a delicious meal that impresses! {{ingredient_image_2}} Start by gathering your ingredients. In a medium mixing bowl, combine: - 3 cloves garlic, minced - 1/4 cup fresh lemon juice (about 2 lemons) - Zest of 1 lemon - 1/4 cup extra-virgin olive oil - 1 teaspoon smoked paprika - 1/2 teaspoon red pepper flakes Next, season the mixture with sea salt and freshly cracked black pepper. Whisk everything together until it blends well. This simple marinade packs a lot of flavor. Now it’s time for the shrimp. Add 1 pound of peeled and deveined shrimp into the marinade. Make sure every piece is coated well. This step is key for flavor. After coating, cover your bowl tightly with plastic wrap. Place it in the refrigerator for at least 30 minutes. If you want more flavor, let it sit for up to 2 hours. This extra time helps the shrimp absorb the zesty marinade. Before grilling, preheat your grill to medium-high heat. Aim for a temperature of about 375°F to 400°F. If you use wooden skewers, soak them in water for about 30 minutes. This helps stop them from burning. Next, carefully thread the marinated shrimp onto the skewers. If you use metal skewers, you can skip the soaking. Make sure the shrimp are evenly spaced. This will help them cook evenly. Place the skewers on the preheated grill. Grill the shrimp for about 2 to 3 minutes on each side. You will know they are done when they turn pink and opaque. Be careful not to overcook them. Overcooked shrimp can become tough and rubbery, ruining your dish. Once cooked, transfer the skewers to a serving plate. Let them rest for a minute. This short wait allows the juices to settle. Garnish with freshly chopped parsley and serve with lemon wedges for a zesty kick. Enjoy your tasty Lemon Garlic Grilled Shrimp! How long should you marinate shrimp for best flavor? I recommend marinating shrimp for at least 30 minutes. If you have time, you can let them soak for up to 2 hours. This longer time will give you a richer taste. Do you want to adjust spice levels? You can add more or less red pepper flakes. Start with 1/2 teaspoon for mild heat. Add more if you like it spicy! How can you prevent shrimp from sticking? Make sure your grill is hot enough before you add the shrimp. You can also brush the grill with oil before grilling. This helps the shrimp slide off easily. How do you check shrimp doneness without overcooking? Look for the color change. When shrimp turn pink and opaque, they are done. This usually takes about 2-3 minutes on each side. Be careful not to leave them on too long! What are some presentation ideas for serving? You can arrange the shrimp skewers on a nice platter. Add lemon wedges around the shrimp for color. A sprinkle of chopped parsley adds a vibrant touch. What side dishes should you serve with grilled shrimp? Try grilled vegetables or a fresh salad. These complement the dish well and add more flavor to your meal! Pro Tips Marinating Time: For the best flavor, let the shrimp marinate for at least 1 hour. This allows the garlic and lemon to penetrate the shrimp, enhancing the overall taste. Grilling Temperature: Ensure your grill is preheated to medium-high heat. This helps achieve a nice sear on the shrimp without overcooking them. Don’t Overcook: Keep a close eye on the shrimp while grilling. They only need about 2-3 minutes per side. Once they turn pink and opaque, they’re done! Serving Suggestions: Serve the grilled shrimp with a side of fresh salad or grilled veggies. The freshness complements the zesty shrimp perfectly! {{image_4}} You can switch up the flavors in your Lemon Garlic Grilled Shrimp. Try using fresh herbs like basil, cilantro, or dill. Each herb brings a unique twist. You can also add spices like cumin or coriander for a warm touch. If you want to explore citrus, try lime or orange juice. They will give a different, bright taste. Grilling is fun, but broiling works too. Broiling shrimp cooks them from above, giving them a nice char. If you don’t have a grill, you can bake the shrimp in the oven. Just set it to 400°F and place your shrimp on a baking sheet. Bake for about 8-10 minutes, or until they are pink and opaque. If you want to change things up, you can use other seafood. Scallops or fish like salmon work well with lemon and garlic. For a protein option, try chicken or pork. They can soak up the marinade just like shrimp. If you prefer vegetarian choices, consider using firm tofu or mushrooms. They can mimic the flavors of shrimp with the right seasoning. To keep your grilled shrimp fresh, refrigerate them right away. Place them in an airtight container. This helps prevent moisture loss and keeps them safe to eat. Make sure to let the shrimp cool down before sealing them up. You can freeze grilled shrimp for future meals. Just place them in a freezer-safe bag. Remove as much air as possible before sealing. This keeps them tasty for a long time. When you're ready to enjoy them, thaw shrimp in the fridge overnight. To reheat, place them in a skillet over low heat. This keeps the shrimp tender and avoids rubbery texture. Grilled shrimp can last in the fridge for up to three days. Always check for signs of spoilage. If they smell off or have a slimy feel, it's best to toss them. Fresh shrimp should smell like the ocean, not fishy. Yes, you can use frozen shrimp. Just make sure to thaw them first. Place the shrimp in the fridge overnight or submerge them in cold water for about 30 minutes. Once thawed, peel and devein them if needed. Frozen shrimp can taste great too, especially when marinated well. Lemon Garlic Grilled Shrimp pairs well with many sides. Here are some ideas: - Grilled vegetables, like zucchini and bell peppers - A fresh green salad with vinaigrette - Rice or quinoa for a filling option - Garlic bread for a tasty crunch - Pasta with light sauce to soak up the flavors To avoid overcooking shrimp, pay attention to their color. Cook them for just 2-3 minutes on each side. They should turn pink and opaque. If you see they curl up tightly, they are likely overcooked. Keep a close eye on them and remove them from the grill as soon as they are done. In this article, we explored how to make delicious Lemon Garlic Grilled Shrimp. We covered the key ingredients, from fresh shrimp to bold seasonings. I shared detailed steps for marinating and grilling to ensure perfect flavor and texture. You can even adjust spices and use various cooking methods. Finally, I offered tips for storage and serving that keep your shrimp tasty. With these strategies, you can enjoy a flavorful meal that’s easy to prepare and share. Happy cooking!

Lemon Garlic Grilled Shrimp Flavorful and Easy Recipe

If you’re looking for a quick and tasty meal, Lemon Garlic Grilled Shrimp is a winner! This dish bursts with

To make Lemon Blueberry Overnight French Toast, gather these ingredients: - 1 loaf of challah or brioche bread, cut into thick slices - 2 cups almond milk (or your preferred milk) - 4 large eggs - 1/2 cup Greek yogurt - 1/4 cup pure maple syrup - Zest of 2 lemons - 1 teaspoon pure vanilla extract - 1 teaspoon ground cinnamon - 1 1/2 cups fresh blueberries - Pinch of salt - Powdered sugar for dusting (optional) You can switch some ingredients if needed: - Use whole milk or oat milk instead of almond milk. - Swap Greek yogurt for regular yogurt or dairy-free yogurt. - If you don’t have maple syrup, honey or agave syrup works too. - Replace lemons with oranges for a different citrus flavor. - Any berries, like strawberries or raspberries, can replace blueberries. Choosing the right bread is key. Look for bread that is soft but sturdy. - Challah and brioche are great because they soak well. - Avoid bread that is too crusty, as it may not absorb the egg mix. - Day-old bread works well since it's drier and absorbs more flavor. - If you want whole grain, use a thick slice of whole wheat bread. Choosing the right bread makes this dish even better! {{ingredient_image_2}} To start, gather your ingredients in a large bowl. You’ll need almond milk, eggs, Greek yogurt, maple syrup, lemon zest, vanilla extract, ground cinnamon, and a pinch of salt. Whisk these together well. Make sure to mix until everything is smooth and blended. This mix is key for the flavor. The lemon zest adds a bright taste, while the cinnamon brings warmth. Now, take your challah or brioche bread and cut it into thick slices. Grease a 9x13-inch baking dish with butter or cooking spray. Arrange the bread in the dish, standing upright or slightly overlapping. This helps soak every slice evenly. Once the bread is arranged, gently pour the egg mixture over it. Use your hands to press down lightly on the bread. This helps it soak up all that yummy flavor. After this, sprinkle fresh blueberries on top. They will burst with juicy sweetness as it bakes. The next morning, preheat your oven to 350°F (175°C). Take the dish out of the fridge and let it sit for about 15 minutes. This helps the dish warm up a bit. Bake the French toast uncovered for 35-40 minutes. It is done when it puffs up and turns golden brown. Let it cool for a few minutes before serving. If you like, dust it with powdered sugar for a sweet touch. To get the best flavor and texture, soak the bread overnight. This lets the bread soak up all the yummy flavors. Use a mix of almond milk, eggs, yogurt, and spices. Make sure to whisk it well. This helps combine the flavors. Gently press on the bread after pouring the mix. This helps each slice absorb the liquid better. To avoid soggy bread, use thick slices of challah or brioche. Thick bread holds up well when soaked. Do not let the bread sit too long in the mix. If you soak it for too long, it can turn mushy. Aim for around 8 to 12 hours of soaking time. This balance gives you the right texture without sogginess. When adding blueberries, sprinkle them evenly over the bread. This helps every bite have that burst of flavor. Try to spread them out so they don’t clump together. You want some in every slice. For a fun twist, mix in some blueberries into the egg mixture too. This adds even more flavor and color to your dish. Pro Tips Use Stale Bread: For the best texture, use day-old bread or slightly stale challah or brioche. This allows the bread to absorb the egg mixture without becoming too mushy. Experiment with Milk: Feel free to substitute almond milk with any milk of your choice, such as oat, coconut, or whole milk, to suit your taste preferences. Customize the Fruit: While blueberries are delicious, you can also mix in other fruits such as raspberries, strawberries, or sliced bananas for added flavor and variety. Make Ahead: This dish is perfect for meal prep. Assemble it the night before and let it sit in the fridge overnight, making your morning routine much easier. {{image_4}} You can change the fruit in this dish based on the season. In summer, use strawberries or peaches. In fall, try apples or pears. Fresh fruit adds flavor and color. It also makes your dish more fun. Just chop the fruit and mix it in with the blueberries. You will get a bright and tasty twist! To make this dish dairy-free or vegan, swap the eggs and yogurt. Replace the eggs with 1/4 cup of flaxseed meal mixed with 3/4 cup of water. This mix works well to bind your French toast. Use coconut yogurt instead of Greek yogurt. For milk, almond milk is great, but you can use oat or soy milk too. These changes keep the dish tasty and soft. You can easily change the flavors in this recipe. Add a pinch of nutmeg for warmth. A dash of cardamom can add a unique twist. You can also use almond extract instead of vanilla. If you want a citrus kick, add more lemon zest. These small changes can make your dish exciting and new each time! To keep your leftover Lemon Blueberry Overnight French Toast fresh, place it in an airtight container. I recommend storing it in the fridge. This will help it stay tasty for up to three days. If you plan to eat it later, avoid adding any toppings like syrup or powdered sugar until you serve it. When you’re ready to enjoy your leftovers, you can reheat them easily. The best way is to use the oven. Preheat your oven to 350°F (175°C). Place the French toast on a baking sheet and cover it with foil. Heat for about 10-15 minutes. This will keep it warm and soft. You can also use a microwave. Just heat each slice for about 30 seconds or until warm. If you want to save some for later, freezing is a great option. Allow the French toast to cool completely. Wrap each slice tightly in plastic wrap, then place them in a freezer-safe bag. This way, they can last up to three months. When you’re ready to eat, thaw them in the fridge overnight. Then reheat as mentioned earlier for a quick breakfast treat. Yes, you can prepare this dish the night before. In fact, it tastes better after soaking. Just mix the ingredients and layer the bread. Cover the dish and place it in the fridge overnight. This way, the bread absorbs all the yummy flavors. You can simply bake it in the morning for a quick and easy breakfast. This French toast pairs well with many sides. Here are some tasty ideas: - Fresh fruit like strawberries or raspberries - A drizzle of pure maple syrup - A dollop of whipped cream or Greek yogurt - A sprinkle of nuts for crunch - A side of crispy bacon or sausage for protein These options add flavor and make your meal more filling. You can tell your French toast is ready when it looks puffed and golden brown. The edges should be crisp, and the center should feel firm. If you insert a knife in the middle, it should come out clean. If it’s too soft or runny, it needs more time. Baking it at 350°F for 35-40 minutes helps ensure even cooking. Enjoy your delicious creation! This blog post covered all you need to know for Lemon Blueberry Overnight French Toast. We discussed key ingredients and smart swaps. I shared step-by-step instructions for a perfect bake. You learned tips to avoid soggy bread and store leftovers well. Don't forget the fun variations to try. With these insights, you can impress at breakfast. Experiment with flavors and fruits as you like. Enjoy your cooking, and make it a tasty experience every time.

Lemon Blueberry Overnight French Toast Delightful Recipe

Are you ready to enjoy a breakfast that tastes like sunshine? My Lemon Blueberry Overnight French Toast is the perfect

Older posts
Page1 Page2 … Page85 Next →

dsad

© 2026 spoonfulsavory • Built with GeneratePress

Our Policies

  • Copyright Policy
  • Cookie Policy
  • GDPR Policy
  • Privacy Policy
  • Disclaimer
  • Terms Of Use

More Information

  • Home
  • About
  • Contact
  • Appetizers
  • Dessert
  • Dinner
  • Drinks
©2026, spoonfulsavory About Back To Top