Skip to content
DisclaimerTerms Of UseGDPR PolicyCookie Policy

spoonfulsavory

  • Home
  • Drinks
  • Appetizers
  • Dinner
  • Dessert
  • About
  • Contact
  • Privacy Policy
DisclaimerTerms Of UseGDPR PolicyCookie Policy

NO-ING-IMG

To make this cheesy taco pasta skillet, you will need: - 8 oz rotini pasta - 1 lb ground beef (or substitute with lean turkey) - 1 packet taco seasoning - 1 can (15 oz) diced tomatoes with green chilies - 1 cup beef broth (or vegetable broth for a vegetarian option) - 1 cup frozen corn - 1 cup shredded cheddar cheese - 1 cup shredded pepper jack cheese - 2 tablespoons olive oil - 1/2 cup red bell pepper, diced - 1/2 cup onion, diced - 2 cloves garlic, minced - 1/4 cup fresh cilantro, chopped (for garnish) - Salt and pepper to taste These simple ingredients come together for an easy meal. You can customize this dish to fit your taste. Some options include: - Sliced jalapeños for heat - Black beans for extra protein - Avocado for creaminess - Lime juice for brightness - Additional spices like cumin or paprika Feel free to mix and match these ingredients to create your perfect dish. This recipe serves 4-6 people. Here’s a rough breakdown of the nutrition per serving: - Calories: 470 - Protein: 30g - Carbohydrates: 42g - Fat: 24g - Fiber: 3g This meal offers a good balance of protein and carbs, making it filling and satisfying. {{ingredient_image_2}} Start by bringing a large pot of salted water to a boil. Add 8 oz of rotini pasta. Cook it for 7 to 8 minutes until it's al dente. Once done, drain the pasta and set it aside. In a large skillet, heat 2 tablespoons of olive oil over medium heat. Once hot, add 1/2 cup diced onion, 1/2 cup diced red bell pepper, and 2 cloves of minced garlic. Sauté everything for 3 to 4 minutes. Stir occasionally until the veggies are soft and fragrant. Next, add 1 lb of ground beef or turkey to the skillet. Use a wooden spoon to break it up. Cook for 5 to 7 minutes or until the meat is browned. Season with salt and pepper to taste. Stir in 1 packet of taco seasoning, 1 can of diced tomatoes (with juices), and 1 cup of beef broth. Let it simmer for about 3 minutes to blend the flavors. Then, add 1 cup of frozen corn and the drained pasta. Toss everything together and cook for 2 to 3 more minutes, ensuring it's heated through. Lower the heat to a gentle simmer. Sprinkle both 1 cup of shredded cheddar cheese and 1 cup of shredded pepper jack cheese over the pasta. Cover the skillet and let it sit for 2 to 3 minutes. This will help the cheese melt and bubble nicely. To cook pasta just right, always watch the clock. Follow the package time for al dente. This means the pasta should be firm when you bite it. After cooking, drain it and do not rinse. Rinsing washes away the starch that helps sauce stick. If you want to save time, cook the pasta while you prepare the other ingredients. This keeps everything moving smoothly. Taco seasoning is key to this dish’s flavor. If you want more spice, add a pinch of cayenne or chili powder. To balance heat, mix in a dash of sugar. Taste as you go. If it feels bland, add salt or pepper. Fresh herbs, like cilantro, boost the flavor too. Feel free to experiment until you find your perfect blend. To clean your skillet easily, soak it right after use. Fill it with warm soapy water and let it sit. This helps loosen food stuck to the pan. Use a soft sponge to scrub gently. Avoid steel wool; it can scratch the surface. For tough spots, sprinkle baking soda and scrub lightly. Rinse well and dry to keep it in great shape. Pro Tips Cook Pasta Al Dente: Ensure the rotini pasta is cooked al dente for the perfect texture that holds up against the sauce and doesn't become mushy. Use Lean Meat: Opt for lean ground turkey instead of beef to create a lighter version while still enjoying great flavor. Add Extra Veggies: Feel free to incorporate more vegetables like zucchini or spinach to boost nutrition and add more flavor to your dish. Experiment with Cheeses: Mix different cheese varieties, such as gouda or mozzarella, to customize the flavor profile to your liking. {{image_4}} To make a vegetarian version, swap the ground beef with black beans or lentils. Use vegetable broth instead of beef broth. You can also add extra veggies like zucchini or mushrooms. These will bring more flavor and texture to the dish. The taco seasoning still works great, adding that spicy kick. If you need a gluten-free option, choose gluten-free rotini pasta. Many brands offer tasty gluten-free pasta that cooks just like regular pasta. Ensure your taco seasoning is gluten-free as well. This way, you can enjoy all the cheesy goodness without worrying about gluten. Feel free to switch up the meat! Ground turkey or chicken can be good substitutes. For a smoky flavor, try using chorizo. When it comes to cheese, mix it up with Monterey Jack or Gouda. Each cheese adds its own unique taste, making your dish even more exciting. After enjoying your Cheesy Taco Pasta, let any leftovers cool down. Place them in an airtight container. Make sure to seal it tightly. Store the container in the fridge. It will stay fresh for about three to four days. Label the container with the date. This helps you keep track of how long it’s been stored. When you're ready to eat, take out the leftovers. You can reheat them on the stove or in the microwave. If using the stove, add a splash of broth to keep it moist. Heat it on low, stirring often. If using the microwave, put it in a microwave-safe dish. Cover it loosely with a lid or microwave-safe wrap. Heat in short bursts, stirring in between, until it's warm. You can also freeze Cheesy Taco Pasta for later. First, let it cool completely. Then, place it in a freezer-safe container. Leave some space at the top because it will expand. Seal it tightly and label it with the date. This dish will last for about three months in the freezer. To thaw, move it to the fridge overnight before reheating. Yes, you can use any pasta you like. Rotini works well, but penne or shells are great too. Just make sure to adjust the cooking time based on the pasta type. Always cook it until it’s al dente for the best texture. You can use lean turkey, chicken, or even plant-based meat. Each option gives a unique flavor. You can also skip meat entirely and add beans for protein. This makes the dish vegetarian and still tasty. This Cheesy Taco Pasta stays fresh in the fridge for up to three days. Store it in an airtight container for best results. Just make sure it cools down before sealing. Yes, you can prepare it ahead of time. Cook the pasta and meat mixture, then store separately. Combine them when you're ready to serve. This saves time and makes dinner even easier on busy nights. This blog post showed you how to make cheesy taco pasta. We covered the key ingredients and cooking steps. I shared tips to avoid overcooked pasta and enhance flavors. You learned how to personalize the dish with options for vegetarian and gluten-free meals. Finally, we discussed storage and reheating. With these steps, you can enjoy a delicious and easy meal any time. Get cooking!

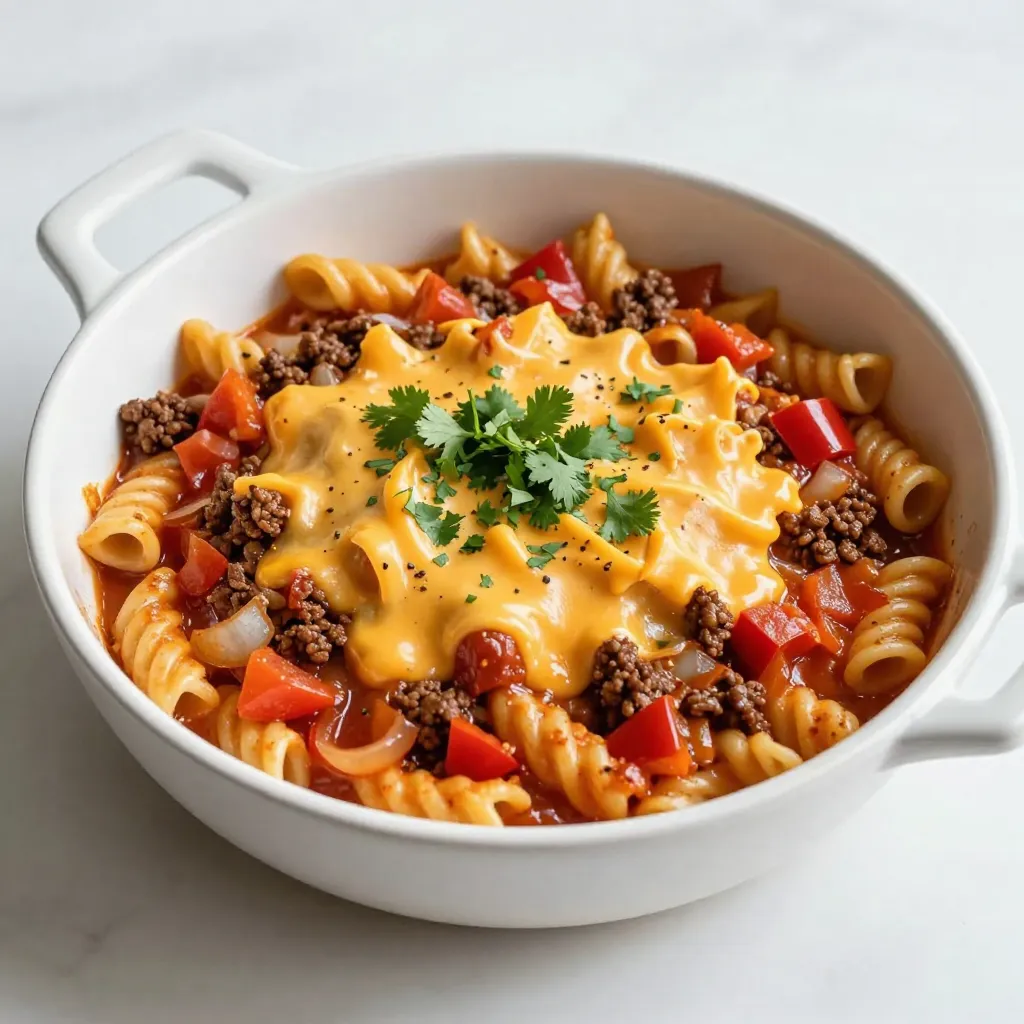
Cheesy Taco Pasta Skillet Easy Family Meal Recipe

Looking for a quick and delicious meal the whole family will love? This Cheesy Taco Pasta Skillet recipe has you

To make a delicious Chocolate Strawberry Icebox Cake, you will need the following ingredients: - 1 lb fresh strawberries, hulled and sliced - 2 cups heavy whipping cream - 1/2 cup powdered sugar - 1 teaspoon pure vanilla extract - 12 ounces chocolate wafer cookies - 2 tablespoons unsweetened cocoa powder - A pinch of sea salt - Chocolate shavings or curls, for garnish These ingredients come together to create a rich, creamy dessert. The fresh strawberries add a nice contrast to the chocolate. Heavy whipping cream is essential to get that light, fluffy texture. The chocolate wafer cookies give the cake its structure and crunch. Cocoa powder intensifies the chocolate flavor, while powdered sugar sweetens the cream. Don't forget the sea salt; it enhances all the flavors! For garnish, chocolate shavings or curls add a touch of elegance. You can customize this cake by using different berries or toppings. Enjoy gathering these ingredients and getting ready for a fun, no-bake treat! {{ingredient_image_2}} To start, gather your ingredients in a large bowl. You need heavy whipping cream, powdered sugar, vanilla extract, cocoa powder, and a pinch of sea salt. Using an electric mixer, whip the mixture on medium-high speed. In about 3 to 5 minutes, you will see stiff peaks form. Stiff peaks are key because they help hold the cake together. If you don't get stiff peaks, the cream may not stay fluffy. Next, grab a 9x13 inch baking dish. Spread a thin layer of whipped chocolate cream on the bottom. This layer acts as the base. Now, take 6 to 8 chocolate wafer cookies and place them on top. Arrange them so they slightly overlap. Then, add half of the sliced strawberries over the cookies. Follow this with another layer of whipped chocolate cream to cover the strawberries well. Now, repeat the layering. Add another set of chocolate wafer cookies, then the rest of the strawberries. Finish with one last layer of whipped chocolate cream. Smooth the top gently with a spatula. Cover the dish tightly with plastic wrap and place it in the fridge. Let it chill for at least 4 hours. For best results, let it sit overnight. This will let the cookies soften and flavors mix well. To make the best whipped cream, whip until you see stiff peaks. This means the cream holds its shape well. Be careful not to over-whip it. If you do, the cream can turn grainy. If you want a lighter texture, try using whipped topping instead. It saves time and makes your cake airy. Even layers are key to a great icebox cake. Start with a thin layer of whipped cream on the bottom. This helps the cookies stick. When placing the cookies, overlap them slightly. This keeps the layers from separating. Make sure to evenly spread the strawberries. This helps every bite taste amazing. Let your cake chill for at least 4 hours. If you can, let it sit overnight. This helps the flavors blend and the cookies soften. Don’t forget to cover the dish tightly with plastic wrap. This keeps the cake fresh and prevents odors from the fridge. Pro Tips Whip it Good: Make sure to whip the cream until stiff peaks form. This will ensure that your layers hold up beautifully and provide a rich texture to the cake. Layer Smart: For even flavor distribution, make sure to evenly spread the whipped cream and strawberries in each layer. This will enhance the overall taste in every bite. Chill Time: Allowing the cake to chill overnight is ideal, as it gives the cookies time to soften and the flavors to meld together for a more delicious dessert. Presentation Matters: Before serving, garnish with chocolate shavings and fresh strawberry slices. This not only makes the cake visually appealing but also adds a delightful touch of flavor. {{image_4}} You can change the flavor of your Chocolate Strawberry Icebox Cake. Try using different berries. Blueberries or raspberries can add a fun twist. They give a fresh taste and nice color. You can also add flavored extracts. Almond extract adds a warm, nutty note. Mint extract can bring a refreshing kick. Just use a small amount, about half a teaspoon, to start. You can always taste and add more if needed. While chocolate shavings are great, you can switch it up. Consider using crushed nuts for a crunchy texture. Walnuts or almonds work well. They add a nice contrast to the creamy layers. Another option is shredded coconut. It gives a tropical feel and a chewy bite. You can toast the coconut for extra flavor. This makes your cake even more special and unique. How long can the cake last in the fridge? Your Chocolate Strawberry Icebox Cake can last up to 5 days in the fridge. Make sure to cover it well with plastic wrap. This keeps it fresh and prevents it from absorbing other smells. What are the steps for freezing and thawing? You can freeze this cake for up to 3 months. First, slice the cake into squares. Wrap each piece in plastic wrap, then place them in an airtight container. When you want to eat it, move the cake to the fridge to thaw overnight. This way, it stays moist and tasty. What are the best methods for serving leftovers? To serve leftovers, take the cake out of the fridge. Let it sit for about 10 minutes at room temperature. This helps the flavors pop. You can add fresh strawberries or a drizzle of chocolate syrup on top. This makes each slice look pretty and inviting! Yes, you can make this cake ahead of time. In fact, it tastes better when chilled overnight. To prepare in advance, follow the recipe steps and layer the cake. After assembling, cover it tightly with plastic wrap. Place it in the fridge for at least four hours, but overnight is best. This gives the cookies time to soften and soak up the flavors. Absolutely! If you need a dairy-free option, use coconut cream instead of heavy whipping cream. For gluten-free, choose gluten-free chocolate wafer cookies. Make sure to check the labels of all products to confirm they fit your dietary needs. You can also use maple syrup instead of powdered sugar for a different sweetness. To store leftovers, keep the cake in the fridge. Cover it well with plastic wrap or foil to keep it fresh. Eat the cake within three days for the best flavor and texture. If you notice the cookies getting too soft, consider serving them in a bowl. This way, you still enjoy those great flavors without losing the cake's form. You can create a delicious chocolate strawberry cake with simple ingredients. Fresh strawberries, whipped cream, and chocolate cookies come together for a tasty treat. Follow the steps to whip the cream and layer the ingredients. Use tips to perfect your technique and try different flavors to customize your cake. Store it well to keep it fresh. This cake is fun to make and share. Explore variations and enjoy every bite!

Chocolate Strawberry Icebox Cake Simple No-Bake Recipe

Craving a sweet treat that’s both easy and delicious? You’re in the right place! This Chocolate Strawberry Icebox Cake is

- 2 cups heavy cream - 1 cup whole milk - 1/2 cup granulated sugar Heavy cream makes the panna cotta rich and smooth. Whole milk adds a light texture. Granulated sugar sweetens the dessert just right. - 2 teaspoons pure vanilla extract - 1 vanilla bean, split lengthwise with seeds scraped Pure vanilla extract brings out the sweet flavor. The vanilla bean gives a deeper taste. Using both makes the panna cotta extra special. - 2 1/2 teaspoons powdered gelatin - 3 tablespoons cold water - Pinch of salt Powdered gelatin helps the panna cotta set properly. Cold water blooms the gelatin for the right texture. A pinch of salt enhances all the flavors. {{ingredient_image_2}} To bloom the gelatin, start by taking a small bowl. Sprinkle the powdered gelatin over 3 tablespoons of cold water. Let it sit for about 5 minutes. This allows the gelatin to absorb the water and swell up. Blooming is key to a smooth texture. It helps the gelatin dissolve evenly in the hot mixture. Next, take a medium saucepan. Pour in 2 cups of heavy cream, 1 cup of whole milk, and 1/2 cup of granulated sugar. Add in 2 teaspoons of pure vanilla extract and the seeds from the split vanilla bean. Don't forget to add the split pod too for extra flavor. Place the saucepan on medium heat. Stir gently until the sugar dissolves completely. Watch closely as you heat it. You want it to simmer, not boil. Once the mixture is hot, remove the saucepan from the heat. Stir in the bloomed gelatin mixture. Mix until it dissolves completely, with no clumps left. To keep your panna cotta smooth, strain the mixture through a fine mesh sieve into a large bowl. This step removes the vanilla bean pod and any undissolved gelatin pieces. Now, carefully pour the silky mixture into ramekins or serving glasses. Let them cool at room temperature for a bit. After that, cover each ramekin with plastic wrap. Refrigerate for at least 4 hours, or until set firmly. To make smooth panna cotta, focus on these key factors: - Use fresh ingredients. Fresh cream and milk improve texture and taste. - Bloom the gelatin well. This step is crucial for a creamy finish. - Heat gently. Avoid boiling the mixture to keep a silky texture. If your panna cotta does not set well, check these common issues: - Too little gelatin can lead to a runny dessert. - Overheating can ruin the cream. Keep it below boiling. - Make sure to strain the mixture. This removes lumps and ensures smoothness. For an elegant dessert presentation, consider these tips: - Use clear glasses or ramekins to show off the panna cotta’s creamy layers. - Layer assorted fresh berries on top for color and flavor. - Drizzle a fruity coulis made from blended berries for a pop of taste. Ideal garnishes include: - Fresh strawberries, blueberries, or raspberries for sweetness. - Mint leaves to add a touch of green and freshness. If you’re busy, here are some prep and chill tips: - Make panna cotta a day ahead. It’s perfect for gatherings. - While the panna cotta chills, prep your garnishes. This saves time later. - Keep everything in the fridge until ready to serve. For make-ahead recommendations: - Store panna cotta in the fridge for up to three days. - If you need to, you can freeze it. Just let it thaw in the fridge before serving. Pro Tips Use Fresh Ingredients: For the best flavor in your panna cotta, always opt for fresh cream and high-quality vanilla extract. Fresh ingredients can significantly enhance the overall taste of the dessert. Chill Thoroughly: Make sure to chill your panna cotta for at least 4 hours. This allows it to set properly and develop a smooth, creamy texture. For best results, chill it overnight. Experiment with Flavors: While vanilla is classic, feel free to experiment with other flavors like coffee, chocolate, or citrus. Just replace the vanilla extract with your desired flavoring to create a unique dessert. Presentation Matters: Enhance the visual appeal by serving the panna cotta in elegant glassware and garnishing with colorful fruits or edible flowers. This transforms a simple dessert into a stunning centerpiece. {{image_4}} You can make panna cotta more exciting with different flavors. For a chocolate panna cotta, melt semi-sweet chocolate into the cream mixture. This adds a rich taste. Use about 4 ounces of chocolate for a nice balance. Stir it in right after you heat the cream and sugar. Fruit-infused panna cotta is also a great option. You can blend fresh fruits like strawberries or mangoes into the cream. Strain the mixture to remove any bits. This gives a fresh and fruity twist. Try adding a layer of pureed fruit on top for extra fun. If you need a dairy-free panna cotta, use coconut milk instead of cream and milk. This will still give you that creamy texture. Almond milk is another option. Just remember to adjust the sugar, as some non-dairy milks are sweeter. For low-sugar or vegan versions, substitute the sugar with a sweetener like maple syrup. Use agar-agar instead of gelatin for a vegan option. Agar-agar works well if you follow the right instructions. This keeps the panna cotta set without any animal products. Serving panna cotta can be fun and creative. Layer it with fresh fruit or sauces. Berries or a berry coulis look stunning on top. They add color and flavor. You can also serve panna cotta in different glassware, like small jars or cups. This makes each dessert feel special. For an added touch, use a squeeze bottle to drizzle sauces over the panna cotta. This gives a fancy look and lets guests enjoy different flavors. You can even stack different flavors in one glass for a unique dessert experience. To store leftover panna cotta, cover each ramekin with plastic wrap. This keeps the dessert fresh and prevents it from absorbing odors. You can also place the panna cotta in an airtight container. Choose containers that fit well to avoid excess air. Panna cotta can be frozen, but it may change in texture. To freeze it safely, allow the panna cotta to set completely in the fridge. Once set, wrap each ramekin tightly with plastic wrap. For best results, place them in a freezer bag. When you are ready to enjoy it, thaw the panna cotta in the fridge overnight. Avoid thawing at room temperature, as it may become too soft. Panna cotta lasts in the fridge for about 5 days. Keep an eye out for signs of spoilage, such as an off smell or a change in texture. If it looks grainy or has an unusual color, it’s best to throw it away. Store it properly to enjoy this creamy delight for as long as possible! Panna cotta is a classic Italian dessert. It is a creamy treat made from sweetened cream thickened with gelatin. The name means "cooked cream" in Italian. This dessert has a smooth and silky texture. You can serve it plain or with toppings like fruit or sauces. It's simple to make and looks elegant on any table. Yes, you can use powdered gelatin as a substitute for sheets. However, you need to adjust the amount used. For each sheet, you use about 1 teaspoon of powdered gelatin. Bloom the powdered gelatin in cold water before adding it to the warm cream mixture. This helps ensure it dissolves properly for a smooth panna cotta. You can tell panna cotta is set when it feels firm to the touch. Gently shake the ramekin; it should jiggle slightly but not be liquid. It usually takes about 4 hours in the fridge for panna cotta to set. If you want to check, use a toothpick; insert it into the panna cotta, and it should come out clean. This article covered how to make panna cotta from start to finish. We explored the key ingredients like heavy cream and gelatin, plus how to blend and heat them. You learned tips for a smooth texture, serving ideas, and even variations for diet needs. Panna cotta is fun and easy to make. With these steps, you can create a tasty treat that impresses. Now, you can enjoy this classic dessert at home or share it with friends. Keep experimenting and have fun in the kitchen!

Vanilla Bean Panna Cotta Creamy and Simple Delight

Are you ready to impress your friends with a stunning dessert? Vanilla Bean Panna Cotta is not only simple to

- 500g button or cremini mushrooms - 4 tablespoons extra-virgin olive oil - 4 cloves garlic, finely minced - 1 teaspoon dried thyme - 1 teaspoon dried rosemary - 1 teaspoon smoked paprika - Sea salt and freshly ground black pepper - Fresh parsley, for garnish - Calories per serving: About 150 - Macronutrient breakdown: - Protein: 3g - Fat: 14g - Carbohydrates: 5g Garlic herb roasted mushrooms make a great side dish. They add flavor and texture to any meal. You can use either button or cremini mushrooms. Both types work well and taste amazing. The base of this recipe is simple. You will need olive oil, garlic, and some herbs. These ingredients create a rich flavor. Dried thyme and rosemary add depth. Smoked paprika gives a nice kick. When you prepare the mushrooms, clean them well. You want them free of dirt. After that, mix the ingredients in a bowl. Toss the mushrooms until they are coated in the herb oil. This step is key for even flavor. Roasting brings out their natural sweetness. In the oven, they become tender and golden. The smell of garlic and herbs will fill your kitchen. It’s hard to resist! For presentation, sprinkle fresh parsley on top. This adds color and freshness. You can serve these mushrooms with crusty bread. They also pair well with grilled meats or pasta. The options are endless! Enjoy these flavorful mushrooms as a delightful side dish. They elevate any meal with ease. {{ingredient_image_2}} Set your oven to 200°C (400°F). This helps roast the mushrooms evenly. Preheating is key for great results. In a large bowl, pour 4 tablespoons of extra-virgin olive oil. Add 4 finely minced garlic cloves, 1 teaspoon of dried thyme, 1 teaspoon of dried rosemary, and 1 teaspoon of smoked paprika. Season with sea salt and freshly ground black pepper. Whisk until it smells great and looks smooth. Take 500g of cleaned and trimmed button or cremini mushrooms. Toss them in the herb oil mixture. Make sure each mushroom is well-coated. This boosts the flavor and makes them tasty. Spread the mushrooms in a single layer on a large baking sheet. This allows space for air to circulate. Roast them for 15-20 minutes. Halfway through, stir gently to help them brown evenly. They should be golden brown and tender when done. After roasting, take the mushrooms out of the oven. Let them cool for about a minute. Transfer them to your serving dish. Garnish with finely chopped fresh parsley for a pop of color and fresh taste. Enjoy your flavorful side dish! When choosing mushrooms, I often pick between button and cremini. Button mushrooms are mild and tender. They work well in many dishes. Cremini mushrooms have a deeper flavor. They add a richer taste to your meals. Both are great options, so it depends on your flavor preference. Spacing your mushrooms on the baking sheet is key. If they touch, they steam instead of roast. This can lead to uneven cooking. I recommend placing them in a single layer. This way, each mushroom can get the perfect amount of heat. You’ll enjoy a nice golden brown color on all sides. You can boost the flavor with extra herbs or spices. Consider adding fresh thyme or dill for a twist. A pinch of red pepper flakes can add some heat. Feel free to experiment! The beauty of this dish is its versatility. Each tweak can bring something new to the table. Pro Tips Use Fresh Herbs: Fresh herbs can elevate the flavor of your roasted mushrooms. If possible, substitute dried thyme and rosemary with fresh ones for a more vibrant taste. Experiment with Mushroom Varieties: While button and cremini mushrooms work well, try mixing in shiitake or portobello for a richer flavor profile and varied textures. Don’t Overcrowd the Pan: Ensure mushrooms are spread out in a single layer. Overcrowding can lead to steaming instead of roasting, resulting in less flavor and texture. Add a Splash of Balsamic Vinegar: For an extra layer of flavor, drizzle a little balsamic vinegar over the mushrooms before roasting. It enhances the umami and adds a hint of sweetness. {{image_4}} You can add other veggies to your garlic herb roasted mushrooms. Carrots, zucchini, and bell peppers work well. These vegetables add color and flavor. Cut them into bite-sized pieces for even cooking. Toss them with the mushroom mixture for a tasty blend. Try using different herbs to change the flavor. Basil, oregano, or sage can add a new twist. Mix fresh herbs with the garlic for a bright taste. You could also use a blend of dried herbs to create layers of flavor. Experimenting is key to finding your favorite mix. If you want a vegan dish, you can easily swap ingredients. Use vegetable oil instead of olive oil. You might also try adding nutritional yeast for a cheesy flavor. This keeps the dish plant-based and full of flavor. Enjoy making it your own! To store leftovers, place your garlic herb roasted mushrooms in an airtight container. Make sure they cool down first. This helps keep them fresh. Store them in the fridge for up to three days. Check for any off smells before eating. If they smell fine, enjoy them! The best way to reheat your mushrooms is in a pan. Heat a small amount of olive oil over medium heat. Add the mushrooms and cook for about 3 to 5 minutes. Stir them gently to keep them from burning. This method keeps their flavor and texture tasty. You can also use a microwave, but they might lose some crispness. You can freeze roasted mushrooms, but they may change in texture. To freeze them, let the mushrooms cool completely. Place them in a freezer bag or container. Remove excess air before sealing. They can last for up to three months in the freezer. When ready to use, thaw them in the fridge overnight. Reheat them in a pan for the best results. Yes, you can use fresh herbs! Fresh herbs add a bright taste. They also bring a lovely aroma. However, they can be more delicate. Here's what to consider: - Pros of fresh herbs: - Stronger flavor and aroma. - Adds vibrant color to the dish. - Cons of fresh herbs: - Shorter shelf life. - You need more to match the taste of dried herbs. If you choose fresh, use about three times the amount of dried herbs. This change ensures you keep the flavor strong. These mushrooms pair well with many dishes. Here are some great options: - Grilled meats: Chicken or steak enhances the meal. - Pasta: Toss the mushrooms with your favorite noodles. - Salads: Add them to a fresh salad for extra flavor. - Bread: Serve with crusty bread to soak up the juices. Mix and match to create a full meal that everyone will enjoy! Roasted mushrooms can last about 3 to 5 days in the fridge. Here are some tips for storage: - Cool completely: Let them cool before storing. - Use airtight containers: This keeps them fresh. - Check for spoilage: Look for any off smells or changes in texture. To enjoy them again, reheat them in the oven or on the stove for the best taste! Garlic Herb Roasted Mushrooms are simple yet packed with flavor. We reviewed the ingredients, detailed the cooking steps, and shared tips for the perfect roast. Don’t forget to explore variations and storage options to maximize your dish's life. Remember, cooking is all about finding what works for you. Enjoy experimenting with flavors and textures. With these mushrooms, you'll impress everyone at your next meal.

Garlic Herb Roasted Mushrooms Flavorful Side Dish

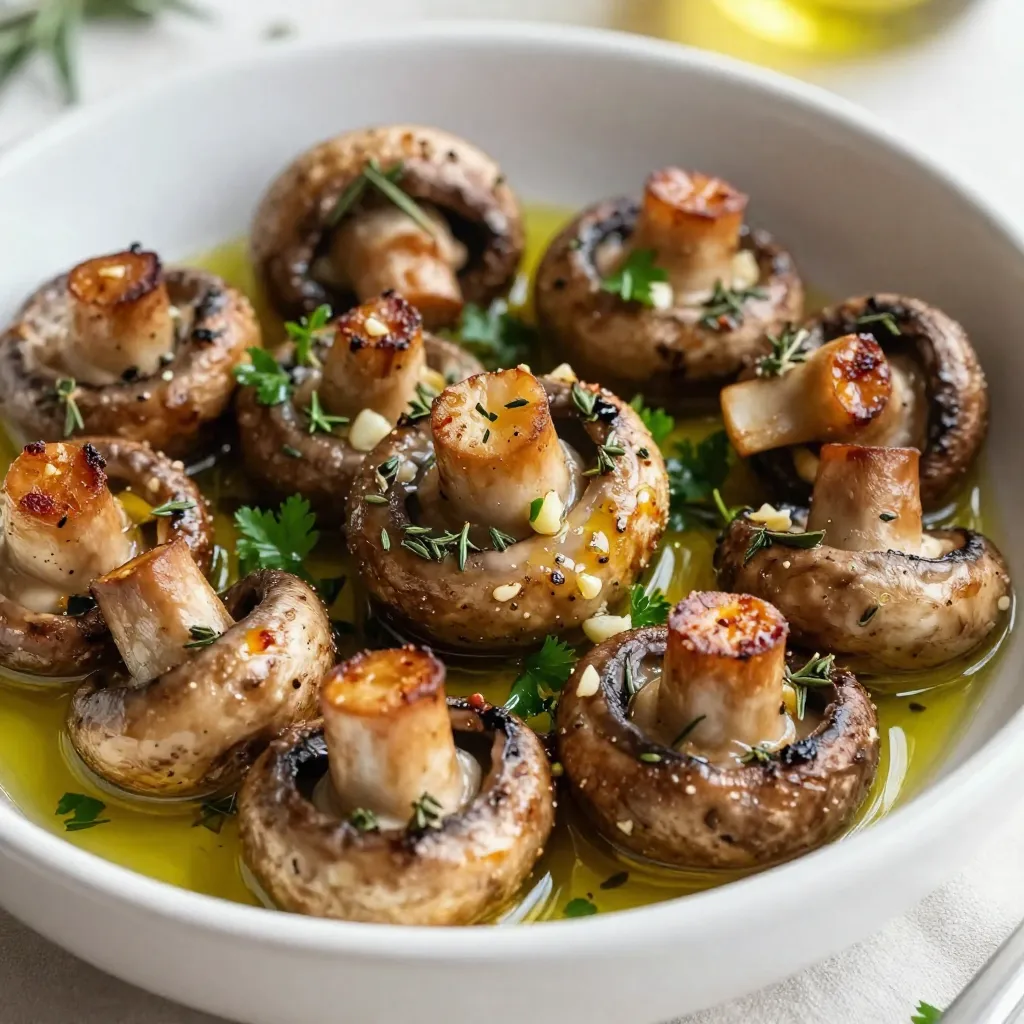
If you’re looking for a delicious side dish, Garlic Herb Roasted Mushrooms are a must-try! These mushrooms are easy to

To make these tasty potatoes, you need: - 4 medium russet potatoes - 1 cup cooked broccoli florets, finely chopped - 1 cup shredded sharp cheddar cheese - 1/2 cup sour cream - 1/4 cup milk - 1/4 cup green onions, finely chopped - 2 tablespoons unsalted butter, melted - Salt and freshly ground black pepper to taste - Additional shredded cheddar cheese for topping - Paprika for garnish (optional) The russet potatoes give a fluffy texture. The broccoli adds nutrition and color. Sharp cheddar cheese brings bold flavor, while sour cream and milk create creaminess. Butter and green onions enhance the taste perfectly. Feel free to personalize your potatoes with these options: - Crumbled bacon for a savory crunch - Garlic powder for extra flavor - Hot sauce for a spicy kick - Different cheese types like mozzarella or gouda These additions can take your dish to new heights. Experiment and find what you love best! If you need alternatives, try these: - Yukon gold potatoes instead of russet potatoes - Greek yogurt instead of sour cream - Almond milk or oat milk instead of regular milk - Frozen broccoli if fresh isn’t available Substituting can help meet dietary needs and still keep the dish delicious. Always aim for flavors you enjoy! {{ingredient_image_2}} Start by preheating your oven to 400°F (200°C). This warmth will give your potatoes a nice bake. Next, wash each russet potato well under running water. Dirt can hide in the skin, and we want them clean. Use a fork to poke holes in each potato. This helps steam escape while baking and keeps them from bursting. Place the prepared potatoes directly on the oven rack. Bake them for about 45 to 60 minutes. You know they are done when a knife slides easily through the flesh. Once they are baked, take them out and let them cool for about 10 minutes. This cooling time makes it safe to handle them. Cut each potato in half lengthwise. With a spoon, gently scoop out the soft insides into a big mixing bowl. Leave about a quarter-inch of potato flesh in the skin. This keeps the skins strong. Now, add the finely chopped broccoli, shredded cheddar cheese, sour cream, milk, melted butter, and chopped green onions to the bowl. Season with salt and pepper. Mix everything until it is creamy and well combined. Spoon the cheesy broccoli mixture back into the potato skins. Make sure to create a nice mound on top. For extra flavor, sprinkle shredded cheddar cheese on each stuffed potato. This will melt beautifully when we bake them again. Place the stuffed potatoes on a baking sheet and return them to the oven. Bake for another 15 to 20 minutes, or until the cheese is golden brown and bubbly. After baking, let the potatoes cool a bit. If you like, sprinkle paprika on top for added color and flavor. To make your filling creamy, use good quality sour cream and sharp cheddar cheese. The cheese adds a strong flavor, while the sour cream keeps it rich. Mix in some milk as well; it helps to create that smooth texture you want. If you like a bit of zest, try adding some lemon juice. This can brighten the flavor of your dish. Soggy potatoes can ruin your meal. To avoid this, be sure to bake the potatoes until they are fully cooked. When you scoop out the insides, leave a little flesh in the skin. This keeps the skin sturdy. Also, make sure to let the baked potatoes cool before you handle them. A hot potato can be hard to scoop without breaking. Start with good quality russet potatoes. They have thick skin and fluffy insides, perfect for twice baking. Always wash them well to remove dirt. Pricking them with a fork before baking helps steam escape. Bake at 400°F for 45 to 60 minutes. When done, a knife should slide in easily. Cool them for a bit before scooping to make it easier. Pro Tips Choose the Right Potatoes: For the best texture and flavor, opt for medium-sized russet potatoes as they have a fluffy interior that works perfectly for twice-baked potatoes. Don't Overmix the Filling: When combining the potato insides with the filling ingredients, mix just until combined. Overmixing can lead to a gummy texture. Customize Your Cheese: Feel free to experiment with different cheeses like Monterey Jack or pepper jack for a unique twist on the classic flavor. Keep It Warm: If you're preparing these potatoes in advance, keep them warm in a low oven (around 200°F) until you're ready to serve to ensure they're nice and melty. {{image_4}} You can add many veggies to your twice-baked potatoes. Try sautéed spinach for a fresh taste. Peas can bring a nice sweetness. Roasted red peppers add color and flavor. Carrots add crunch and a bit of sweetness. Mix and match to find your favorite blend. Not a fan of cheddar? Use mozzarella for a milder taste. Goat cheese adds a tangy kick. Vegan cheese works well for dairy-free options. You can also mix cheeses for a unique flavor. Just make sure to adjust the amount to keep it creamy. To make this dish vegan, swap sour cream with cashew cream or coconut yogurt. Use dairy-free cheese to keep it cheesy. For gluten-free, just ensure any added ingredients are gluten-free. You can still enjoy this dish no matter your diet! To keep your leftover broccoli cheddar twice-baked potatoes fresh, let them cool completely. Then, wrap each potato in plastic wrap or aluminum foil. Place them in an airtight container. Store them in the fridge for up to three days. This method helps maintain their flavor and texture. When you're ready to enjoy your leftovers, preheat your oven to 350°F (175°C). Unwrap the potatoes and place them on a baking sheet. Reheat them for about 15 to 20 minutes, or until they are warmed through. This method keeps the cheese melty and the potato fluffy. You can also use a microwave for quick reheating. Just place a potato on a microwave-safe plate and heat for 2-3 minutes. If you want to freeze these tasty delights, first let them cool completely. Wrap each potato tightly in plastic wrap, then in foil. Place them in a freezer bag and label it with the date. They will stay good for up to three months. When ready to eat, thaw them overnight in the fridge. Then, reheat them as described above for a delicious meal anytime. You should bake the potatoes for about 45 to 60 minutes. The time depends on their size. You can tell they are ready when a knife goes in easily. This means the insides are soft and fluffy. Yes, you can prepare these potatoes ahead of time. You can bake them and then stuff them. After that, cover and store them in the fridge. When you are ready, bake them again for about 15 to 20 minutes. This will warm them up and melt the cheese. Twice-baked potatoes pair well with many dishes. You can serve them with a fresh salad or grilled chicken. They also go great with a hearty soup. This adds balance to your meal and makes it more filling. Broccoli cheddar twice baked potatoes are a tasty and fun dish. We covered main and optional ingredients, plus how to customize your meal. I shared step-by-step instructions for perfect baking and flavor. You learned tips to prevent soggy potatoes and achieve creaminess. We discussed variations for different diets and proper storage. Now, you can enjoy this dish anytime, knowing how to adapt it to fit your needs. Happy cooking!

Broccoli Cheddar Twice Baked Potatoes Tasty Delight

If you’re craving a dish that’s creamy, cheesy, and loaded with veggies, I’ve got just the recipe for you: Broccoli

- 1 ½ cups graham cracker crumbs - ½ cup unsweetened shredded coconut - ½ cup unsalted butter, melted - 1 cup sweetened condensed milk - 1 cup fresh raspberries (or frozen, thawed) - 1 cup semi-sweet chocolate chips - ½ cup chopped walnuts or pecans (optional) - ½ teaspoon vanilla extract - A pinch of sea salt To create these delicious Raspberry Coconut Magic Bars, gather your ingredients first. You will need graham cracker crumbs for the base. These crumbs give the bars a sweet and crunchy texture that everyone loves. Next, you’ll need unsweetened shredded coconut. This adds a tropical flavor that pairs well with the raspberries. Melt your unsalted butter to bind everything together. Sweetened condensed milk is key for that rich, creamy layer. Fresh raspberries bring a burst of flavor and color. If you can’t find fresh ones, thawed frozen raspberries work too. Semi-sweet chocolate chips add a touch of richness. You can include chopped walnuts or pecans if you want extra crunch. Don’t forget a bit of vanilla extract for flavor and a pinch of sea salt to balance the sweetness. Each ingredient plays a role in making these bars truly magical. - 9x9-inch baking pan - Mixing bowls - Spatula - Measuring cups For this recipe, you need a few key tools. A 9x9-inch baking pan works best for even cooking. Mixing bowls help combine all your ingredients with ease. Use a spatula to spread the layers and ensure everything is well mixed. Measuring cups are essential for accuracy. You want your bars to turn out perfectly. With these ingredients and tools, you’re ready to make a treat that will impress everyone. {{ingredient_image_2}} - Preheat the oven to 350°F (175°C). - Grease the pan or line with parchment paper. - Combine graham cracker crumbs, coconut, melted butter, and a pinch of sea salt. - Press the mixture into the bottom of the baking pan. This forms the base for your bars. - Pour sweetened condensed milk over the crust. - Evenly add the fresh raspberries, chocolate chips, and nuts if you choose to use them. - Place the pan in the oven and bake for 25-30 minutes. The edges will turn golden brown, and the center will bubble. - Let the bars cool in the pan for 30 minutes before moving on. - Transfer the pan to the refrigerator. Chill for one hour before cutting into squares. This helps them set and makes cutting easier. For the best texture, let your bars cool completely in the pan. This helps them set well. I find that cooling for about 30 minutes is just right. Then, move them to the fridge for an hour. This step firms them up nicely. If you want to switch things up, consider ingredient substitutions. You can use gluten-free graham crackers if needed. Also, swap fresh raspberries for frozen ones; just make sure they are thawed and drained well. To wow your guests, dust the bars with powdered sugar. This adds a nice touch. You can also garnish with fresh raspberries and a sprinkle of shredded coconut. Arrange the bars on a decorative platter for a beautiful display. These bars are perfect for special occasions like birthdays or holidays. Serve them with a scoop of vanilla ice cream for a delightful treat. If your bars turn out too gooey, try baking them a bit longer. Look for golden edges and a bubbling center. This means they’re done! For even baking, make sure to spread your ingredients evenly in the pan. Press the crust down firmly. This helps the layers stay together during baking. Pro Tips Use Fresh Raspberries: Fresh raspberries provide the best flavor and texture, but if using frozen, ensure they are thoroughly drained to avoid excess moisture. Chill for Best Texture: After baking, let the bars cool completely, then refrigerate for at least an hour. This helps them firm up, making cutting easier and preventing crumbling. Customize Your Nuts: Feel free to mix and match nuts based on your preference. Pecans or almonds can add a unique flavor profile to your bars. Layering Technique: When adding toppings, press them down lightly into the condensed milk layer to ensure they adhere well while baking, creating a more cohesive bar. {{image_4}} You can make these bars even better with different flavors. Try adding fresh blueberries or strawberries. These fruits mix well with the tartness of raspberries. You can also switch the chocolate. Use white chocolate for a sweeter taste or dark chocolate for a richer flavor. Each choice changes the bars in a fun way. If you need a gluten-free option, use gluten-free graham crackers. They work just as well in the crust. For a vegan version, swap the butter for coconut oil. You can also use coconut milk instead of sweetened condensed milk. These changes still keep the bars tasty and satisfying. Want a quick treat? You can make a no-bake version of these magic bars. Simply mix the crust ingredients and press them into a pan. Instead of baking, chill the mixture in the fridge for a few hours. After it firms up, add the toppings. This way, you get a delicious dessert without any cooking. To keep your Raspberry Coconut Magic Bars fresh, store them in an airtight container. This helps prevent them from drying out. Place a piece of parchment paper between layers to avoid sticking. The best temperature for storage is at room temperature for short periods. If you live in a hot area, it’s better to refrigerate them. These bars can last about 3-4 days at room temperature. If you want them to last longer, move them to the fridge. In the fridge, they stay fresh for up to a week. Just remember to seal them well to keep moisture away. Freezing these magic bars is simple. First, cut them into squares. Next, wrap each square tightly in plastic wrap. Place the wrapped bars in a freezer-safe bag. Be sure to label the bag with the date. They can last up to three months in the freezer. When you want to eat one, take it out and let it thaw in the fridge overnight. This keeps the texture nice and tasty. Yes, you can. If you want to swap out walnuts or pecans, try almonds or hazelnuts. Each nut gives a unique taste and texture. Almonds add a nice crunch, while hazelnuts offer a rich flavor. Use the same amount as the original nuts for best results. You have several options. For a gluten-free choice, use gluten-free graham crackers. You can also try crushed cookies like vanilla wafers or digestive biscuits. If you want a nutty twist, use ground almonds or oats. Each option will change the flavor and texture a bit. Yes, you can make them in advance. Bake the bars and let them cool completely. Then, store them in an airtight container. They last well for up to five days at room temperature. If you want to keep them longer, freeze them for up to three months. Just thaw in the fridge before serving. You now have a simple guide to make Raspberry Coconut Magic Bars. Gather your essential ingredients, follow the step-by-step instructions, and enjoy a delicious treat. Remember to chill the bars for the best taste and texture. You can try different flavors or even a no-bake version. Whether you share them or keep them for yourself, these bars are sure to please. Happy baking, and enjoy every bite of your sweet creation!

Raspberry Coconut Magic Bars Irresistible Treat Recipe

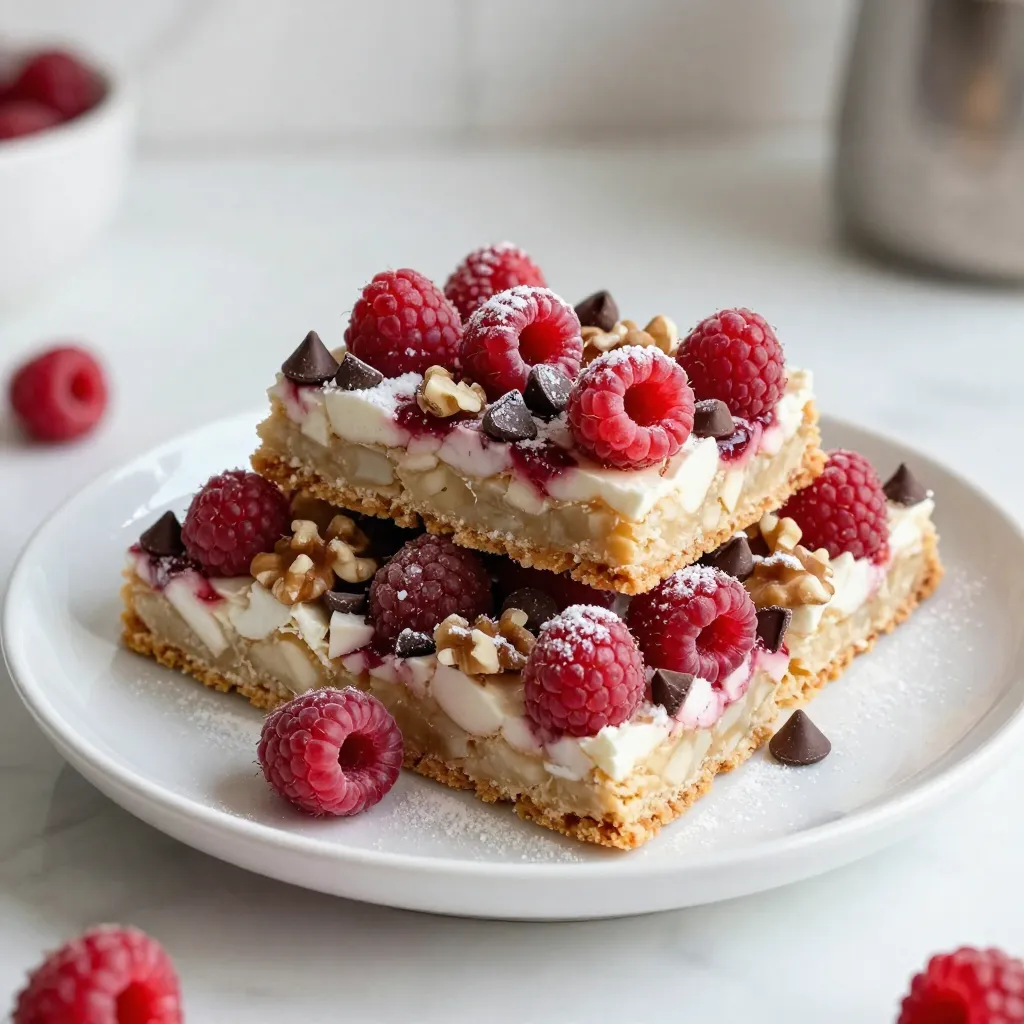
Do you crave a treat that bursts with flavor and is easy to make? Look no further! My Raspberry Coconut

- 1 package (about 14-15) chocolate graham crackers - 1 cup heavy whipping cream - 1 cup powdered sugar - 1 teaspoon pure vanilla extract - 8 oz cream cheese, softened - 1 cup mint chocolate chips - 1/2 cup sour cream - 1 cup whipped topping (like Cool Whip) - 2 tablespoons mint extract - Grated dark chocolate or cacao nibs for garnish - Extra fresh mint leaves for garnish (optional) Each ingredient plays a key role in this dessert. The chocolate graham crackers form the base and add a rich flavor. The heavy whipping cream and powdered sugar create a fluffy filling. This filling becomes even richer with cream cheese, sour cream, and mint extract. The mint chocolate chips give that lovely minty flavor. The whipped topping adds lightness to the mix. If you want to switch things up, consider these options: - Use vanilla wafers instead of chocolate graham crackers for a different taste. - Swap heavy cream for coconut cream for a dairy-free version. - Try using Greek yogurt instead of sour cream for a healthier twist. - For a different flavor, mix in peanut butter chips instead of mint chocolate chips. These alternatives can help you customize the dessert to your taste. Enjoy experimenting! {{ingredient_image_2}} To start, grab a mixing bowl and your electric mixer. Pour in the heavy whipping cream. Beat it until soft peaks form. Then, slowly add the powdered sugar and vanilla extract. Keep whipping until you see stiff peaks. This fluffy cream is now ready. Set it aside for later. In a separate bowl, take the softened cream cheese. Use the mixer to beat it until it’s smooth and creamy. Next, add the mint extract and sour cream. Mix until they are fully combined. Now, take the whipped cream you made earlier. Gently fold it in with a spatula. Lastly, fold in the mint chocolate chips without deflating the mixture. Grab a 9x9 inch square dish. Start with a layer of chocolate graham crackers at the bottom. Next, spread half of your mint cream cheese mixture over the crackers. Smooth it out evenly. Then, add another layer of chocolate graham crackers on top. Spread the rest of the cream cheese mixture over this layer. Finish with one last layer of chocolate graham crackers. Cover your dish tightly with plastic wrap. Place it in the fridge for at least four hours. For the best taste, let it chill overnight. This allows the flavors to mix and the layers to set nicely. Once chilled, take the lasagna out of the fridge. Carefully slice it into squares. For a beautiful touch, garnish each square with grated dark chocolate or cacao nibs. You can also add a fresh mint leaf on top for extra flair. Enjoy your no-bake mint chocolate lasagna! To get stiff peaks, start with cold tools. Use a cold mixing bowl and beaters. This helps the cream whip better. Pour the heavy whipping cream into the bowl. Whip it on medium speed. As it thickens, add the powdered sugar and vanilla. Keep whipping until peaks form. Stiff peaks stand tall and do not droop. This step is key for your cream filling. Layering is all about evenness. Start with a flat layer of chocolate graham crackers. Make sure they fit snugly in your dish. Spread half of the mint cream cheese mixture evenly on top. Use a spatula for smoothness. Repeat with another layer of crackers and the remaining mixture. End with a final layer of crackers on top for a nice finish. This helps keep the structure of your dessert. Chilling is crucial for the best flavor and texture. Cover your dish tightly with plastic wrap. This keeps moisture in and prevents odors from mixing. Chill for at least 4 hours, but overnight is best. This allows flavors to blend and layers to set. The longer it chills, the better it tastes. Pro Tips Chill for Better Texture: Allow the lasagna to chill overnight for the best flavor and texture. This extra time helps the layers set properly and enhances the overall taste. Use Fresh Ingredients: Opt for fresh mint leaves and high-quality mint chocolate chips to elevate the flavor of your lasagna. Fresh ingredients make a noticeable difference! Be Gentle When Folding: When combining the whipped cream with the cream cheese mixture, use a gentle folding motion to preserve the light and airy texture for a better mouthfeel. Experiment with Layers: Feel free to add extra layers or mix in other flavors, like crushed Oreos or peanut butter chips, to customize your lasagna to your liking. {{image_4}} You can switch up the flavors in this dessert! Try using vanilla or hazelnut extract instead of mint. This change makes the dish taste different and fun. You can also swap the mint chocolate chips for peanut butter or caramel chips. Each swap gives a new twist to the classic recipe. Mix and match until you find your favorite combo! Making a gluten-free version is easy. Just use gluten-free chocolate graham crackers. They taste great and work well in this recipe. For a nutty flavor, you can also use crushed almond flour cookies. This way, you can enjoy the dessert without worrying about gluten. Extra toppings can make your lasagna even more special. Try adding fresh berries, like raspberries or strawberries, on top of each slice. You can also sprinkle crushed nuts for a crunchy texture. If you love chocolate, drizzle some chocolate sauce over the top. These toppings add flavor and make the dish look fancy! Store any leftover lasagna in an airtight container. Make sure the lid seals well to keep out air. You can also cover the dish tightly with plastic wrap. This method keeps the dessert fresh and tasty. Place it in the fridge, where it will last up to three days. You can freeze the lasagna if you want to keep it longer. First, cut it into squares for easy servings. Wrap each piece tightly in plastic wrap. Then, place the wrapped pieces in a freezer-safe bag or container. This way, it can stay frozen for up to two months. When you’re ready to enjoy it, let it thaw in the fridge overnight. Reheat the lasagna gently to maintain its texture. You can use a microwave or an oven. If using a microwave, heat it for about 30 seconds at a time, checking often. If using an oven, preheat it to 350°F and cover the lasagna with foil. Bake for about 10 to 15 minutes until warmed through. Enjoy your dessert at its best! You can use coconut cream as a great substitute for heavy whipping cream. It has a thick texture and a mild flavor. Another option is to use a mixture of milk and butter. For every cup of heavy cream, mix 3/4 cup of milk with 1/3 cup of melted butter. This dessert lasts for about 3 to 5 days in the fridge. Keep it covered tightly with plastic wrap. If you notice any changes in texture or smell, it's best to toss it out. Yes, you can make this dessert a day ahead. It tastes even better after chilling overnight. This allows the flavors to blend perfectly and the layers to set well. Yes, you can create a vegan version. Use coconut cream instead of heavy whipping cream. Replace cream cheese with a vegan cream cheese alternative. Make sure to use vegan chocolate chips as well. This way, you can enjoy the same minty flavor without dairy. This blog post covered everything you need for a delicious No-Bake Mint Chocolate Lasagna. We discussed ingredients and their measurements, plus tasty alternatives. I shared clear steps to prepare, layer, chill, and serve your dessert. Tips helped you make the perfect treat. We explored fun variations and storage tips to keep it fresh. In the end, this recipe is fun and easy. Enjoy creating and sharing this tasty dessert with friends and family!

No-Bake Mint Chocolate Lasagna Dessert Delight

Are you ready to treat yourself to a delicious No-Bake Mint Chocolate Lasagna? This dessert is easy to make and

- 4 boneless, skinless chicken thighs - 4 medium Yukon Gold potatoes, cut into quarters - 1 red bell pepper, sliced into strips - 1 yellow onion, sliced into thin rings - 4 cloves garlic, finely minced - 2 teaspoons dried oregano - 1 teaspoon dried thyme - 1 teaspoon smoked paprika - 3 tablespoons extra virgin olive oil - Juice of 1 medium lemon - Sea salt and freshly cracked black pepper to taste Gather these ingredients to create a tasty One Pan Greek Chicken and Potatoes meal. Using chicken thighs gives you rich flavor. Yukon Gold potatoes cook well and become creamy. The red bell pepper adds a sweet crunch. The yellow onion brings sweetness and depth. The marinade combines garlic, oregano, thyme, and smoked paprika. These spices give your dish a warm and earthy taste. Olive oil and lemon juice help to tenderize the chicken and add brightness. Sea salt and black pepper enhance all the flavors. Prepare these fresh ingredients, and you’ll be ready to cook a delightful and hearty meal. {{ingredient_image_2}} First, preheat your oven to 400°F (200°C). This step is key for a great roast. While the oven warms up, grab a large mixing bowl. In this bowl, whisk together the olive oil, lemon juice, minced garlic, dried oregano, thyme, smoked paprika, sea salt, and black pepper. The mix should smell great. Now, take your chicken thighs and add them to the marinade. Use your hands or tongs to coat each thigh well. Make sure every piece gets that tasty mix. For the best flavor, let them marinate for at least 15 minutes. If you have more time, marinating for up to 2 hours in the fridge works wonders. Next, let’s chop the veggies. Cut your Yukon Gold potatoes into quarters. Slice the red bell pepper into strips and the onion into thin rings. Add them to a large oven-safe skillet or roasting pan. Drizzle with a tablespoon of olive oil and season with sea salt, black pepper, and a pinch of dried oregano. Toss the vegetables well for an even coating. Create a space in the center of your veggies. Place the marinated chicken thighs right on top. This lets the chicken juices flavor the vegetables as they cook. Now, transfer the skillet or pan to your preheated oven. Bake for about 35-40 minutes. Check the chicken's internal temperature; it should reach 165°F (75°C). The potatoes should be tender and golden. For a crispy finish, switch to broil for 2-3 minutes. Keep a close eye to avoid burning. After baking, let it rest for a few minutes. This helps the juices settle. For the best flavor, marinate the chicken for at least 15 minutes. If you can, let it sit for up to 2 hours in the fridge. This helps the spices soak in well. You can use a large bowl or a zip-top bag for marinating. Both options work great and keep things clean. To get a crispy finish, use the broiler for the last few minutes. This makes the chicken skin extra crunchy. Always check the chicken for doneness. It should reach 165°F (75°C). Use a meat thermometer to be sure it's safe to eat. Serve the dish straight from the skillet for a homey feel. If you want to impress, plate the chicken and veggies separately. Drizzle some pan juices on top for added flavor. A sprinkle of fresh parsley adds a nice touch. You might also add a lemon wedge for a pop of color and zest. Pro Tips Marinating Time: For the best flavor, marinate the chicken thighs for at least 2 hours or overnight if possible. This allows the spices and lemon to penetrate the meat thoroughly. Vegetable Variations: Feel free to add other vegetables like zucchini or cherry tomatoes to the dish for added color and nutrition. Just ensure they are cut to a similar size for even cooking. Check Chicken Temperature: Always use a meat thermometer to check that the chicken reaches an internal temperature of 165°F (75°C) for safe consumption. Serving Suggestions: Pair this dish with a side of Greek salad or tzatziki for a refreshing complement to the hearty chicken and potatoes. {{image_4}} You can switch chicken thighs for chicken breasts. Breasts cook faster but may dry out. Use bone-in pieces for more flavor. For vegetables, I love using sweet potatoes instead of Yukon Gold. They add a nice sweetness. You can also try zucchini or carrots for extra color and taste. To boost flavor, add more spices like cumin or coriander. Fresh herbs like basil or dill can brighten the dish as well. You can change the marinade too. Try adding yogurt for creaminess or honey for sweetness. This adds a different twist to your Greek chicken. Pair this dish with a fresh Greek salad. A simple mix of cucumbers, tomatoes, and feta works well. You can also serve warm pita bread on the side. This adds a nice touch and helps soak up the juices. Try tzatziki sauce for a cool, creamy dip. To store leftovers, let the dish cool down. Place it in an airtight container. This helps keep the chicken and potatoes fresh for up to four days in the fridge. When you want to eat, just take out what you need. For reheating, use the oven if you can. Preheat it to 350°F (175°C). Place the chicken and potatoes on a baking sheet. Heat for around 15-20 minutes. This keeps the food juicy and tasty. You can also use a microwave. Just cover the dish to avoid drying out the food. Heat in short bursts, stirring in between. To freeze this dish, wait until it's fully cool. Cut the chicken into smaller pieces if you like. Place everything in a freezer-safe bag or container. Remove as much air as you can. This helps prevent freezer burn. You can freeze it for up to three months. When you're ready to eat, take it out and let it thaw in the fridge overnight. For reheating, put it in the oven at 350°F (175°C) until it's hot all the way through. If you're in a hurry, the microwave also works. Just be careful to heat it slowly to keep it moist. Yes, you can use chicken breast or drumsticks. Chicken breast will cook faster. Be careful not to overcook it. Drumsticks have more flavor and stay juicy. Both options work well with the marinade. Baking times can vary by oven type. Generally, bake for 35-40 minutes at 400°F. Always check the chicken's temperature. It should reach 165°F for safety. If you have a convection oven, it may cook faster. Adjust your time to avoid drying out the chicken. You can add many other veggies. Try zucchini, carrots, or cherry tomatoes. These vegetables add color and taste. Just remember to cut them similar in size. This helps them cook evenly with the chicken and potatoes. Yes, this recipe is great for meal prep. You can marinate the chicken ahead of time. It holds flavor well in the fridge for up to 2 hours. Cooked leftovers can be stored in the fridge for 3-4 days. Reheat gently to keep the chicken moist. This recipe offers a tasty and easy way to cook chicken thighs with veggies. You learned about main ingredients and simple steps to prepare the dish. Don’t forget the important marinating and cooking tips to get the best flavor. Feel free to make variations, explore new spices, and pair with your favorite sides. Proper storage will let you enjoy leftovers without waste. Cooking should be fun, so experiment and make it your own!

One Pan Greek Chicken and Potatoes Delight

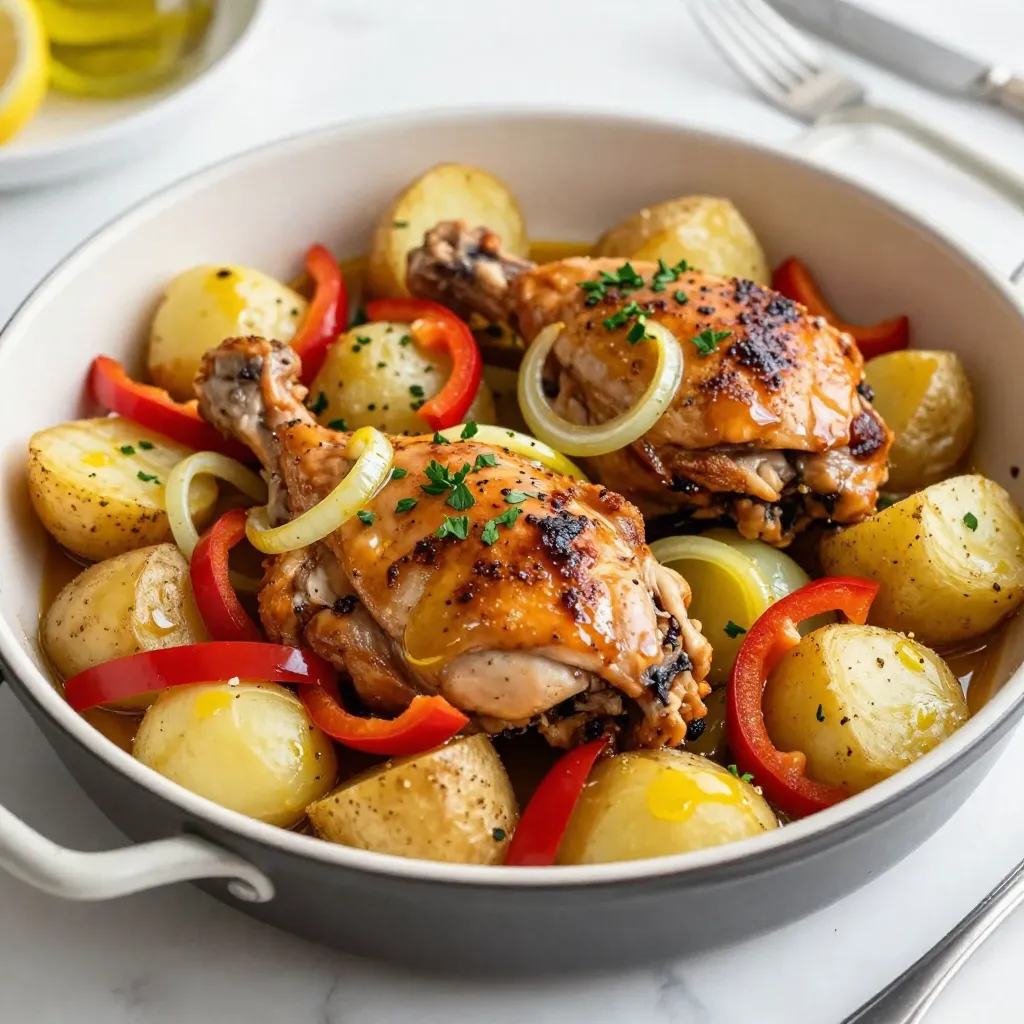
Looking for a simple, tasty dinner that brings the flavors of Greece to your table? This One Pan Greek Chicken

To make this delicious soup, you will need: - 2 tablespoons olive oil - 1 medium onion, finely diced - 3 cloves garlic, minced - 1 carrot, finely diced - 1 can (28 oz) crushed tomatoes - 4 cups vegetable broth - 1 teaspoon dried basil - 1 teaspoon dried oregano - Sea salt and freshly ground black pepper, to taste - 1 package (9 oz) cheese tortellini (fresh or frozen) - 1 cup heavy cream (or coconut cream for a dairy-free alternative) - Fresh basil leaves, for garnish - Grated Parmesan cheese, for serving (optional) If you have allergies or need to make swaps, here are some ideas: - Use olive oil for any cooking oil. - Substitute the onion with leeks or shallots. - For a gluten-free option, choose gluten-free tortellini. - To make it vegan, replace heavy cream with coconut cream. - If you can't find cheese tortellini, use mushroom or spinach tortellini. When choosing your ingredients, here are my tips: - Select fresh, firm vegetables for the best flavor. - Look for high-quality canned tomatoes, like San Marzano, for a richer taste. - Use homemade vegetable broth if possible; it adds depth. - For tortellini, brands like Rana or Buitoni offer great flavors. - Always pick fresh basil that feels vibrant and smells fragrant. These choices will help you create a creamy tomato tortellini soup that shines with flavor and comfort. To start making creamy tomato tortellini soup, gather all your ingredients. Here’s what you need: - 2 tablespoons olive oil - 1 medium onion, finely diced - 3 cloves garlic, minced - 1 carrot, finely diced - 1 can (28 oz) crushed tomatoes - 4 cups vegetable broth - 1 teaspoon dried basil - 1 teaspoon dried oregano - Sea salt and freshly ground black pepper, to taste - 1 package (9 oz) cheese tortellini (fresh or frozen) - 1 cup heavy cream (or coconut cream for a dairy-free alternative) - Fresh basil leaves, for garnish - Grated Parmesan cheese, for serving (optional) Now, finely dice the onion and carrot. Mince the garlic. This helps the flavors mix well. 1. Heat the Olive Oil: In a large pot, heat the olive oil over medium. 2. Sauté the Onion: Add the diced onion. Cook for 4-5 minutes until it is soft and clear. 3. Add Garlic and Carrot: Mix in the minced garlic and diced carrot. Cook for 2-3 minutes until fragrant. 4. Combine Tomatoes and Broth: Pour in the crushed tomatoes and vegetable broth. Stir well and bring to a gentle boil. 5. Season the Soup: Add dried basil, oregano, salt, and pepper. Lower the heat and let it simmer for about 10 minutes. 6. Cook the Tortellini: Increase the heat again. Add the tortellini and cook according to the package, usually 3-5 minutes. 7. Stir in the Cream: Lower the heat and mix in the heavy cream or coconut cream. Heat for another 2 minutes, but do not boil. 8. Taste and Adjust: Try the soup and add more salt and pepper if needed. Serve the soup hot in deep bowls. For a nice touch, add a fresh basil leaf on top. A drizzle of olive oil adds flavor and looks great. Pair the soup with crusty bread for a full meal. Enjoy the warmth and comfort of this creamy dish! To get the best flavor in your creamy tomato tortellini soup, follow some simple steps: - Use fresh herbs. Fresh basil adds a bright taste. - Sauté your vegetables. Sautéing onion and garlic first builds a rich base. - Adjust seasoning. Always taste your soup before serving. Add salt and pepper as needed. - Simmer long enough. Letting the soup simmer helps flavors blend well. - Add cream slowly. Stir in the cream gently to keep it smooth. Avoid these common mistakes for a perfect soup: - Don’t rush the sautéing. Cooking vegetables too fast can lead to bland soup. - Skip the boiling. Make sure to bring the broth to a gentle boil before adding tortellini. - Overcook the tortellini. Follow the package directions closely to avoid mushy pasta. - Forget to taste. Always check if it needs more salt or spice. Gather these tools for easy cooking: - Large pot. A sturdy pot helps with even heating. - Cutting board and knife. Use these to chop your veggies finely. - Wooden spoon. A good spoon helps mix ingredients well. - Measuring cups and spoons. Accurate measurements lead to great results. - Ladle. This makes serving the soup neat and easy. These tips will help you create a creamy tomato tortellini soup that’s full of flavor and comfort. Enjoy your cooking! {{image_4}} You can easily make this soup dairy-free. Instead of heavy cream, use coconut cream. It adds a nice sweetness and richness. For a vegan option, skip the cheese tortellini. Use a vegetable-based tortellini instead. Many brands offer vegan options that taste great. Want to boost the flavor? Add some chopped spinach or kale. They cook quickly and add nutrients. You can also mix in cooked chicken or sausage for protein. If you like heat, sprinkle in some red pepper flakes. These small changes can take your soup to the next level. Not a fan of cheese tortellini? Try other types! Mushroom or spinach tortellini adds unique flavors. You can even use homemade tortellini if you feel adventurous. Each type gives a new twist to this classic dish. Explore and find your favorite! To keep your creamy tomato tortellini soup fresh, let it cool first. Once cooled, pour it into an airtight container. Store it in the fridge for up to three days. Make sure to label the container with the date. This helps you know when to eat it. You can freeze this soup if you want to keep it longer. Use a freezer-safe container or a heavy-duty freezer bag. Leave some space at the top, as soup expands when frozen. It can stay good in the freezer for up to three months. When ready to eat, thaw it overnight in the fridge. To reheat your soup, you can use the stovetop or microwave. If using the stovetop, pour the soup into a pot. Heat it over medium heat, stirring often. This helps it heat evenly. If using the microwave, place the soup in a microwave-safe bowl. Heat it in short bursts, stirring in between. Make sure it is hot throughout before serving. Enjoy! Yes, you can use store-bought tortellini. Fresh or frozen tortellini works well. The cooking time may vary slightly. Just follow the package instructions for the best results. I often choose cheese tortellini for extra creaminess. This saves time and still gives great flavor. To adjust for more servings, simply double the ingredients. Use 4 tablespoons of olive oil and 2 cans of crushed tomatoes. You may also want to add more broth. Keep the same cooking steps, but allow extra time if needed. This way, you still get that rich taste with more portions. This soup pairs well with crusty bread or a simple green salad. You could also add grilled cheese sandwiches for a cozy meal. Fresh basil on top adds a nice touch, too. Enjoying it with friends or family makes it even better! Creamy tomato tortellini soup is easy to make and customize. You can swap ingredients or adjust flavors to fit your taste. Storing and reheating the soup is simple too, so leftovers are not a problem. I hope you feel confident in trying the recipe and making it your own. Enjoy every warm bowl of this comforting dish!

Creamy Tomato Tortellini Soup Simple and Comforting Dish

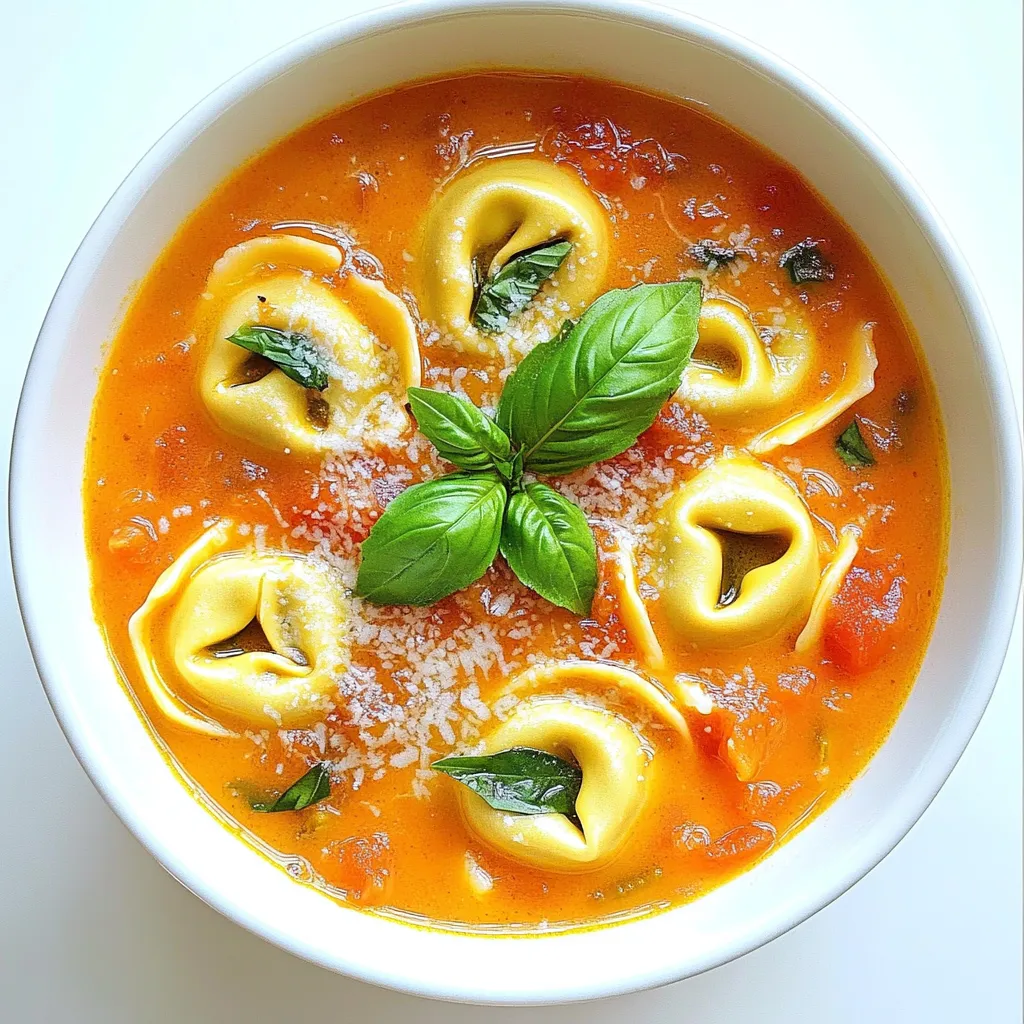
Looking for a warm, tasty meal that’s super easy to make? Creamy Tomato Tortellini Soup hits all the right notes!

- 1 ripe mango, peeled and diced - 1 cup dragonfruit (fresh or frozen), chopped into cubes - 1 banana, sliced - 1 cup coconut milk (or your choice of milk) - 1 tablespoon honey or agave syrup (optional for sweetness) - 1 tablespoon chia seeds - Ice cubes (optional, for a thicker consistency) To make the Mango Dragonfruit Smoothie, you need fresh, ripe ingredients. Start with a mango. Choose one that feels slightly soft but is not bruised. The color should be vibrant, showing it is ripe. Next, grab some dragonfruit. If using fresh, look for one that has bright pink or yellow skin. Fresh dragonfruit has a sweet taste and a crunchy texture. You will also need a banana. Pick one that is yellow with a few brown spots. This means it is sweet and ready to use. For the milk, coconut milk adds a creamy flavor. However, you can use any milk you prefer, such as almond or oat milk. If you like sweetness, add honey or agave syrup. This step is optional, depending on your taste. Chia seeds are a great addition for nutrition. They are tiny but full of fiber and protein. Finally, you can add ice cubes for a thicker smoothie. This is perfect for hot days when you want a cold treat. Gather these ingredients, and you are ready to blend a refreshing drink! - Handling and chopping dragonfruit: Cut the dragonfruit in half. Use a spoon to scoop out the bright flesh. Chop the flesh into small cubes. This fruit adds a fun color and taste. - Peeling and dicing the mango: Cut off the skin of the mango. Hold the fruit in one hand and slice it into cubes. Be careful of the pit! Diced mango gives sweetness to the smoothie. - Slicing the banana: Take a ripe banana and peel it. Use a knife to slice it into rounds. Banana adds creaminess and a nice flavor. - Combining base ingredients in a blender: In a blender, add the coconut milk first. Then, add the diced mango, dragonfruit cubes, and sliced banana. This mix will create a rich base. - Adding optional honey or agave syrup: If you like your smoothie sweet, drizzle in honey or agave syrup. This step is optional, so taste it first! - Incorporating chia seeds: Sprinkle chia seeds into the blender. These seeds are tiny but mighty. They add nutrition and a fun texture. - Blending until smooth and adjusting consistency: Blend the mixture on high until it’s creamy. If you want a thicker smoothie, add ice cubes. Blend again until smooth. Check the taste and adjust as needed! To choose the best mango, look for one that feels slightly soft when you press it. The skin should be a mix of yellow and red. A good mango smells sweet at the stem end. Avoid ones with dark spots or wrinkles. For dragonfruit, pick one that is bright in color and firm. The skin should not have too many blemishes. A ripe dragonfruit has a sweet scent. If it feels too soft, it may be overripe. To make a thicker smoothie, add ice cubes or use frozen fruits. This gives it a creamy texture. For a thinner smoothie, add more coconut milk or juice. When blending, start on a low speed to mix. Then, increase to high speed until smooth. This method helps break down all the ingredients evenly. If it's too thick, add a splash of milk and blend again. Adjust to your liking! {{image_4}} If you're looking for dairy-free options, use almond milk or oat milk instead of coconut milk. Both work well and keep the smoothie creamy. For sweeteners, honey is great, but you can try maple syrup or stevia if you prefer. These alternatives can suit your taste and dietary needs. Want to boost the nutrients? Add a handful of spinach or kale. They blend well and you won’t taste them much. For extra flavor, mix in other fruits like pineapple or berries. Each addition gives a unique twist to the classic Mango Dragonfruit Smoothie. To keep your leftover smoothie fresh, store it in the fridge. Use a sealed container to prevent oxidation. This way, it stays tasty for up to 24 hours. When you’re ready to drink, shake it well or stir to mix any settled ingredients. If you want to save the smoothie for longer, freezing is a good option. Pour it into ice cube trays or freezer-safe bags. This lets you enjoy it later in individual portions. To keep your mango fresh, store it at room temperature until ripe. Once ripe, place it in the fridge for a few days. This helps maintain its sweetness and texture. For dragonfruit, keep it in the fridge, too. Wrap it in plastic wrap to prevent it from drying out. This way, it stays juicy and vibrant for your smoothies. Chia seeds are easy to store. Keep them in a cool, dry place in an airtight container. This helps them stay fresh for months. Make sure to check the date on the package for the best quality. You can use other milks if you don't want coconut milk. Here are some great options: - Almond milk - Oat milk - Soy milk - Cashew milk These milks will keep your smoothie creamy and tasty. Each type has its own flavor. For example, almond milk is nutty, while oat milk is sweet. Adjust your choice based on your taste. Yes, you can use frozen fruit! In fact, using frozen fruit has many benefits: - It makes your smoothie cold and refreshing. - It gives your drink a thicker texture. - Frozen fruit saves time since you don’t need to chop fresh fruit. Using frozen dragonfruit and mango can be a smart choice. Plus, it keeps your smoothie fresh longer and helps you enjoy it anytime. This smoothie is packed with good nutrients! Here are some health benefits: - Mango is high in vitamins A and C, which help your skin and immune system. - Dragonfruit has antioxidants that can improve your health. - Bananas provide potassium, which is good for your heart. - Chia seeds have fiber and omega-3 fatty acids, great for digestion. Overall, this smoothie is a tasty way to bring good nutrition into your diet. Enjoy it as a snack or breakfast! This blog post covered how to make a delicious mango dragonfruit smoothie. You learned about the key ingredients and how to prepare them. I shared tips for selecting ripe fruit and achieving your desired smoothie texture. You can explore fun variations and storage tips for leftovers too. Enjoy experimenting with this recipe. It's easy to adapt for your taste and needs! A tasty smoothie can be a quick and healthy choice any time of day. Now it's your turn to blend!

Mango Dragonfruit Smoothie Refreshing and Flavorful Drink

Looking for a refreshing drink that bursts with flavor? A Mango Dragonfruit Smoothie is the perfect choice. It combines sweet

Older posts
Newer posts
← Previous Page1 Page2 Page3 … Page85 Next →

dsad

© 2026 spoonfulsavory • Built with GeneratePress

Our Policies

  • Copyright Policy
  • Cookie Policy
  • GDPR Policy
  • Privacy Policy
  • Disclaimer
  • Terms Of Use

More Information

  • Home
  • About
  • Contact
  • Appetizers
  • Dessert
  • Dinner
  • Drinks
©2026, spoonfulsavory About Back To Top