Skip to content
DisclaimerTerms Of UseGDPR PolicyCookie Policy

spoonfulsavory

  • Home
  • Drinks
  • Appetizers
  • Dinner
  • Dessert
  • About
  • Contact
  • Privacy Policy
DisclaimerTerms Of UseGDPR PolicyCookie Policy

NO-ING-IMG

- 1 medium cauliflower, cut into bite-sized florets - 1 cup all-purpose flour - 1 teaspoon garlic powder - 1 teaspoon onion powder - ½ teaspoon smoked paprika - ½ teaspoon fine sea salt - ½ teaspoon freshly ground black pepper - 1 cup water (or plant-based milk, like almond or oat) - ½ cup buffalo sauce (adjust to your preferred spice level) To make these tacos, you start with fresh cauliflower. It gives the best taste and texture. You will mix the flour with spices to create a tasty batter. Garlic powder and smoked paprika add flavor. The batter is key for coating the florets well. - 1 ripe avocado, sliced - 1 cup finely shredded red cabbage - ¼ cup fresh cilantro, chopped Toppings make these tacos shine. Sliced avocado adds creaminess. Shredded red cabbage gives a nice crunch. Fresh cilantro brings brightness. You can mix and match to make these tacos your own. - 8 small corn tortillas - 8 small flour tortillas You have a choice of tortillas. Corn tortillas are gluten-free and have a nice flavor. Flour tortillas are soft and chewy. Warm them up before adding the filling for the best taste. Mixing the batter In a large bowl, combine the flour, garlic powder, onion powder, smoked paprika, sea salt, and black pepper. This blend gives the cauliflower great flavor. Gradually add water or plant-based milk. Whisk until the mix is smooth and thick like pancake batter. Coating the florets Take each floret and dip it into the batter. Ensure it is fully coated but let the extra batter drip off. Place the florets on a plate lined with parchment paper. This helps prevent sticking and makes cleanup easier. Preheating the air fryer Set your air fryer to 375°F (190°C) and let it preheat. Preheating helps the cauliflower cook evenly and become crispy. Cooking times and batch cooking Arrange the coated florets in a single layer in the air fryer basket. Do not overcrowd them. It’s best to cook in batches if needed. Air fry for 12-15 minutes. Shake the basket halfway through to ensure even cooking. The florets should turn golden brown and crispy. Wrapping the tortillas Warm the tortillas in a dry skillet or microwave them for a few seconds. This step makes them soft and easy to wrap. Adding toppings Fill each tortilla with the hot buffalo cauliflower. Top with sliced avocado, shredded red cabbage, and fresh cilantro. These toppings add color and crunch. Squeeze lime juice over the tacos for a burst of flavor. Enjoy your spicy and simple buffalo cauliflower tacos! To get the best texture in your tacos, start with a good batter. Make sure to mix the flour, garlic powder, onion powder, smoked paprika, sea salt, and black pepper well. When you add water or plant-based milk, stir until smooth. For even batter coating, dip each floret carefully. Allow excess batter to drip back into the bowl. This keeps the coating light and crispy. To achieve optimal crispiness, preheat your air fryer to 375°F. Cook the florets in a single layer. If they overlap, they won’t cook evenly. Shake the basket halfway through the cooking time. This ensures each piece gets that golden crunch we love. Feeling adventurous? Adjust the buffalo sauce to match your spice level. Start with half a cup and mix. Then taste it. If you want more heat, add a bit more sauce. For dipping, consider serving with ranch or yogurt sauce. These creamy sides balance the heat of the buffalo sauce. They also add a nice touch to your tacos. When serving, make your tacos visually appealing. Use a colorful platter to catch the eye. Lay the tacos side by side, and add lime wedges for a fresh pop. Garnish with fresh cilantro and lime. This adds brightness and flavor. A sprinkle of extra cilantro can make your dish look restaurant-worthy. Enjoy your tasty creation! {{image_4}} You can easily make this dish vegan. Use plant-based milk like almond or oat instead of regular milk. This keeps the batter creamy and delicious. For sauce, try a vegan buffalo sauce. Many brands offer great options that are fully plant-based. If you need a gluten-free option, use gluten-free flour. It works well in the batter. You can also swap out the cauliflower for other veggies. Try using broccoli or sweet potatoes for a different taste and texture. Both options will still give you that crunch you love. Pair these tasty tacos with a fresh side salad or some roasted veggies. A cool drink like iced tea or a light beer goes well too. If you have leftovers, store the taco filling separately. You can easily reheat it for another meal. Simply warm the cauliflower in the air fryer to keep it crispy. To keep your buffalo cauliflower tacos fresh, store them in the fridge. Use an airtight container to prevent moisture. They will stay good for about 3 days. If you want to keep them longer, freezing is an option. Place the cooled tacos in a freezer-safe bag. They can last up to 2 months in the freezer. When it’s time to reheat, you have two great options: the microwave or the air fryer. The microwave is quick, but it may make the tacos soft. If you want them crispy, use the air fryer. Preheat it to 375°F (190°C) and heat for about 5-7 minutes. This helps keep that crunchy texture you love. How long will your tacos last? In the fridge, they last about 3 days. In the freezer, they can last up to 2 months. Look for signs of spoilage, like a sour smell or mold. If you see any, it's best to toss them out. Enjoy your tacos while they are fresh! To make cauliflower crispy, start with a good batter. Use all-purpose flour mixed with spices. Make sure to whisk in enough water to create a smooth batter. Dip each floret and let the excess drip off. This helps keep them crispy. Preheat your air fryer to 375°F (190°C). Cook the florets in a single layer. Shake the basket halfway through cooking. This ensures even crispiness. Aim for about 12-15 minutes until they turn golden brown. Yes, you can use frozen cauliflower. However, you need to adjust cooking times. First, thaw the cauliflower completely. Pat it dry with a towel to remove extra moisture. This helps the batter stick better. You may need to cook them a bit longer, about 15-20 minutes. Check for crispiness and shake the basket often. To make the tacos less spicy, choose a milder buffalo sauce. Look for sauces labeled "mild" or "original." You can also mix in some yogurt or sour cream with the buffalo sauce. This adds creaminess and cuts the heat. For toppings, try using plain avocado or shredded cheese. These will also balance the spice while adding great flavor. This blog post covered how to make tasty cauliflower tacos. We explored key ingredients like cauliflower, flour, and spices, plus fun toppings like avocado and cabbage. I shared step-by-step instructions, tips for crispiness, and ideas for serving. You can even adjust for vegan or gluten-free needs. To wrap up, these tacos offer a fun twist on classic flavors. Enjoy experimenting with your toppings and make it your own!

Air Fryer Buffalo Cauliflower Tacos Spicy and Simple

Are you ready to spice up your taco night with a twist? These Air Fryer Buffalo Cauliflower Tacos are not

To make these chai spiced sugar cookies, you will need: - 2 ¾ cups all-purpose flour - 1 teaspoon baking powder - ½ teaspoon baking soda - ½ teaspoon salt - 2 teaspoons ground cinnamon - 1 teaspoon ground ginger - ½ teaspoon ground cardamom - ½ teaspoon ground cloves - 1 cup unsalted butter, softened to room temperature - 1 cup granulated sugar, plus extra for rolling - ½ cup powdered sugar - 1 large egg - 1 teaspoon vanilla extract You can add a few fun twists to your cookies. Consider: - ½ cup chopped nuts for crunch - ½ cup chocolate chips for a sweet surprise - A pinch of nutmeg for extra warmth Having the right tools makes baking easier. You will need: - Mixing bowls: one large and one medium - Electric mixer for creaming ingredients - Measuring cups and spoons for accuracy - Baking sheets lined with parchment paper - A wire rack for cooling the cookies - Cookie scoop for even portions Start by preheating your oven to 350°F (175°C). Line two baking sheets with parchment paper. This helps the cookies not to stick. In a medium bowl, whisk together these dry ingredients: - 2 ¾ cups all-purpose flour - 1 teaspoon baking powder - ½ teaspoon baking soda - ½ teaspoon salt - 2 teaspoons ground cinnamon - 1 teaspoon ground ginger - ½ teaspoon ground cardamom - ½ teaspoon ground cloves Set this mix aside. It adds great flavor to your cookies. In a large bowl, cream together: - 1 cup unsalted butter, softened - 1 cup granulated sugar - ½ cup powdered sugar Use an electric mixer. Beat until the mix is light and fluffy. This should take about 3-4 minutes. Add in one large egg and 1 teaspoon of vanilla extract into the creamed mixture. Mix well until everything is combined. This adds richness to your cookies. Gradually add the dry ingredient mix to the wet mixture. Use low speed on your mixer. Mix until just combined. Be careful not to overmix, as it can change the cookie texture. Transfer the dough to the fridge. Chill for about 30 minutes. This step is key for making the dough easier to handle later. Once chilled, scoop tablespoon-sized portions of dough. Roll them into balls with your hands. Roll each ball in granulated sugar until fully coated. Place them on the baking sheets, leaving about 2 inches between each cookie. This space allows them to spread. Flatten each cookie slightly using a fork or the bottom of a glass. Put the cookie sheets in the oven and bake for 10-12 minutes. Look for lightly golden edges to know they are done. After baking, take the sheets out of the oven. Let the cookies cool on the sheets for 5 minutes. Then, move them to a wire rack to cool completely. This helps them stay soft and delicious. To get that soft and chewy texture, chill the dough. Chilling helps the butter firm up. This step prevents the cookies from spreading too much during baking. Aim for a smooth dough that's not too sticky. You want it to hold its shape but still be soft. Accurate measuring is key to great cookies. Use a kitchen scale for flour if you have one. If not, spoon flour into a measuring cup and level it off with a knife. Avoid packing the flour down, as this can lead to dry cookies. Measure your sugar with the same care for best results. Mix just until the ingredients combine. Overmixing can make cookies tough. When you add the dry ingredients, use low speed. Stir gently to keep the dough light. This keeps your cookies soft and tender. For a lovely display, place your cookies on a festive plate. Dust them with powdered sugar for a touch of elegance. Pair these cookies with a warm cup of chai. This enhances the spice and creates a cozy experience. Enjoy sharing them with family and friends! {{image_4}} You can make your chai spiced sugar cookies even better by adding nuts or chocolate chips. Try chopped walnuts or pecans for a crunchy texture. If you love chocolate, mix in some semi-sweet chocolate chips. Just fold them in gently after you combine the wet and dry mixtures. This will give each bite a delightful surprise. If you need a gluten-free option, use a gluten-free flour blend. These blends often work well in cookie recipes. You can also try almond flour for a nutty flavor. Just keep in mind that gluten-free flours can change the cookie's texture. You might want to add a bit of xanthan gum to help with binding. To change the flavor of your cookies, experiment with seasonal spices. In fall, add nutmeg or allspice for warmth. In winter, try a hint of star anise for a unique twist. Just a little extra spice can make your cookies taste festive and cozy. Adjust the amounts to suit your taste. Store your baked chai spiced sugar cookies in an airtight container. This keeps them soft and fresh. Layer parchment paper between cookies to avoid sticking. Place the container in a cool, dry area. Avoid direct sunlight as it can dry them out. You can freeze the cookie dough for later use. First, scoop the dough into balls and roll them. Next, place them on a baking sheet and freeze until firm. After that, transfer the balls into a freezer bag. Keep them in the freezer for up to three months. When ready to bake, just add a few extra minutes to the baking time. Baked cookies last about one week at room temperature. For longer freshness, store them in the fridge for two weeks. Make sure to check for any signs of spoilage before eating. Enjoy these soft cookies with a warm drink. Their spice flavor pairs well with tea or coffee. Chai spices are a blend of warm flavors. They often include cinnamon, ginger, cardamom, and cloves. These spices create a cozy, comforting taste. In my chai spiced sugar cookies, I use: - 2 teaspoons ground cinnamon - 1 teaspoon ground ginger - ½ teaspoon ground cardamom - ½ teaspoon ground cloves These spices make the cookies rich and aromatic. They add a unique twist to classic sugar cookies. Yes, you can substitute some ingredients if needed. If you don’t have all-purpose flour, try a gluten-free blend. For butter, use coconut oil or a vegan butter. You can swap granulated sugar with coconut sugar for a different flavor. Just remember that texture may change a bit. To make vegan chai spiced sugar cookies, you need to replace the egg. Use a flax egg instead. Mix 1 tablespoon of flaxseed meal with 2.5 tablespoons of water. Let it sit for 5 minutes. This helps bind the cookies. Also, use vegan butter in place of regular butter. Follow the same steps in the recipe. Store your cookies in an airtight container. This keeps them soft and fresh. Layer parchment paper between the cookies to prevent sticking. For longer storage, keep them in the fridge. They will last longer that way. Chai spiced sugar cookies can last about a week. When stored properly, they remain soft and delicious. If you freeze them, they can last for up to three months. Just thaw them in the fridge before enjoying. Yes, you can use brown sugar instead of granulated sugar. Brown sugar adds moisture and a richer flavor. The cookies may be a bit chewier. Just keep the same amount, one cup, for best results. Baking cookies can be fun and easy with the right steps. We covered key ingredients, tools, and methods to make perfect cookies. I shared tips for texture, measuring, and presentation. You learned about tasty variations and proper storage. Now, it’s your turn to bake. Enjoy the process and share your creations!

Chai Spiced Sugar Cookies Irresistible and Soft Recipe

Are you ready to bake the most delightful Chai Spiced Sugar Cookies? This soft and flavorful recipe will fill your

- 1.5 lbs baby Yukon Gold potatoes - 4 cloves garlic, minced - 1/2 cup grated Parmesan cheese - 1/4 cup olive oil - 1/4 cup heavy cream - Salt and pepper to taste - Fresh parsley for garnish Garlic Parmesan Smashed Potatoes need simple, fresh ingredients. The star of this dish is the baby Yukon Gold potatoes. They are creamy and buttery. I love using them because they smash well and taste great. Next, garlic adds a punch of flavor. I use four cloves, minced, to ensure every bite is tasty. Parmesan cheese brings a rich, salty kick. I prefer using freshly grated cheese for better melting and flavor. For creaminess, I add heavy cream. It makes the potatoes smooth and rich. Olive oil gives a nice finish and helps the potatoes crisp up. Finally, don’t forget salt and pepper. They balance the flavors and enhance the dish. Fresh parsley adds a pop of color and a hint of freshness on top. When you gather these ingredients, you prepare for a delightful cooking experience. Enjoy the process! Fill a large pot with water and add a generous pinch of salt. Next, place the baby Yukon Gold potatoes into the water. Bring this to a vigorous boil. Cook the potatoes for about 15-20 minutes until they are fork-tender. You can check doneness by poking a potato with a fork. After the potatoes finish boiling, carefully drain them using a colander. Let them cool for a few minutes. This cooling step is key. It helps you handle the potatoes without burning your fingers. While the potatoes cool, preheat your oven to 425°F (220°C). This hot oven will give the potatoes a nice crispy finish. Once the potatoes are cool enough, place them on a parchment-lined baking sheet. With a fork or potato masher, gently smash each potato. Flatten them a bit, but keep them intact. This rustic look adds charm. In a medium bowl, whisk together the minced garlic, olive oil, heavy cream, and half of the grated Parmesan cheese. Make sure to season this mixture with salt and pepper to taste. This blend brings a rich flavor. Evenly drizzle or brush the garlic-Parmesan mixture over the smashed potatoes. Make sure each potato gets a good coating. Then, place the baking sheet in your preheated oven. Bake for 20-25 minutes until the edges turn golden brown and crispy. During the last 5 minutes of baking, sprinkle the remaining grated Parmesan cheese over the potatoes. This will melt into a delicious cheesy layer. Once out of the oven, let the potatoes sit for a moment. Finish with a sprinkle of finely chopped fresh parsley for color and freshness. - Boil the potatoes until they are fork-tender. This takes about 15-20 minutes. - Use a gentle hand when smashing. This keeps them looking great on the plate. - These smashed potatoes pair well with meats like chicken or beef. They also make a great side at gatherings. - Drizzle any leftover garlic-Parmesan mixture over the top. This adds even more flavor. - Feel free to experiment with herbs like rosemary or thyme. They can add a new twist. - For extra crunch, consider adding crispy bacon bits. This brings a savory touch. {{image_4}} Garlic Parmesan smashed potatoes are a fantastic base for many twists. You can easily change the flavor to suit your taste. - Add different cheeses like cheddar or feta for a richer taste. - Mix in sour cream for extra creaminess and tang. These changes give a fun new spin to the classic dish. - Incorporate fresh rosemary or thyme for an earthy flavor. - Try adding chives for a mild onion kick. Fresh herbs can brighten your dish and add depth. - Substitute heavy cream with plant-based cream to keep it dairy-free. - Use nutritional yeast instead of Parmesan for a savory kick. These swaps make the dish vegan-friendly while keeping it tasty. After you enjoy your Garlic Parmesan Smashed Potatoes, store any leftovers in an airtight container. This keeps them fresh and tasty. They are best consumed within 2-3 days. If you want to make these potatoes ahead of time, freeze them before baking. This way, you can easily prepare a delicious meal later. When you're ready to bake, thaw them in the fridge overnight for the best results. To reheat, use your oven. This method keeps the potatoes crispy. Just pop them in the oven until warm. If you’re in a hurry, the microwave works too, but the texture may suffer a bit. To make your Garlic Parmesan Smashed Potatoes crispy, first, ensure your oven is hot. Preheat it to 425°F (220°C). This step is key for nice texture. Once you bake the potatoes, look for golden edges. Bake them for 20-25 minutes. This will give you that wonderful crunch. Yes, you can use other potatoes, but Yukon Gold is best. Yukon Gold potatoes have a creamy texture and rich flavor. They smash well and hold their shape. This makes them perfect for this dish. Other types may not give you the same result. Garlic Parmesan Smashed Potatoes pair well with many dishes. They go great with grilled meats, like chicken or steak. You can also serve them with roasted veggies. They add a nice touch to a hearty meal. Enjoy them at your next gathering for a hit! Garlic Parmesan smashed potatoes are a simple yet tasty side dish. We covered the main steps: boiling, smashing, and baking the potatoes to achieve a golden finish. You can try various cheese types or add fresh herbs for a twist. Store leftovers in the fridge or freeze before cooking for later use. Enjoy these delightful potatoes at your next meal or gathering to impress your guests. Remember, cooking is all about experimenting and finding what you love!

Garlic Parmesan Smashed Potatoes Rich and Flavorful Dish

Are you ready to savor a dish that’s both rich and flavorful? Garlic Parmesan Smashed Potatoes are the perfect side

- 1 cup canned pumpkin puree - 1/2 cup vegetable oil - 1/2 cup packed brown sugar - 1/4 cup granulated sugar - 2 large eggs - 1 teaspoon vanilla extract - 1 1/2 cups all-purpose flour - 1 teaspoon baking soda - 1 teaspoon baking powder - 1 teaspoon ground cinnamon - 1/2 teaspoon ground nutmeg - 1/4 teaspoon ground cloves - 1/4 teaspoon salt - 1/3 cup all-purpose flour - 1/4 cup packed brown sugar - 1/2 teaspoon ground cinnamon - 2 tablespoons unsalted butter, cold and cubed These ingredients make the best muffins. The pumpkin puree gives moisture and flavor. The oils help keep the muffins soft. Brown sugar adds a nice caramel taste. Granulated sugar balances that sweetness. Eggs help bind everything together. Vanilla extract adds warmth and depth. The flour gives structure, while baking soda and powder help them rise. The spices bring out the pumpkin's natural taste. For the streusel topping, the flour and brown sugar create a sweet crunch. Ground cinnamon adds spice. Cold butter helps form those lovely crumbs. This mix is what makes the muffins extra special! - Preheat the oven to 350°F (175°C) - Prepare muffin tin with liners or grease First, you want a warm oven. Preheating it to 350°F gets your muffins just right. While the oven warms, grab your muffin tin. You can use paper liners for easy cleanup or grease the cups with a bit of oil or butter. This helps the muffins pop out smoothly after baking. - Combine pumpkin puree, vegetable oil, and sugars - Incorporate eggs and vanilla extract In a large bowl, mix the canned pumpkin puree with vegetable oil. Add in packed brown sugar and granulated sugar. Stir until smooth. Next, crack in two large eggs and pour in the vanilla extract. Mix well until everything is combined. This will create a rich, moist base for your muffins. - Sift together flour, baking soda, baking powder, and spices - Gradually mix dry ingredients into wet ingredients Now, take another bowl and sift together the all-purpose flour, baking soda, baking powder, ground cinnamon, ground nutmeg, ground cloves, and salt. Sifting helps keep your muffins light. Gradually add this dry mix to the wet ingredients. Stir gently until just combined. It's okay if a few lumps remain; overmixing can make muffins tough. - Mix flour, brown sugar, and cinnamon - Incorporate cold butter into the mixture For the streusel topping, combine the flour, brown sugar, and cinnamon in a small bowl. Now, take cold, cubed butter and add it to the dry mix. Using your fingers or a pastry cutter, blend until it looks like coarse crumbs. This adds a sweet crunch on top of your muffins. - Fill muffin cups 2/3 full with batter - Add streusel topping generously Using a spoon or a large scoop, fill each muffin cup about two-thirds full with the batter. This gives them room to rise. Don’t forget to sprinkle the streusel topping generously on each muffin. This will create a deliciously crunchy layer. - Bake for 18-22 minutes - Cool muffins in the pan for 5 minutes before transferring Place your muffin tin in the preheated oven. Bake for 18 to 22 minutes. Check them by inserting a toothpick into the center of a muffin; it should come out clean. After baking, let the muffins cool in the pan for about 5 minutes. Then, transfer them to a wire rack to cool completely. Enjoy the warm, spiced smell filling your kitchen! To make perfect muffins, mix gently. Use a rubber spatula to fold in the dry ingredients. Stop when you see a few lumps. Overmixing makes muffins tough, and we want them soft. Check for doneness by inserting a toothpick into the center of a muffin. If it comes out clean, your muffins are ready. If it has wet batter, bake a few more minutes. To boost flavor, add a pinch of ground ginger or allspice. These spices pair well with pumpkin. You can also use nutmeg for a warm kick. For extra texture, mix in chopped nuts like walnuts or pecans. Chocolate chips add a fun twist too. Just fold them in gently with the batter. Serve your muffins warm with a pat of butter on top. This adds a nice richness. Another idea is to dust them with powdered sugar for a sweet touch. For a lovely display, use a rustic wooden platter. Arrange the muffins neatly. This simple touch makes them look even more inviting. {{image_4}} You can make these muffins fit different diets. For a gluten-free option, swap all-purpose flour with almond flour or a gluten-free blend. This keeps the muffins tasty while catering to gluten sensitivities. For low-sugar muffins, reduce brown and granulated sugar. Try using applesauce or a sugar substitute, like stevia, to cut the sweetness but still maintain moisture. Want to mix it up? You can add chocolate chips or dried cranberries to the batter. These add a fun twist and extra sweetness. Alternatively, try different spices. Ginger or allspice can give your muffins a unique flavor. Just a little change can make a big impact on taste! To bring out fall vibes, consider adding chopped pecans or walnuts to your batter. The crunch complements the softness of the muffins. For a sweet finish, drizzle a simple glaze made of powdered sugar and milk on top. This adds a lovely shine and a touch of sweetness. You can also sprinkle some cinnamon sugar on top before baking for an extra flavor boost! To keep your muffins fresh at room temperature, store them in an airtight container. Place a paper towel at the bottom to absorb moisture. This helps to prevent sogginess. Keep the muffins away from direct sunlight and heat. They will stay fresh for about three days this way. For long-term storage, freezing is a great option. Wrap each muffin tightly in plastic wrap. Then, place the wrapped muffins in a freezer-safe bag. They can last for up to three months in the freezer. To thaw, take a muffin out and leave it at room temperature for about an hour. If you want to enjoy them warm, pop them in the microwave for 15-20 seconds. Check your muffins for freshness by looking for any mold or an off smell. If they feel dry or crumbly, they may be past their prime. To extend their shelf life, always store muffins in a cool, dry place. If you notice the muffins getting stale, try warming them slightly before eating. This can bring back some moisture and flavor. Yes, you can use fresh pumpkin. Start by cutting a pumpkin in half. Remove the seeds and stringy parts. Roast the halves cut side down at 400°F (200°C) for 40-50 minutes. Once soft, scoop out the flesh and puree until smooth. Use this fresh pumpkin puree in the recipe. Keep in mind that fresh pumpkin can be more watery. You may need to drain some excess moisture. To make these muffins dairy-free, replace the butter in the streusel with coconut oil or a dairy-free margarine. Use almond milk or oat milk instead of any dairy ingredients. Both options maintain the flavor and texture of the muffins. Just ensure to mix well to keep the batter smooth. To turn these muffins into mini ones, use a mini muffin tin. Fill each cup about halfway with batter. Bake for 10-15 minutes instead of the usual time. Check with a toothpick to see if they are done. They should come out clean. Enjoy the bite-sized treats! In this article, we explored how to make delicious pumpkin muffins. We covered the key ingredients and step-by-step instructions. You learned tips for perfect muffins and creative variations. Remember, you can customize flavors and store your muffins for later. Baking these treats is simple and fun. Use this guide to impress your friends and family with your baking skills. Enjoy the process, and happy baking!

Cinnamon Streusel Pumpkin Muffins Delightful Treat

If you’re looking for a cozy, tasty treat, these Cinnamon Streusel Pumpkin Muffins are perfect! With warm spices and a

- 1 lb ground chicken - 1/4 cup breadcrumbs - 1/4 cup grated Parmesan cheese For the base of these meatballs, I use ground chicken. It has a light flavor and is very tender. Breadcrumbs give the meatballs a nice texture. They help keep them moist. Parmesan cheese adds a wonderful savory taste. - Zest of 1 lemon - 2 tablespoons fresh lemon juice - 2 cloves garlic, minced - 1/4 cup fresh parsley, finely chopped Lemon zest and juice bring brightness to the meatballs. They wake up the flavors. Garlic adds depth and a hint of warmth. Fresh parsley gives color and freshness. It makes the meatballs look great too. - 1 teaspoon dried oregano - 1 teaspoon dried basil - 1/2 teaspoon salt - 1/4 teaspoon freshly ground black pepper - 1/4 cup olive oil (for frying) Dried oregano and basil add classic Italian flavor. They mix well with the lemon and garlic. Salt and black pepper boost all the tastes. Olive oil is key for frying. It helps get that golden crust on the meatballs. Using these ingredients makes the lemon herb chicken meatballs tasty and fun to eat. You can feel good knowing they are easy to make too! {{ingredient_image_2}} - Start by gathering your dry ingredients. In a large mixing bowl, combine: - 1 lb ground chicken - 1/4 cup breadcrumbs - 1/4 cup grated Parmesan cheese - Mix these dry ingredients gently with a fork or your hands. This helps to keep them light and fluffy. - Next, it’s time for the wet ingredients. Add: - Zest of 1 lemon - 2 tablespoons fresh lemon juice - 2 cloves garlic, minced - 1 teaspoon dried oregano - 1 teaspoon dried basil - 1/2 teaspoon salt - 1/4 teaspoon freshly ground black pepper - 1/4 cup fresh parsley, finely chopped - Stir everything together gently until just combined. Be careful not to overmix; this keeps the meatballs tender. - Now, let’s shape the meatballs. Use your hands to take portions of the mixture. Aim for about 1 inch in diameter. - Place each shaped meatball on a plate. To keep them uniform, try to use the same amount of mixture for each ball. - Preheat a large skillet over medium heat. Add 1/4 cup of olive oil. Wait until the oil shimmers, which means it’s ready. - Carefully arrange the meatballs in the skillet. Don’t overcrowd them; it’s best to cook in batches if needed. - Sear each meatball for about 5-6 minutes on each side. Look for a golden-brown crust. Ensure they reach an internal temperature of 165°F (75°C). - Once cooked, transfer the meatballs to a plate lined with paper towels. This will help absorb any extra oil. To make great meatballs, avoid overmixing. Mix just until the ingredients blend. Overmixing makes meatballs tough. Aim for meatballs about 1 inch wide. This size cooks evenly and stays moist. Check for doneness by using a meat thermometer. The inside should reach 165°F (75°C). This ensures they are safe to eat. Oil temperature is key. Heat your olive oil until it shimmers. This helps achieve a nice, golden-brown crust. Serve the meatballs on a bright platter. A colorful presentation makes them look appetizing. Garnish with fresh parsley and lemon wedges. This adds color and freshness. For a fun twist, pair them with creamy garlic yogurt sauce or a crisp salad. Pro Tips Use Fresh Herbs: Fresh herbs will elevate the flavor of your meatballs significantly compared to dried herbs. If possible, opt for fresh parsley, basil, and oregano. Chill the Mixture: If you have time, chill the meatball mixture in the refrigerator for about 30 minutes before shaping. This helps the meatballs hold their shape better while cooking. Test for Seasoning: Before cooking all your meatballs, fry a small piece of the mixture in the skillet to taste and adjust the seasoning as needed. Use a Meat Thermometer: To ensure that your meatballs are cooked perfectly, use a meat thermometer to check that they've reached an internal temperature of 165°F (75°C). {{image_4}} You can change the meat in these meatballs. Turkey works great for a leaner option. Ground beef also tastes good and adds a richer flavor. For a vegetarian twist, try using chickpeas or lentils. These options offer protein and a unique taste. Remember to adjust cooking times as needed. You can make these meatballs even more exciting. Add fresh herbs like thyme or rosemary for a new flavor. Try spices like cumin or paprika to give it a kick. You can also mix in finely chopped vegetables, like bell peppers or spinach. This not only adds flavor but also makes the meatballs healthier. Pair these meatballs with different sauces to enhance your meal. A lemon garlic sauce or marinara works well. For sides, consider a fresh salad or roasted vegetables. These pair nicely with the meatballs and add color to your plate. You can also serve them over pasta or rice for a hearty dish. Lemon herb chicken meatballs last up to four days in the fridge. Store them in an airtight container. This keeps them fresh and safe to eat. Let the meatballs cool before sealing them. This prevents moisture buildup, which can make them soggy. You can freeze chicken meatballs for up to three months. To freeze, lay them on a baking sheet. This keeps them from sticking together. Once they are frozen solid, transfer them to a freezer bag. Label the bag with the date so you know when to use them. To thaw, place the meatballs in the fridge overnight. You can also reheat them straight from the freezer. Just add a few extra minutes to your cooking time. These meatballs are versatile and easy to use in meals. You can add them to pasta dishes, salads, or wraps. They are also great in soups. If you have leftovers, get creative! Try making a meatball sub with marinara sauce and cheese. You can even chop them up and add them to a frittata for breakfast. The options are endless! You can tell the meatballs are done by checking their internal temperature. Use a meat thermometer to ensure they reach 165°F (75°C). This temperature guarantees they are safe to eat. If you don't have a thermometer, cut one open. The meat should be no longer pink, and juices should run clear. Yes, you can make these meatballs ahead of time. After cooking, let them cool completely. Then, store them in an airtight container in the fridge for up to three days. To reheat, place them in a skillet over medium heat until warmed through. You can also microwave them for a quick option. Lemon herb chicken meatballs pair well with many sides. Here are a few ideas: - A fresh green salad with lemon vinaigrette - Creamy garlic yogurt sauce for dipping - Quinoa or rice for a filling meal - Roasted vegetables for extra flavor These sides enhance the meal and add variety to your plate. In this blog post, we explored how to make delicious lemon herb chicken meatballs. We covered main ingredients, flavor enhancers, and seasoning essentials. I provided step-by-step instructions for preparing, shaping, and cooking the meatballs. Additionally, I shared tips for perfecting your meatballs and ideas for variations. Remember, you can store these meatballs in the fridge or freeze them for later. Use these meatballs in various ways to enjoy different meals. With these simple strategies, you can create a tasty dish that impresses everyone. Enjoy cooking and experimenting with your flavors!

Lemon Herb Chicken Meatballs Flavorful and Easy Recipe

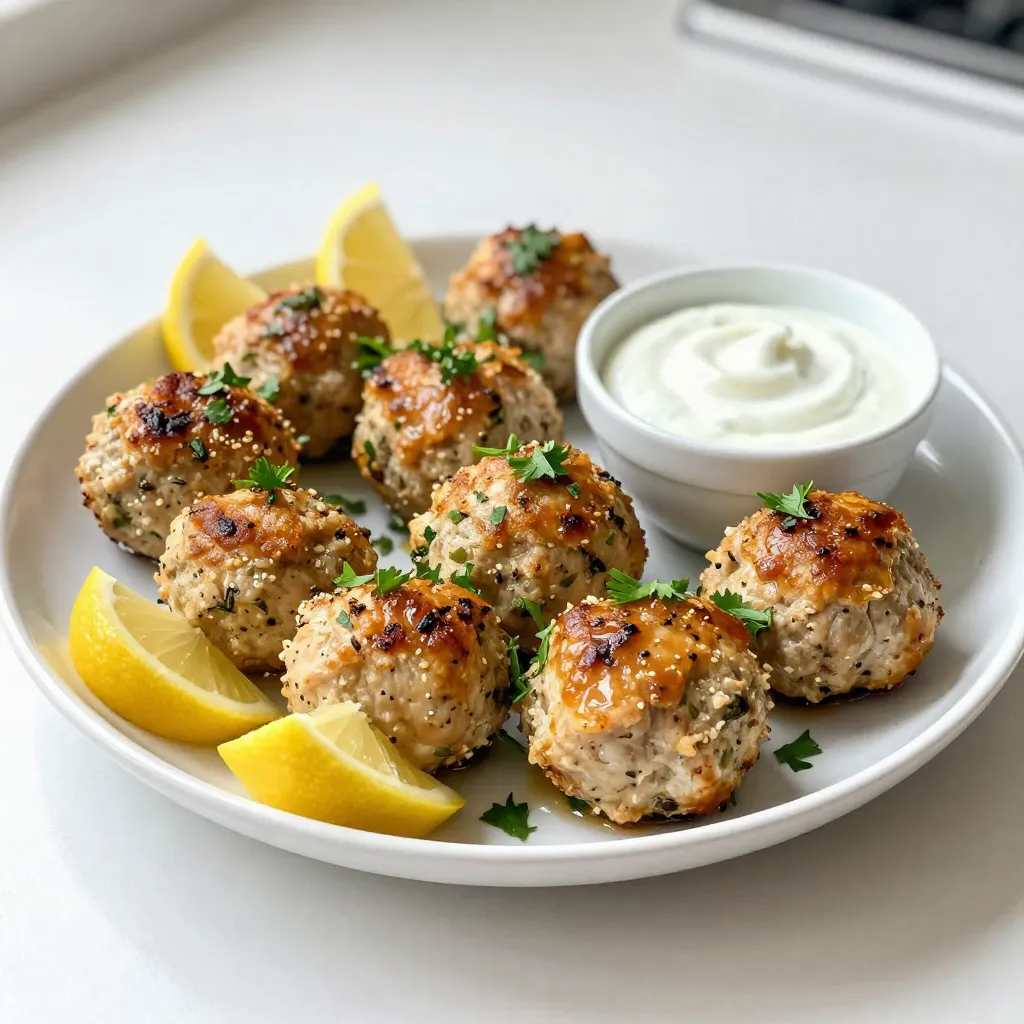
Looking for a simple and tasty dinner idea? Try my Lemon Herb Chicken Meatballs! With just a few fresh ingredients

- 1 cup rolled oats - 1 ½ cups almond milk (or milk of your choice) - ½ cup Greek yogurt (plain or vanilla) - 1 tablespoon maple syrup (or honey) - 1 teaspoon vanilla extract - 1 cup fresh strawberries, sliced - ¼ cup chopped almonds or walnuts - A pinch of salt To create Strawberry Shortcake Overnight Oats, you need simple yet tasty ingredients. Start with rolled oats. These oats form the base of your dish, giving it a hearty texture. Next, add almond milk for creaminess. You can use any milk you like, but almond milk works great. Greek yogurt adds a rich flavor and a good source of protein. Sweeten your oats with maple syrup or honey. This adds a touch of natural sweetness without being too much. Vanilla extract brings warmth and enhances the overall taste. Fresh strawberries are key to the shortcake flavor. They add sweetness and a juicy burst. Chopped almonds or walnuts bring a delightful crunch. Finally, a pinch of salt balances the flavors. Using these ingredients, you ensure a healthy and delicious breakfast. Each element plays a role in making your oats creamy and delightful. Plus, you can easily find these ingredients at your local store. Enjoy the process of mixing and preparing your overnight oats! - In a medium bowl, combine 1 cup of rolled oats, 1 ½ cups of almond milk, and ½ cup of Greek yogurt. - Add 1 tablespoon of maple syrup, 1 teaspoon of vanilla extract, and a pinch of salt. - Stir everything together until it is creamy and smooth. - Next, gently fold in half of the sliced strawberries. This gives each bite a fresh taste. - Divide the mixture evenly into two jars or containers. - For a beautiful look, top each jar with the rest of the sliced strawberries. - Sprinkle ¼ cup of chopped almonds or walnuts on top for crunch. - Seal the jars tightly and place them in the fridge overnight. This lets the oats soak up all the flavors. - Enjoy your overnight oats cold right from the fridge. - If you want a warm treat, heat them in the microwave. - Stir well before eating to mix any settled ingredients. - For extra flair, you can add more fresh strawberries or a drizzle of maple syrup. Soaking oats is key to getting the right texture. When you let them sit, they absorb the liquid. This makes them soft and creamy. I recommend soaking them overnight. It gives the best results. You can use almond milk or any milk you like. If you want it sweeter, add more maple syrup or honey. Taste as you go. Everyone has a different sweet spot. Garnishing your oats can make them look lovely. Fresh strawberries on top add color and flavor. A sprig of mint gives a nice touch too. For gatherings, serve them in clear jars. This shows off the layers. You can even drizzle some extra maple syrup on top. It makes it look special. One mistake is getting the ratio of oats to liquid wrong. Too much liquid makes it runny. Too little makes it dry. Stick to the recipe for the best balance. Another mistake is not letting the oats sit long enough. They need time to soak. Aim for at least four hours, but overnight is best. This lets all the flavors mix well. {{image_4}} You can switch up the flavors in your overnight oats. Try using different fruits such as blueberries, peaches, or mixed berries. Each fruit offers a unique taste. You can also add fun flavorings. Chocolate syrup gives a sweet twist. Coconut flakes add a tropical vibe. If you need dairy-free options, use almond milk and skip the Greek yogurt. You can replace it with a dairy-free yogurt alternative. To make it gluten-free, choose certified gluten-free oats. For nut allergies, you can swap out the almonds or walnuts for seeds, like pumpkin or sunflower seeds. You can easily adjust the serving sizes. If you need more, double the recipe. For fewer servings, just halve it. This flexibility helps with meal prep. You can create jars for the whole week or just one for today. To keep your Strawberry Shortcake Overnight Oats fresh, store them in airtight containers. Glass jars work well since they seal tightly and let you see the colorful layers. Avoid using plastic containers that can absorb odors. Always make sure the lids are secure to prevent spills and keep moisture out. Your Strawberry Shortcake Overnight Oats can last in the fridge for up to five days. If you see any signs of spoilage, like an off smell or mold, throw them away. Always trust your senses; if it looks or smells bad, it’s best to skip it. Yes, you can freeze overnight oats! To freeze, use freezer-safe containers. Leave a little space at the top because the oats will expand. When you're ready to eat, move them to the fridge to thaw overnight. Reheat in the microwave for a warm treat. Just stir well before enjoying to mix the flavors again. Can I use instant oats instead of rolled oats? Yes, you can use instant oats. However, they absorb liquid faster than rolled oats. This will change the texture. Your overnight oats may be mushier. If you prefer a chewier bite, stick with rolled oats. How can I make these overnight oats vegan? To make them vegan, swap Greek yogurt for a plant-based yogurt. You can also use maple syrup as your sweetener. Choose almond milk or any other plant milk. This way, your dish stays creamy and delicious. Each serving of Strawberry Shortcake Overnight Oats has around 350 calories. Here’s a quick breakdown: - Fats: 10 grams - Proteins: 12 grams - Carbs: 54 grams Health benefits of key ingredients: - Rolled oats provide fiber, aiding digestion. - Greek yogurt adds protein, helping you feel full longer. - Strawberries are rich in vitamins and antioxidants. - Almonds or walnuts offer healthy fats and protein. To make meal prep simple, prepare multiple jars at once. This saves time during busy mornings. Fill each jar with the oat mixture and toppings. You can make these for the week ahead. Combine oats and liquid ahead of time. This lets the oats soak and soften. It also makes mornings easy. Just grab a jar from the fridge, and you’re ready to go. You now know how to make delicious Strawberry Shortcake Overnight Oats. By mixing wholesome ingredients and letting them sit overnight, you can enjoy a tasty and healthy breakfast. Remember to adjust flavors to your liking and try different toppings. If you follow the tips on storage and serving, your oats will stay fresh and inviting. Experiment with various fruits and flavors to find your perfect bowl. Start your morning right with this easy, nutritious meal!

Strawberry Shortcake Overnight Oats Creamy Delight

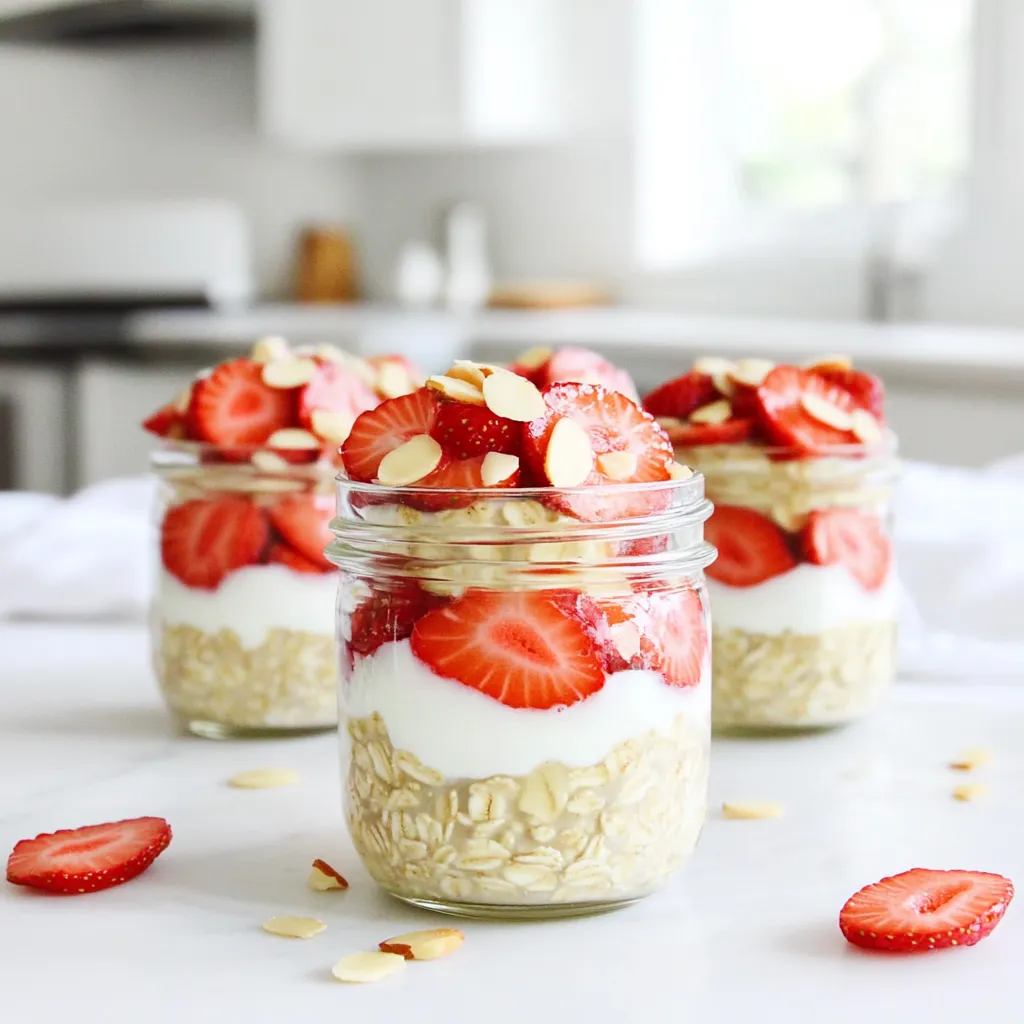
Are you ready to transform your breakfast routine? Let’s dive into the world of Strawberry Shortcake Overnight Oats! This creamy

- 1 can (15 oz) chickpeas, drained and rinsed Chickpeas are the star of this dish. They hold flavor well and become crunchy in the air fryer. Always rinse them to remove any canning liquid. This step ensures they crisp up nicely. - 1 tablespoon olive oil - 2 tablespoons everything bagel seasoning - 1 teaspoon garlic powder - 1 teaspoon onion powder - Salt, to taste The magic happens with the seasonings. Olive oil helps the spices stick and adds richness. Everything bagel seasoning gives a savory kick. The garlic and onion powders add depth. Don’t forget the salt! It enhances all the flavors. - Fresh parsley or chives, finely chopped, for garnish Garnishes can elevate your dish. Fresh herbs add color and freshness. They also brighten the flavor of the chickpeas. You can skip this step, but it makes a fun difference. Start by preheating your air fryer to 400°F (200°C). This takes about 5 minutes. Preheating is key for crispy chickpeas. A hot air fryer cooks them evenly and helps them brown nicely. Next, grab a can of chickpeas. Drain and rinse them under cold water. This removes any canning liquid. After rinsing, spread them on a paper towel. Pat them dry gently. Dry chickpeas get crunchier when cooked. In a large bowl, add the dried chickpeas. Then, pour in 1 tablespoon of olive oil. Sprinkle 2 tablespoons of everything bagel seasoning, 1 teaspoon of garlic powder, 1 teaspoon of onion powder, and salt to taste. Mix well using a spatula or your hands. Make sure each chickpea is coated in the tasty mix. Carefully place the seasoned chickpeas in the air fryer basket. Spread them out in a single layer. This helps them cook evenly. Air fry for 12-15 minutes. Shake the basket halfway through to ensure they crisp up all over. Keep an eye on them to reach a golden brown color. Once done, take the chickpeas out of the air fryer. Let them cool for a few minutes to enhance their crunch. For a pop of color, you can garnish them with chopped parsley or chives. This adds a fresh touch to your crispy delight. Enjoy your tasty snack! To get the best crunch from your chickpeas, start with dry ones. After rinsing, spread them on a paper towel. Pat them dry to remove extra moisture. This key step makes a big difference. Preheat your air fryer to 400°F (200°C) for 5 minutes. This heat is perfect for crisping. When you air fry, arrange the chickpeas in a single layer. This helps them cook evenly. Shake the basket halfway through cooking to ensure all sides get crispy. If you see them turning golden, you’re on the right path! Feel free to play with flavors! You can swap everything bagel seasoning for taco seasoning for a spicy twist. Adding smoked paprika gives a nice, smoky taste. If you want something sweet, try cinnamon and sugar. You can also mix in some cayenne pepper for heat. Experiment with herbs like rosemary or thyme to find your favorite flavor. The best part is that you can go wild and create a blend that suits your taste! These chickpeas are great on their own, but you can make them even better. Serve them warm in a bowl. Pair them with a dip like hummus or yogurt sauce for a tasty snack. You can also sprinkle fresh parsley or chives on top for a pop of color. They make a perfect topping for salads or grain bowls. Feel free to get creative! {{image_4}} To make spicy everything bagel chickpeas, add heat to your mix. Start with the base recipe. Then, toss in some cayenne pepper or crushed red pepper flakes. Use about half a teaspoon or more if you love spice. This adds a nice kick. You can also add a splash of hot sauce for extra flavor. The heat works well with the savory bagel seasoning. Enjoy the crispiness with a spicy twist! For a fresh herb twist, focus on the herbs. Replace the everything bagel seasoning with a mix of dried herbs. Try oregano, thyme, or dill. You can use about one tablespoon of your chosen herbs. This gives a bright flavor that pairs well with the chickpeas. Feel free to add lemon zest for citrus notes. The herbed chickpeas are perfect as a snack or salad topper. For a sweet treat, switch things up with sweetness. Use the base recipe but swap the everything bagel seasoning for cinnamon sugar. Mix two tablespoons of sugar with one teaspoon of cinnamon. Toss the chickpeas in this mix after air frying. You can even drizzle a bit of honey or maple syrup for extra sweetness. This variation is great for a fun dessert snack. It’s a unique way to enjoy chickpeas! To store leftover chickpeas, let them cool completely. Place them in an airtight container. You can keep them in the fridge for up to four days. Make sure they are not too hot when you store them. Hot chickpeas can create steam and make them soft. When you want to reheat your chickpeas, use the air fryer again for best results. Preheat your air fryer to 350°F (175°C). Spread the chickpeas in a single layer in the basket. Heat them for about 5-7 minutes. This will help them regain their crunch. You can also use the oven. Spread the chickpeas on a baking sheet and bake at 350°F for a similar time. You can freeze these chickpeas if you have extras. First, let them cool down. Then, place them in a freezer-safe bag or container. Seal tightly to prevent freezer burn. They can last in the freezer for up to three months. When you're ready to eat them, thaw in the fridge overnight before reheating. Yes, you can use dried chickpeas. First, soak them overnight in water. Then, cook them until tender. This step takes longer but adds a great texture. Everything bagel seasoning is a mix of seeds and spices. It usually includes sesame seeds, poppy seeds, garlic, onion, and salt. This blend gives your chickpeas a unique flavor. These chickpeas can last up to five days in an airtight container at room temperature. If you want them fresh, eat them soon after cooking. Yes, you can bake these in the oven. Spread the seasoned chickpeas on a baking sheet. Bake at 400°F (200°C) for about 20-25 minutes. Shake the pan halfway through cooking for even crispiness. This blog post covered how to make delicious air-fried chickpeas. We discussed essential ingredients, like chickpeas and exciting seasonings. You learned step-by-step instructions to prep and fry your snacks. We explored tips to boost crispiness and detailed different flavor variations. Finally, I shared storage info and answered common questions. Enjoy making these tasty snacks that can please anyone's palate. Whether spicy or herbed, you have the tools you need to create great chickpeas at home. Dive in and have fun experimenting!

Air Fryer Everything Bagel Chickpeas Crispy Delight

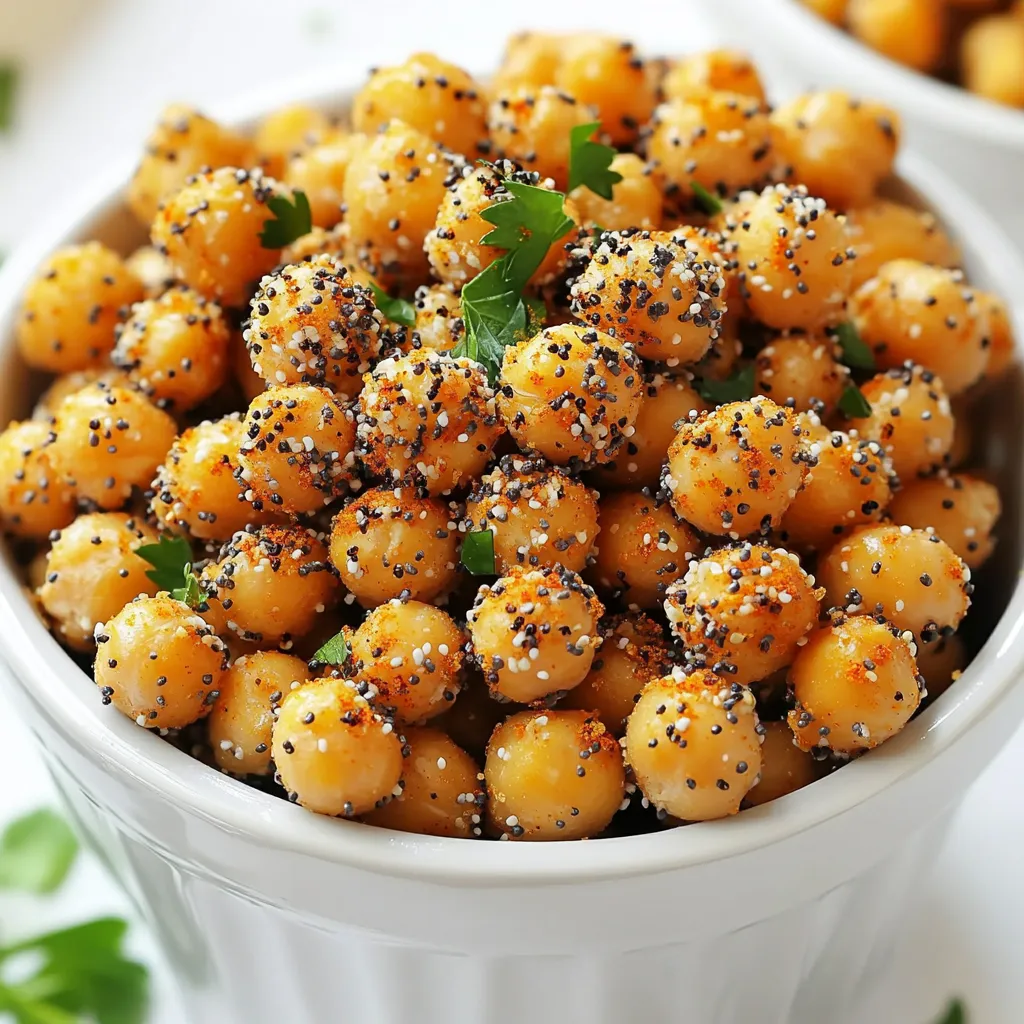
Looking for a tasty snack that’s quick and easy? Let me introduce you to Air Fryer Everything Bagel Chickpeas! These

For this dish, you need simple yet high-quality ingredients. Here’s what you will gather: - 1.5 pounds flank steak, well-trimmed - 2 tablespoons unsalted butter, melted - 4 cloves garlic, finely minced - 1 teaspoon smoked paprika - 1 teaspoon garlic powder - 1 teaspoon onion powder - Salt and freshly ground black pepper to taste The right veggies make this meal pop! Choose these colorful vegetables: - 1 bell pepper (red or yellow), sliced into strips - 1 medium zucchini, sliced into half-moons - 1 cup cherry tomatoes, halved - 1 cup fresh broccoli florets - 2 tablespoons extra virgin olive oil Flavor is key to this dish. You’ll use: - Fresh parsley, finely chopped, for garnish - A generous pinch of salt and freshly ground black pepper These ingredients come together to create a rich, savory flavor. The garlic butter sauce enhances the steak, while the veggies add brightness and texture. This mix ensures every bite is full of taste and color. Don't forget to drizzle any leftover garlic butter over your plate for that extra kick! First, set your oven to 425°F (220°C). This high heat helps the steak and veggies cook fast. Next, line a large baking sheet with parchment paper. This makes cleaning up easy after cooking. In a small bowl, melt 2 tablespoons of unsalted butter. Add 4 finely minced garlic cloves. Then mix in 1 teaspoon of smoked paprika, 1 teaspoon of garlic powder, and 1 teaspoon of onion powder. Season this with salt and black pepper. Whisk it all together until it’s well-blended. This mixture adds rich flavor to the steak. Place your 1.5 pounds of flank steak in the center of the baking sheet. Use a brush or spoon to coat both sides with the garlic butter mixture. Make sure the steak is evenly covered. This step ensures the meat stays juicy and tasty. In another bowl, combine your sliced bell pepper, zucchini half-moons, cherry tomatoes, and broccoli florets. Drizzle 2 tablespoons of extra virgin olive oil over them. Season with salt and pepper. Toss everything well until all the veggies are coated. Arrange the vegetables around the steak on the baking sheet. Keep them in a single layer for even cooking. Place the baking sheet in your preheated oven. Roast for 15 to 20 minutes. Use a meat thermometer to check the steak. For medium-rare, it should read 135°F. This ensures a perfect doneness. When the steak is done, carefully take the baking sheet out of the oven. Let the steak rest for about 5 minutes. This step helps the juices stay inside. After resting, slice the steak against the grain into thin strips. Serve the steak with the colorful roasted vegetables. Drizzle any leftover garlic butter from the pan over the dish. Lastly, sprinkle fresh chopped parsley on top to add color and freshness. Enjoy your delicious meal! To cook steak just right, use a meat thermometer. For medium-rare, aim for 135°F. Insert the thermometer into the thickest part of the steak. This helps avoid guesswork. Remember, the steak will continue to cook slightly after you take it out. Let it rest for about five minutes. This keeps the juices inside and makes it juicy and flavorful. Prep your veggies ahead of time. Chop your bell pepper, zucchini, and broccoli a day before. Store them in the fridge in an airtight container. This cuts down on cooking time. You can also make the garlic butter mix in advance. Just whisk the butter and spices together and store it in the fridge. When you’re ready to cook, you can quickly coat the steak. For a stunning look, serve on a rustic wooden board. Place the steak in the center, surrounded by colorful veggies. Drizzle any leftover garlic butter on top for shine. Sprinkle fresh parsley over the dish for a pop of color. This not only makes it look good but also adds a fresh taste. A beautiful presentation makes your meal feel special. {{image_4}} You can use many cuts for this dish. Flank steak is great, but try sirloin or ribeye. These cuts are tender and flavorful. If you want something leaner, go for tenderloin. Each cut has its unique taste and texture. Adjust cooking times based on thickness. Thicker cuts need more time, while thinner cuts cook fast. Feel free to swap out the veggies. Asparagus, green beans, or carrots work well. You can also use mushrooms for an earthy flavor. If you want a sweeter touch, add sweet potatoes. Just keep in mind the cooking time for each vegetable. Some may need a bit longer to roast. You can change the flavor in many ways. Add fresh herbs like rosemary or thyme for depth. Experiment with spices like cumin or chili powder for a kick. If you like heat, try adding red pepper flakes. You can also mix in a splash of soy sauce for an umami boost. The options are endless, so have fun with it! To store your leftovers, let the food cool first. Then, place the steak and veggies in an airtight container. You can keep them in the fridge for up to three days. Make sure to keep the steak and veggies separate to keep them fresh. To reheat, preheat your oven to 350°F (175°C). Place the steak and veggies on a baking sheet. Heat for about 10-15 minutes or until warmed through. You can also use a microwave if you are in a hurry. Just be careful not to overheat, as this can dry out the steak. You can freeze this dish if you want to save some for later. Wrap the cooled steak tightly in plastic wrap, then place it in a freezer bag. Freeze the veggies in a separate bag. You can freeze both for up to three months. When ready to eat, thaw them in the fridge overnight before reheating. Cooking steak in the oven takes about 15 to 20 minutes. The exact time depends on your steak's thickness and your desired doneness. For medium-rare, check for an internal temperature of 135°F. Always use a meat thermometer to ensure accuracy. Yes, you can use frozen vegetables! They are convenient and save time. Just make sure to thaw them first. Pat them dry to avoid excess moisture. This way, your veggies will roast nicely and stay crisp. Many seasonings work well with garlic butter steak. Here are some favorites: - Rosemary - Thyme - Black pepper - Chili flakes These flavors add depth and enhance the steak's taste. Flank steak is a great choice, but it's not the only option. It is tender and full of flavor. Other cuts like sirloin or ribeye work well, too. Choose a cut that fits your taste and budget. Yes, grilling is a fantastic option! Preheat your grill to medium-high heat. Cook the steak for about 5 to 7 minutes per side. Grill the veggies in a grill basket for a smoky flavor. Enjoy the outdoor cooking experience! This post covered how to make a tasty sheet-pan garlic butter steak dish. We discussed key ingredients, simple steps, and helpful tips for perfect steak. You can use different cuts of steak and swap vegetables for variety. Save time with meal prep ideas and presentation tips. Remember to follow storage guidelines for leftovers. Enjoy making this easy, delicious meal that fits into your busy life. With these steps, you can create a dish that impresses and satisfies. Your kitchen adventures will be fun and rewarding!

Sheet-Pan Garlic Butter Steak and Veggies Delight

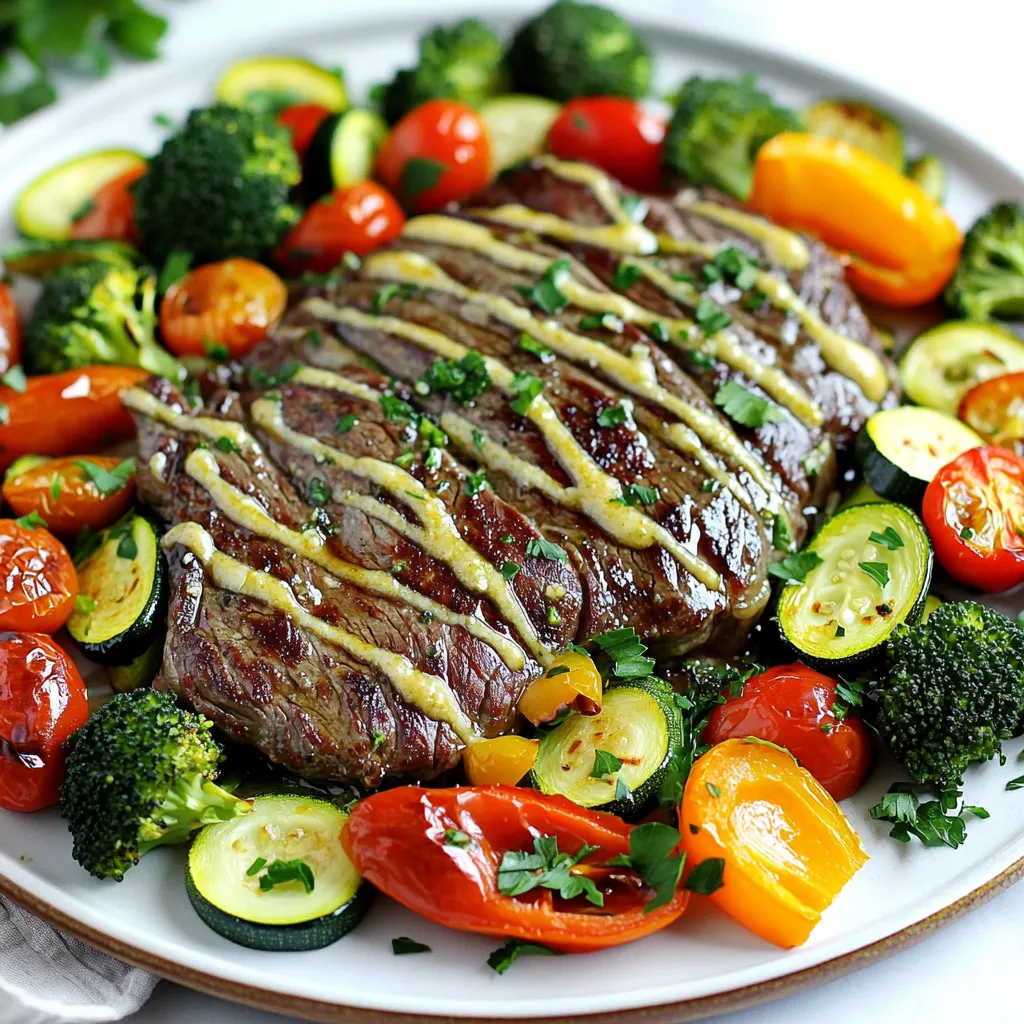
Get ready for a tasty, easy dinner with my Sheet-Pan Garlic Butter Steak and Veggies Delight! This dish brings juicy

- 4 bone-in chicken thighs, skin removed - 1/2 cup honey - 1/4 cup low sodium soy sauce - 4 cloves garlic, minced - 1 tablespoon fresh ginger, grated - 1 teaspoon sesame oil - 1/2 teaspoon freshly ground black pepper - 1/4 teaspoon chili flakes (for heat) - 2 green onions, thinly sliced (for garnish) - Sesame seeds (for garnish) - Slow cooker - Mixing bowl - Tongs To make Slow Cooker Honey Garlic Chicken Thighs, you need a few key ingredients. The main items include chicken thighs, honey, soy sauce, garlic, ginger, and sesame oil. These create a rich, sweet, and savory sauce. You can customize the dish with optional ingredients. Black pepper adds depth, while chili flakes bring heat. Green onions and sesame seeds are great for garnishing. They add color and crunch. You will need some equipment too. A slow cooker is essential for cooking the chicken low and slow. A mixing bowl helps you combine the sauce. Tongs make it easy to handle the hot chicken after cooking. Gather these ingredients and tools to create a delightful meal. The mix of flavors will impress everyone at your table. - Combine honey, soy sauce, garlic, ginger, sesame oil, black pepper, and chili flakes. - Mix until fully blended. Start by gathering all your ingredients. In a bowl, add the honey and soy sauce. The honey gives sweetness, while the soy adds saltiness. Next, add the minced garlic and grated ginger. These bring a fresh, bold flavor. Then, pour in the sesame oil. It adds a nutty taste. Stir in the black pepper and chili flakes if you want some heat. Mix everything until it is smooth and well combined. This sauce will coat the chicken and make it tasty. - Place chicken thighs in slow cooker. - Pour sauce over chicken and cover. Now, take your chicken thighs and place them in the slow cooker. Make sure they sit flat and do not overlap. This helps them cook evenly. Once the chicken is arranged, pour your sauce over all the thighs. Use a spoon to make sure every piece gets coated. Cover the slow cooker with the lid. Set it to low for six hours or high for three to four hours. Your chicken is done when it is tender and the juices run clear. - Prepare a cornstarch slurry and mix with water. - Stir into sauce and cook on high for 15-20 minutes. When the chicken is ready, it’s time to thicken the sauce. In a small bowl, mix cornstarch with water. Stir until it is smooth. This mixture will help your sauce become thick and glossy. Add this slurry into the slow cooker. Switch the heat to high and cover again. Let it cook for another 15 to 20 minutes. This will make your sauce rich and perfect to drizzle on top of the chicken. For the best results, choose the low setting for slow cooking. This method allows the chicken to become very tender and soak up all the great flavors. If you're short on time, use the high setting to cook it in about 3 to 4 hours. To ensure even cooking, lay the chicken thighs flat in the slow cooker. Avoid stacking them on top of each other. This way, every piece gets coated in sauce and cooks through without drying out. Want to spice things up? You can add more chili flakes if you like heat. If you prefer a milder dish, skip the chili flakes. You can also mix in paprika or cumin for unique flavors. For added depth, consider fresh herbs. Thyme or rosemary can elevate the dish. Add them during the last hour of cooking for fresh, bright notes. Serve your honey garlic chicken thighs over fluffy rice. This creates a lovely base that soaks up the sauce. You can also pair it with roasted vegetables for a colorful plate. To make your dish look beautiful, garnish it with sliced green onions and sesame seeds. This adds a nice crunch and a pop of color. A drizzle of extra sauce on top makes it even more appealing. {{image_4}} You can use boneless chicken thighs. They cook faster and stay tender. If you prefer, swap chicken for boneless chicken breasts. They also work well with this recipe. For a gluten-free dish, use gluten-free soy sauce. Many brands offer this option, so check labels. If you want to cut back on sugar, use a low-sugar honey alternative. This keeps the sweet taste without the extra sugar. Want to change the flavor? Try teriyaki sauce for a sweet twist. Citrus marinades also add a nice zing. You can mix in vegetables like bell peppers or snap peas for added crunch. Nuts like cashews or peanuts can provide a tasty crunch too. To store leftovers, let the chicken cool first. Place it in an airtight container. This keeps the chicken fresh and tasty. You can safely eat refrigerated chicken for up to four days. After that, it may lose flavor and texture. If you want to freeze cooked chicken, let it cool completely. Wrap each piece in plastic wrap and then in foil. This helps avoid freezer burn. You can freeze the chicken for up to three months. Just remember to label it with the date! To reheat your honey garlic chicken, use the oven or microwave. In the oven, preheat to 350°F (175°C) and place the chicken in a dish covered with foil. This keeps it moist. In the microwave, cover it with a damp paper towel. Heat it in short bursts, checking often. The safe reheating temperature is 165°F (74°C). Enjoy your meal again just as much! Cooking chicken thighs in a slow cooker takes about 6 hours on low or 3 to 4 hours on high. The chicken should become tender, and the juices should run clear when it's done. Yes, you can use frozen chicken thighs. If using frozen, cook them on high for about 4 to 5 hours. Thawing them first will help them cook more evenly. Always check that they reach a safe internal temperature of 165°F. Some great sides for honey garlic chicken include: - Steamed rice - Roasted vegetables - Mashed potatoes - Quinoa salad These sides will balance the sweet and savory flavors of the chicken. To spice things up, add more chili flakes to the sauce. You can also use hot sauce or fresh chopped peppers. For a smoky flavor, consider adding smoked paprika. Start with a small amount and taste as you go. You now have a clear plan to make honey garlic chicken in a slow cooker. You learned about the main and optional ingredients and the right equipment. The step-by-step instructions guide you from preparing the sauce to thickening it. I shared tips for perfect cooking and creative presentation ideas. Remember, adapt the recipe to match your taste and storage needs. Enjoy experimenting with different flavors. It's fun and tasty! Your kitchen adventure starts now.

Slow Cooker Honey Garlic Chicken Thighs Delight

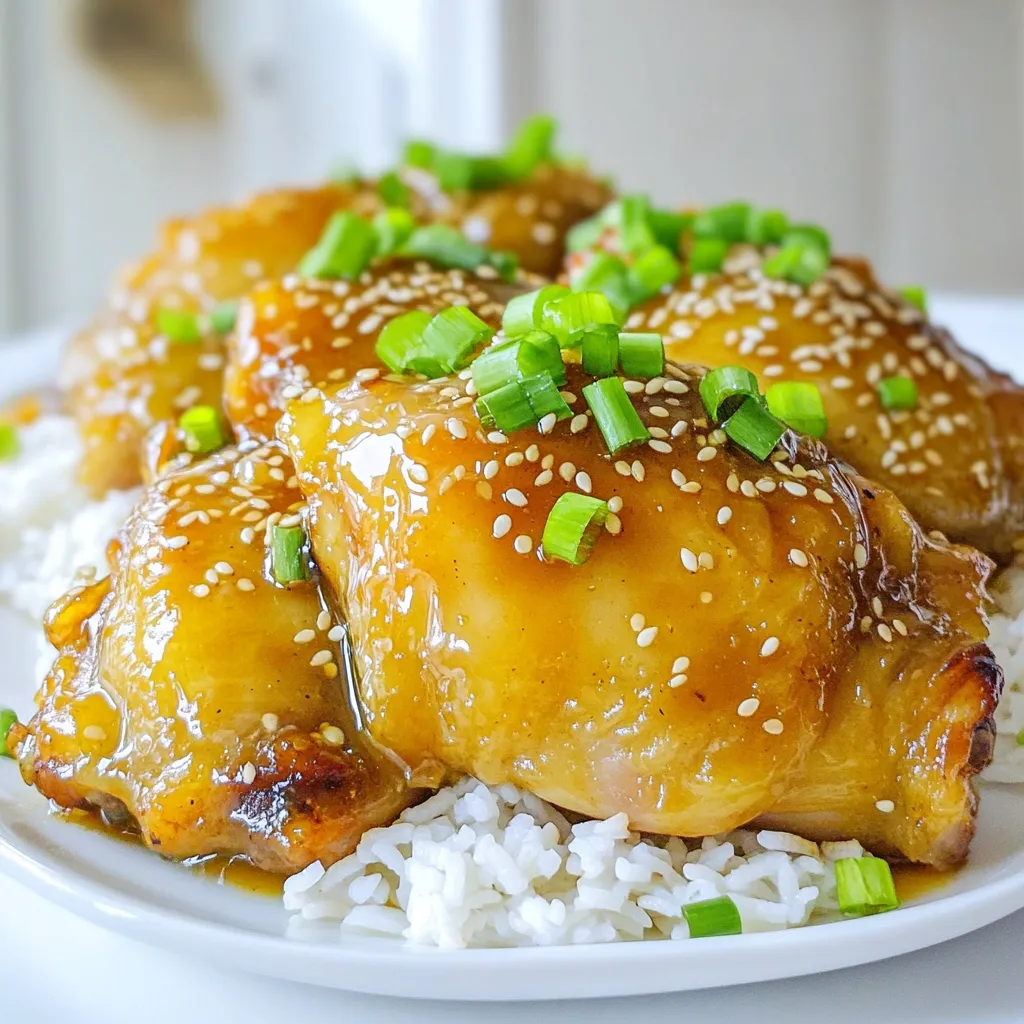
Welcome to my kitchen! Today, we’re making Slow Cooker Honey Garlic Chicken Thighs. This dish is a winning combo of

- 1 cup rolled oats - 1 cup almond milk (or milk of your choice) - 1 cup Greek yogurt The base of this recipe is simple and healthy. Rolled oats give you fiber and energy. You can choose almond milk or any milk you like. Greek yogurt adds creaminess and protein. - 1 tablespoon honey or maple syrup - 1 teaspoon vanilla extract To sweeten, you can use honey or maple syrup. Both add a nice touch. A splash of vanilla extract brings warmth and flavor. Adjust the sweetness to your liking for the best taste. - 1 cup fresh strawberries, hulled and sliced - 1/4 cup crushed graham crackers - Fresh mint leaves for garnish (optional) Fresh strawberries are the star of this dish. They add natural sweetness and color. Crushed graham crackers give a fun crunch, like shortcake. If you want, add mint leaves for a fresh finish. First, take a medium mixing bowl. Combine 1 cup of rolled oats, 1 cup of almond milk, and 1 cup of Greek yogurt. You can choose vanilla yogurt for extra sweetness or plain if you like. Add 1 tablespoon of honey or maple syrup, depending on your sweetness preference. Don't forget to include 1 teaspoon of vanilla extract and a pinch of salt. Mix everything well with a whisk or spoon until it looks smooth. Next, grab 1 cup of fresh strawberries. Hull and slice them up. Carefully add half of the sliced strawberries into your oat mixture. Use a spatula to gently fold them in. This step helps the oats soak up that sweet strawberry flavor while keeping the fruit intact. Now it's time to layer! Distribute the oat mixture into two jars or containers. On top of each serving, layer the remaining sliced strawberries for a colorful look. Sprinkle 1/4 cup of crushed graham crackers over the strawberry layers. This topping gives it that classic shortcake feel. Secure the lids on your jars and place them in the fridge. Let them soak for at least 4 hours, or better yet, overnight. This soaking time allows the oats to soften and absorb all the flavors. Soaking your oats is key. It softens them, making the oats creamy by morning. I suggest letting them soak for at least 4 hours, but overnight is best. This gives the oats time to absorb all the liquid and flavors. If you find the oats too thick, just add a splash of almond milk. Stir well to get the right creaminess. Feel free to swap ingredients based on your needs. You can use dairy-free yogurt for a vegan option. Use any milk you like, such as coconut or oat milk. For a crunchy twist, add some chopped nuts or seeds just before eating. Almonds, walnuts, or chia seeds work great! Make your oats look as good as they taste. Layer the oats with fresh strawberries in clear jars. This shows off the vibrant colors. Finish with a sprinkle of crushed graham crackers on top. Add fresh mint leaves for a pop of color and a fresh taste. These small touches make your breakfast feel special! {{image_4}} You can easily swap strawberries for other berries or fruits. Blueberries, raspberries, or peaches work great. Each fruit brings a new taste. For example, blueberries add a sweet burst. Raspberries bring a mild tartness. You can even try bananas for a creamy texture. Each combination makes your overnight oats unique and fun. If you're looking for different sweeteners, consider agave or stevia. Agave has a light taste and is great for drizzling. Stevia is very sweet, so use it sparingly. You can adjust the sweetness based on your taste. This way, you can find what makes your oats perfect for you. Making this dish vegan is simple. Just use plant-based yogurt and almond milk. Coconut yogurt adds a rich flavor. You can also try oat milk for a nut-free option. These swaps keep your overnight oats creamy and delicious. You won't miss the dairy at all. Experiment with these options to find your favorite mix! You can store your strawberry shortcake overnight oats in the fridge for up to three days. This makes it perfect for meal prep. Just keep them sealed in jars or airtight containers. The flavors will blend and taste even better over time, but be sure to check for freshness before enjoying. If you want to keep your oats longer, you can freeze them. Just prepare the oats as usual but skip the fresh strawberries and graham crackers for now. Pour the oats into freezer-safe containers, leaving some space for expansion. Seal them tightly and label with the date. They can last for up to three months in the freezer. To enjoy your frozen oats, move them to the fridge a day before you plan to eat them. This will help them thaw slowly. If you need them quickly, you can microwave them in 30-second intervals. Add a splash of almond milk after thawing to restore creaminess. Mix in fresh strawberries and graham crackers just before serving for that fresh taste! Yes, you can make this recipe vegan! To do this, swap Greek yogurt with plant-based yogurt. Use almond milk or any nut milk instead of dairy milk. For sweetening, choose maple syrup, which is vegan-friendly. These changes keep the flavor rich and creamy while being kind to the planet. Overnight oats last up to five days in the fridge. Keep them in airtight jars or containers to stay fresh. Just remember, the sooner you eat them, the better they taste. If you see any changes in smell or texture, it's best to toss them. You can use instant oats, but the texture will be different. Instant oats absorb liquid quickly and may become mushy. Rolled oats, however, keep a nice chewiness. Stick with rolled oats for the best bite and flavor. If you prefer instant oats, reduce soaking time to a few hours. This post reviewed how to make delicious strawberry shortcake overnight oats. We covered base ingredients like oats, almond milk, and yogurt. We added sweeteners, fresh strawberries, and toppings for flavor and fun. I shared tips for texture, customizations, and even variations for dietary needs. Lastly, storage info ensures you enjoy your oats longer. Keep experimenting with flavors and textures. You’ll find the perfect combination for your taste!

Strawberry Shortcake Overnight Oats Simple Delight

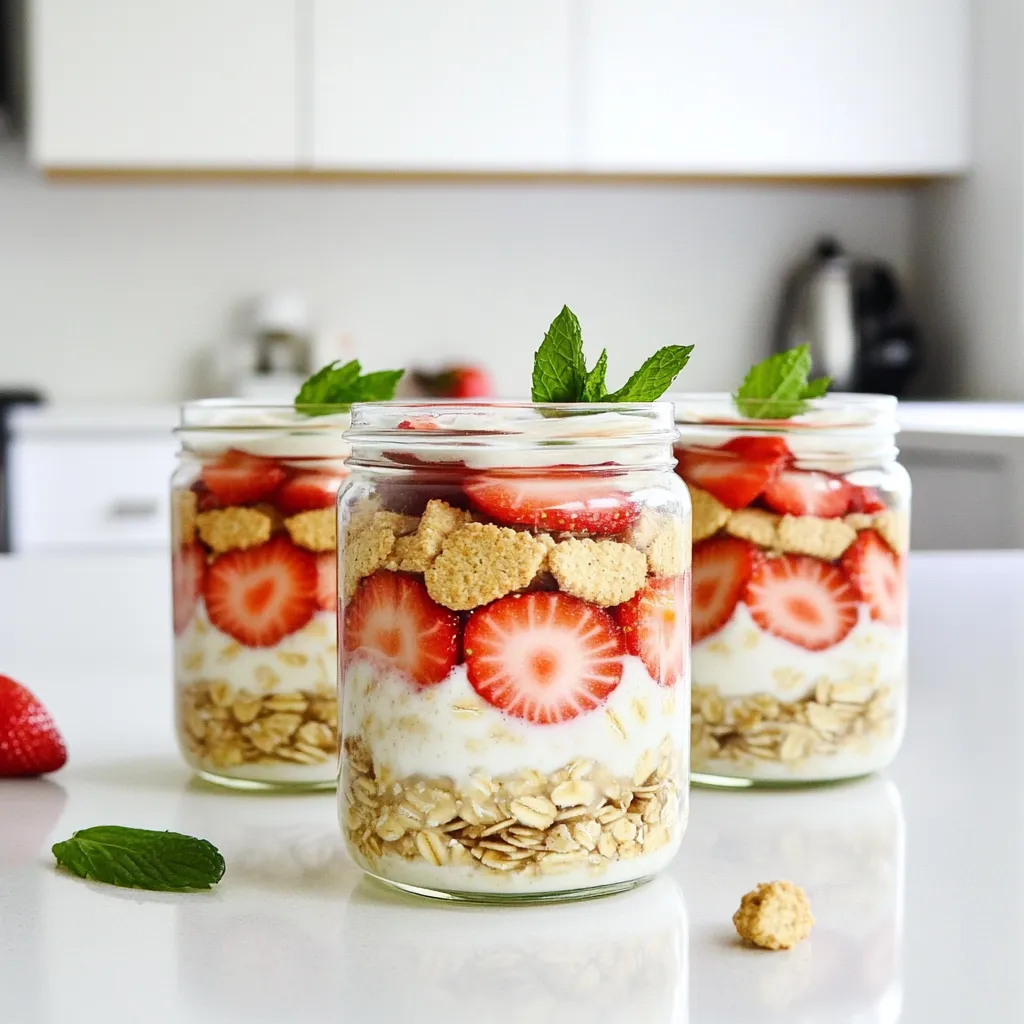
Are you craving a sweet, creamy breakfast that’s quick and easy? Look no further! Today, I’m sharing my Strawberry Shortcake

Older posts
Newer posts
← Previous Page1 Page2 Page3 Page4 … Page85 Next →

dsad

© 2026 spoonfulsavory • Built with GeneratePress

Our Policies

  • Copyright Policy
  • Cookie Policy
  • GDPR Policy
  • Privacy Policy
  • Disclaimer
  • Terms Of Use

More Information

  • Home
  • About
  • Contact
  • Appetizers
  • Dessert
  • Dinner
  • Drinks
©2026, spoonfulsavory About Back To Top