Craving a sweet treat that’s simple yet indulgent? Look no further! My No Bake Nutella Cheesecake is the answer. With creamy Nutella and a buttery graham cracker crust, you can whip this dessert up in no time. I’ll guide you through each step to create a showstopper that impresses every guest. Let’s dive into this decadence that requires no baking and guarantees smiles all around!
Ingredients
Main Ingredients
– 1 ½ cups graham cracker crumbs
– 6 tablespoons unsalted butter, melted
– 2 cups cream cheese, softened to room temperature
– 1 cup Nutella, plus extra for drizzling
Additional Ingredients
– ½ cup powdered sugar
– 1 teaspoon pure vanilla extract
– 1 cup heavy whipping cream
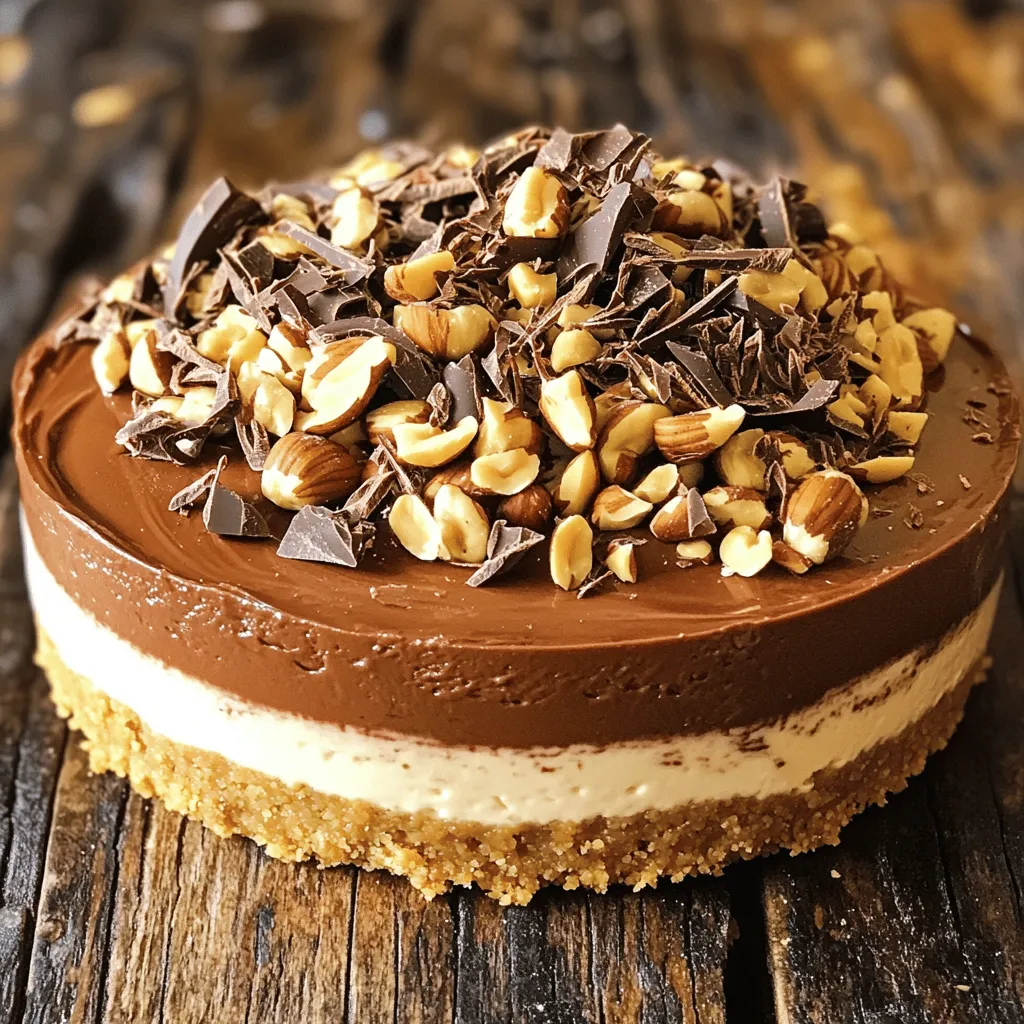
– Chocolate shavings for garnish
– Chopped hazelnuts for garnish
Optional Ingredients
– Fresh mint for garnish
– Extra Nutella for drizzling
When I whip up a no-bake Nutella cheesecake, I keep it simple. Each ingredient adds magic to the dish. The graham cracker crumbs form a crunchy base. The melted butter binds them together. Cream cheese gives the cheesecake its creamy texture. Nutella? It’s the star of the show, bringing a rich chocolate hazelnut flavor that is hard to resist.
To sweeten the cheesecake, I use powdered sugar. It blends well and adds a touch of sweetness. Pure vanilla extract enhances the flavor, making it even more delightful. Heavy whipping cream is crucial for that light and airy texture. It makes every bite feel like a cloud!
For the finishing touch, I love adding chocolate shavings and chopped hazelnuts. They not only look great but also add extra texture. If you want to get creative, fresh mint leaves can add a fresh touch. A drizzle of extra Nutella makes it even more decadent.You won’t want to miss out on this treat!
Step-by-Step Instructions
Preparing the Crust
1. In a bowl, combine 1 ½ cups of graham cracker crumbs with 6 tablespoons of melted unsalted butter.
2. Stir the mixture until all crumbs get coated with butter.
3. Transfer this mixture into a 9-inch springform pan.
4. Use the back of a measuring cup to press the mixture firmly into the pan.
5. Ensure it’s compact and flat for a stable crust.
Making the Cheesecake Filling
1. In a clean bowl, beat 2 cups of softened cream cheese until smooth.
2. Add 1 cup of Nutella, ½ cup of powdered sugar, and 1 teaspoon of pure vanilla extract.
3. Mix these ingredients until the filling is smooth and luscious.
Folding the Whipped Cream
1. In another bowl, whip 1 cup of heavy whipping cream until soft peaks form.
2. Gently fold the whipped cream into the Nutella mixture.
3. Be careful here! You want to keep the lightness of the whipped cream.
4. Pour this filling into the prepared crust.
5. Use a spatula to smooth the top evenly.
Tips & Tricks
Achieving the Perfect Texture
To get that smooth and creamy texture in your cheesecake, start with room temperature cream cheese. Cold cream cheese can make your filling lumpy. Let it sit out for about 30 minutes before mixing. This small step makes a big difference in the final result.
When folding in whipped cream, move slowly. Use a spatula to lift and turn the mixture gently. This keeps the air in the whipped cream, making your cheesecake light and fluffy. Remember, the goal is to mix well without losing that volume!
Serving Suggestions
When it’s time to slice your cheesecake, use a sharp knife. Dip the knife in hot water, then wipe it dry. This technique helps create clean slices. You can serve the cheesecake on individual plates for a nice touch.
For a beautiful finish, drizzle some melted Nutella on each slice. Add chocolate shavings or chopped hazelnuts on top for extra flavor and crunch. A sprig of fresh mint can brighten the plate and add color.
Common Mistakes to Avoid
One big mistake is overmixing the filling. While you want everything blended, overmixing can lead to a dense texture. Mix just until smooth.
Another common error is not chilling the cheesecake long enough. It needs at least four hours to set properly. For the best results, chill it overnight. This waiting makes the cheesecake firmer and much easier to slice.

Variations
Flavor Additions
You can easily change the flavor of your no-bake Nutella cheesecake. Adding espresso can give it a rich mocha twist. Just mix in about 1-2 tablespoons of espresso powder with the Nutella. This small change can bring a bold flavor that coffee lovers will adore.
If you want something even richer, try adding peanut butter. Mix in half a cup of creamy peanut butter with the Nutella. This makes the cheesecake taste even more indulgent and adds a nice nutty flavor.
Gluten-Free Options
For those who need gluten-free desserts, this cheesecake can work too. Simply swap out regular graham crackers for gluten-free graham crackers. Many brands offer tasty options that will fit right into this recipe. Your guests won’t even notice the difference!
Dietary Modifications
If you want a dairy-free or vegan version, you have options. Use dairy-free cream cheese and coconut cream instead of heavy cream. Coconut cream gives a nice richness similar to heavy whipping cream. For the Nutella, look for a dairy-free chocolate spread. This way, everyone can enjoy a slice of cheesecake without worries.
These variations make it easy to customize your cheesecake. The base recipe remains the same, but you can create new flavors and meet dietary needs.
Storage Info
Refrigeration Guidelines
To store leftover cheesecake, cover it tightly with plastic wrap or use an airtight container. This keeps the cheesecake fresh and prevents it from absorbing other odors in the fridge. You can also place a piece of parchment paper on top before wrapping to add an extra layer of protection.
In the refrigerator, your Nutella cheesecake will last for about 3 to 5 days. If you notice any changes in texture or smell, it’s best to discard it. This simple storage method helps maintain the cheesecake’s creamy texture and rich flavor.
Freezing Instructions
To freeze your Nutella cheesecake, first, let it set in the fridge for at least 4 hours. Once set, remove it from the springform pan and wrap it tightly in plastic wrap. Then, place it in a freezer-safe bag or container. This prevents freezer burn and keeps the cheesecake fresh.
When you want to serve it later, take the cheesecake out of the freezer. Place it in the fridge for about 6 to 8 hours to thaw gently. Avoid thawing at room temperature, as this can make it too soft. After thawing, enjoy your cheesecake just like the first day! For best taste, eat it within 1 to 2 months after freezing.
FAQs
Can I use a different type of chocolate spread?
Yes, you can switch Nutella with other chocolate spreads. Some good choices include:
– Hershey’s Chocolate Spread
– Justin’s Chocolate Hazelnut Butter
– Biscoff Spread for a unique twist
Each choice brings a new flavor. Just pick one you love!
How long do I have to chill the cheesecake?
Chill the cheesecake for at least 4 hours. For the best taste and texture, leave it overnight. This helps it set and makes slicing easier.
Can I make this cheesecake ahead of time?
Absolutely! You can prepare this cheesecake a day or two ahead. Just store it in the fridge with plastic wrap. It keeps well and tastes great after resting.
Is there a way to make this recipe lower in calories?
Yes, you can make some easy swaps:
– Use light cream cheese instead of regular.
– Swap powdered sugar for a sugar substitute.
– Try Greek yogurt to replace some cream cheese.
These changes help cut calories without losing flavor. Enjoy your guilt-free treat!
This blog post walked you through making a delicious Nutella cheesecake. We covered key ingredients like graham cracker crumbs, cream cheese, and Nutella. I shared step-by-step instructions and helpful tips to avoid common mistakes. You can also try fun variations and learn the best ways to store your cheesecake.
In conclusion, enjoy this sweet treat with friends and family. Customize it to your taste for a fun dessert. Happy baking!