Go Back
- 2 cups rolled oats - 1 cup almond butter (or substitute with peanut butter) - 1/2 cup honey (or use maple syrup for a vegan alternative) These main ingredients form the base of our bars. Rolled oats give them a hearty texture and keep you full. Almond butter is creamy and rich. You can swap it for peanut butter if you prefer that flavor. Honey adds sweetness and helps bind everything together. If you want a vegan option, maple syrup works just as well. - 1/2 cup chopped nuts (such as almonds, walnuts, or pecans) - 1/4 cup chia seeds (optional) - 1/2 cup mini chocolate chips Optional add-ins let you customize your bars. Chopped nuts add crunch and healthy fats. You can use any nuts you love. Chia seeds are great for extra nutrients. Mini chocolate chips make the bars even more delicious. You can add as many as you like. - 1 teaspoon vanilla extract - A pinch of salt Flavor enhancers are key to making your bars pop. Vanilla extract adds depth and warmth. A little salt balances the sweetness and brings out flavors. Don’t skip these ingredients; they make a big difference. - Prepare and line the baking dish: Start by taking an 8x8 inch baking dish. Line it with parchment paper, letting some paper hang over the sides. This helps lift the bars out later. - Mix the wet ingredients: In a small saucepan, combine 1 cup of almond butter and 1/2 cup of honey (or maple syrup). Heat it on low, stirring until it melts and becomes smooth. Once smooth, take it off the heat and mix in 1 teaspoon of vanilla extract and a pinch of salt. - Combine dry ingredients: In a large bowl, mix 2 cups of rolled oats, 1/2 cup of chopped nuts, and 1/4 cup of chia seeds if you like. - Fold in chocolate chips: Gently fold in 1/2 cup of mini chocolate chips. This way, they spread evenly without melting too much. - Transfer mixture to the pan: Pour the mixture into your lined baking dish. Use a spatula or your hands to press it down firmly. This helps the bars stick together. - Chill and cut into bars: Put the dish in the fridge for at least 1 hour. Once firm, lift the granola out using the parchment paper. Place it on a cutting board and cut it into bars or squares. - Store the bars in an airtight container. - Keep them in a cool, dry place. - For longer storage, use the fridge. - To prevent chewiness, avoid high humidity when storing. - Swap honey for agave nectar as a sweetener. - Use sunflower seed butter for a nut-free option. - Substitute oats with puffed rice for a lighter texture. - Add dried fruits like cranberries or raisins for extra sweetness. - Serve bars on a colorful plate for a fun look. - Drizzle melted chocolate over the top for extra flair. - Pair these bars with fresh fruit or yogurt. - Enjoy them with a glass of milk for a tasty snack. {{image_4}} You can easily change the flavor of your granola bars. Adding dried fruits like cranberries or apricots gives a sweet touch. You can also mix in spices like cinnamon or nutmeg for warmth. If you want nut-free bars, simply skip the nuts. Instead, you can add more seeds or coconut flakes. This keeps the crunch while making it safe for those with nut allergies. If you need gluten-free options, use certified gluten-free oats. They will keep your bars tasty and safe. For vegan or paleo diets, switch honey with maple syrup. Almond butter can also be replaced with sunflower seed butter. These swaps keep the bars delicious and adaptable to your needs. Try using seasonal ingredients to give your bars a twist. In fall, add pumpkin spice for a cozy flavor. During winter, top your bars with dark chocolate or crushed peppermint for a festive vibe. You can even add colorful sprinkles for birthdays or special events. These small changes can make your no-bake chocolate chip granola bars exciting all year long. To keep your no-bake chocolate chip granola bars fresh, store them in airtight containers. This helps prevent them from drying out. Ziplock bags are also a good option, but they may not keep the bars as fresh. The best shelf life for these bars is about one week at room temperature. If you want them to last longer, consider freezing. To freeze your granola bars, first cut them into individual pieces. Wrap each bar in plastic wrap or foil. Place the wrapped bars in a freezer-safe container or bag. This method keeps them fresh for about three months. When you are ready to eat them, take out the bars and let them defrost in the fridge. For the best texture, avoid microwaving them to defrost. You can tell if your bars have gone bad by checking for any off smells or changes in texture. If they feel overly hard or crumbly, it’s a sign they may not be good. Stale bars can still be used in fun ways! Try crumbling them over yogurt or ice cream for a tasty dessert. Yes, you can! If you want to skip nuts, use sunflower seed butter instead of almond butter. It gives a similar texture and flavor. You can also try soy nut butter as another nut-free option. Both work well in keeping the bars tasty and chewy. Just remember to check labels to ensure no nuts are in your products. To keep your granola bars from being too sticky, make sure to measure your honey or syrup carefully. Too much can cause stickiness. Another tip is to chill the mixture longer before cutting. Pressing the mix down firmly in the pan helps too. If they still stick, try lightly dusting the knife with a bit of flour or cooking spray. You can use quick oats, but the texture will change. Quick oats are finer and can make the bars softer. Rolled oats give a chewier bite, which I prefer. If you use quick oats, watch the cooking time. They tend to absorb moisture quicker, so you may need less liquid in your mix. You learned how to make no-bake chocolate chip granola bars with simple ingredients. We covered main ingredients, optional add-ins, and tasty variations. Customizing these bars ensures they fit your taste and dietary needs. Storing them correctly will keep them fresh, too. Enjoy these bars as snacks or dessert. They are easy to make and fun to share. You can create many flavors to keep things exciting. Get creative with your choices and have fun in the kitchen!

No-Bake Chocolate Chip Granola Bars

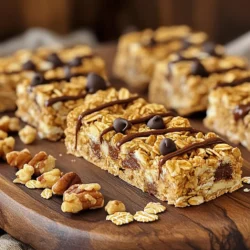
Indulge in a delicious and healthy snack with these No-Bake Chocolate Chip Granola Bars! Packed with rolled oats, nuts, and mini chocolate chips, they are easy to make and perfect for on-the-go munching. In just 15 minutes of prep time, you can whip up a batch for yourself or your family. Click through for the full recipe and enjoy creating these tasty treats that are sure to satisfy your sweet cravings!

Ingredients
  

2 cups rolled oats

1 cup almond butter (or substitute with peanut butter)

1/2 cup honey (or use maple syrup for a vegan alternative)

1/2 cup mini chocolate chips

1/2 cup chopped nuts (such as almonds, walnuts, or pecans)

1/4 cup chia seeds (optional)

1 teaspoon vanilla extract

A pinch of salt

Instructions
 

Prepare the Pan: Start by lining an 8x8 inch baking dish with parchment paper. Ensure you leave some paper overhanging on the sides, as this will help you lift the granola bars out of the dish later.

    Mix Wet Ingredients: In a small saucepan, combine the almond butter and honey (or maple syrup) over low heat. Stir continuously until the mixture is fully melted and smooth in texture. Once melted, remove the saucepan from the heat and mix in the vanilla extract along with a pinch of salt for extra flavor.

      Combine Ingredients: In a large mixing bowl, add the rolled oats, chopped nuts, and chia seeds (if you choose to include them). Drizzle the warm almond butter mixture over the dry ingredients and mix thoroughly until all components are well blended.

        Add Chocolate Chips: Carefully fold in the mini chocolate chips to ensure they are evenly distributed throughout the mixture without melting too much.

          Transfer to Pan: Transfer the mixture into the prepared baking dish. Using a spatula or your hands, firmly and evenly press it down into the pan, creating a compact layer to ensure the bars hold together when cut.

            Chill: Place the baking dish into the refrigerator and allow it to chill for at least 1 hour, or until the mixture is solid and firm to the touch.

              Cut into Bars: After the chilling time is complete, use the overhanging parchment paper to lift the granola out of the pan. Place it on a cutting board and carefully cut it into bars or squares, as desired.

                Prep Time: 15 minutes | Total Time: 1 hour 15 minutes | Servings: 12 bars

                  - Presentation Tips: For a decorative flair, drizzle melted chocolate over the top of the bars before slicing. Serve them on a rustic wooden platter for an inviting presentation. Alternatively, wrap individual bars in parchment paper and tie them with twine for an adorable grab-and-go option!