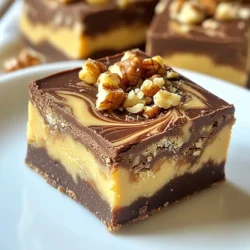
Peanut Butter Chocolate Swirl Fudge
A deliciously rich and creamy fudge with a delightful swirl of peanut butter and chocolate.
Ingredients
- 1 cup creamy peanut butter
- 1 cup semi-sweet chocolate chips
- 1 cup sweetened condensed milk
- 1 teaspoon vanilla extract
- 1/4 teaspoon salt
- 1/2 cup chopped nuts (walnuts or almonds) - optional
- additional amount chocolate chips or melted chocolate for topping - optional
Instructions
- Prepare the Baking Dish: Begin by lining an 8-inch square baking dish with parchment paper. Allow some overhang on the sides; this will help you lift the fudge out later and make for easy clean-up.
- Melt the Chocolate Mixture: In a medium saucepan, add the semi-sweet chocolate chips along with 1/2 cup of the sweetened condensed milk. Set over low heat, stirring continuously until the chocolate is fully melted and smooth. Once melted, remove it from the heat and mix in 1/2 teaspoon of vanilla extract and a pinch of salt to enhance the flavor.
- Prepare the Peanut Butter Mixture: In a separate mixing bowl, combine the remaining creamy peanut butter, the other 1/2 cup of sweetened condensed milk, 1/2 teaspoon of vanilla extract, and another pinch of salt. Stir until the mixture is completely combined and has a creamy consistency.
- Layering the Fudge: Pour half of the melted chocolate mixture into the prepared baking dish, using a spatula to spread it evenly across the bottom. Then, scoop the peanut butter mixture on top of the chocolate layer, smoothing it out evenly. Finally, dollop the remaining chocolate mixture over the peanut butter layer.
- Create the Swirl Effect: With a toothpick or skewer, gently swirl the layers together to create a marbled effect. Be cautious not to mix too thoroughly, as you want to maintain distinct layers for visual appeal.
- Incorporate Nuts (if desired): If you’re adding nuts for additional texture and crunch, sprinkle them evenly over the top of the fudge at this stage.
- Chill the Mixture: Transfer the fudge to the refrigerator and chill for at least 3 hours or until it has fully set and reached a firm texture.
- Cut & Serve the Fudge: Once the fudge is set, lift it out of the baking dish using the parchment paper overhang. Cut it into squares or rectangles based on your preference.
Notes
For an extra touch, drizzle some melted chocolate or peanut butter sauce over the top and garnish with whole nuts.